
Biomes: light, weather and ground
With the biome form you decide what a stretch of land looks like: light and mood, time of day, weather, ground, the vegetation, the creatures that live there, and the quirks of individual islands. Vegetation, pick-ups and creatures are now maintained only here: there are no lists built into the program any more, and what the biome says is what applies in the game. Cinderfell is an example: by day a muted, reddish sunlight lies in a thick haze (fog 0.03 to 0.04). The night is “medium bright”: its brightness sits in the middle of the biomes (light strength 0.76 plus a warm ambient light), the sky sits at the level of the other biomes (night fog colour about as bright as the average of the other biomes, slightly different per weather), the ground stays readable. Light strength, the sun colours of morning, day and evening, the night ambient colour and the fog densities apply identically under all six weather states because the biome marks them as “edited”; light per weather state does not exist yet. The night fog colour, by contrast, is not marked and comes from the respective weather state: it differs slightly per state and, weighted over the six states, sits at the level of the other biomes. If you enter a night colour there yourself (field “Fog colour night”, which marks it as “edited”), it acts as soon as it is set, in all weather states with colour and brightness, also in the night of every state; unset, the weather state applies. The grading tints the shadows slightly blue-black, the midtones brown-orange and the highlights yellowish. In the Weather tab ash rain is the most frequent state (just over half of the weights); cinder rain, meteor shower and ash storm are rare.
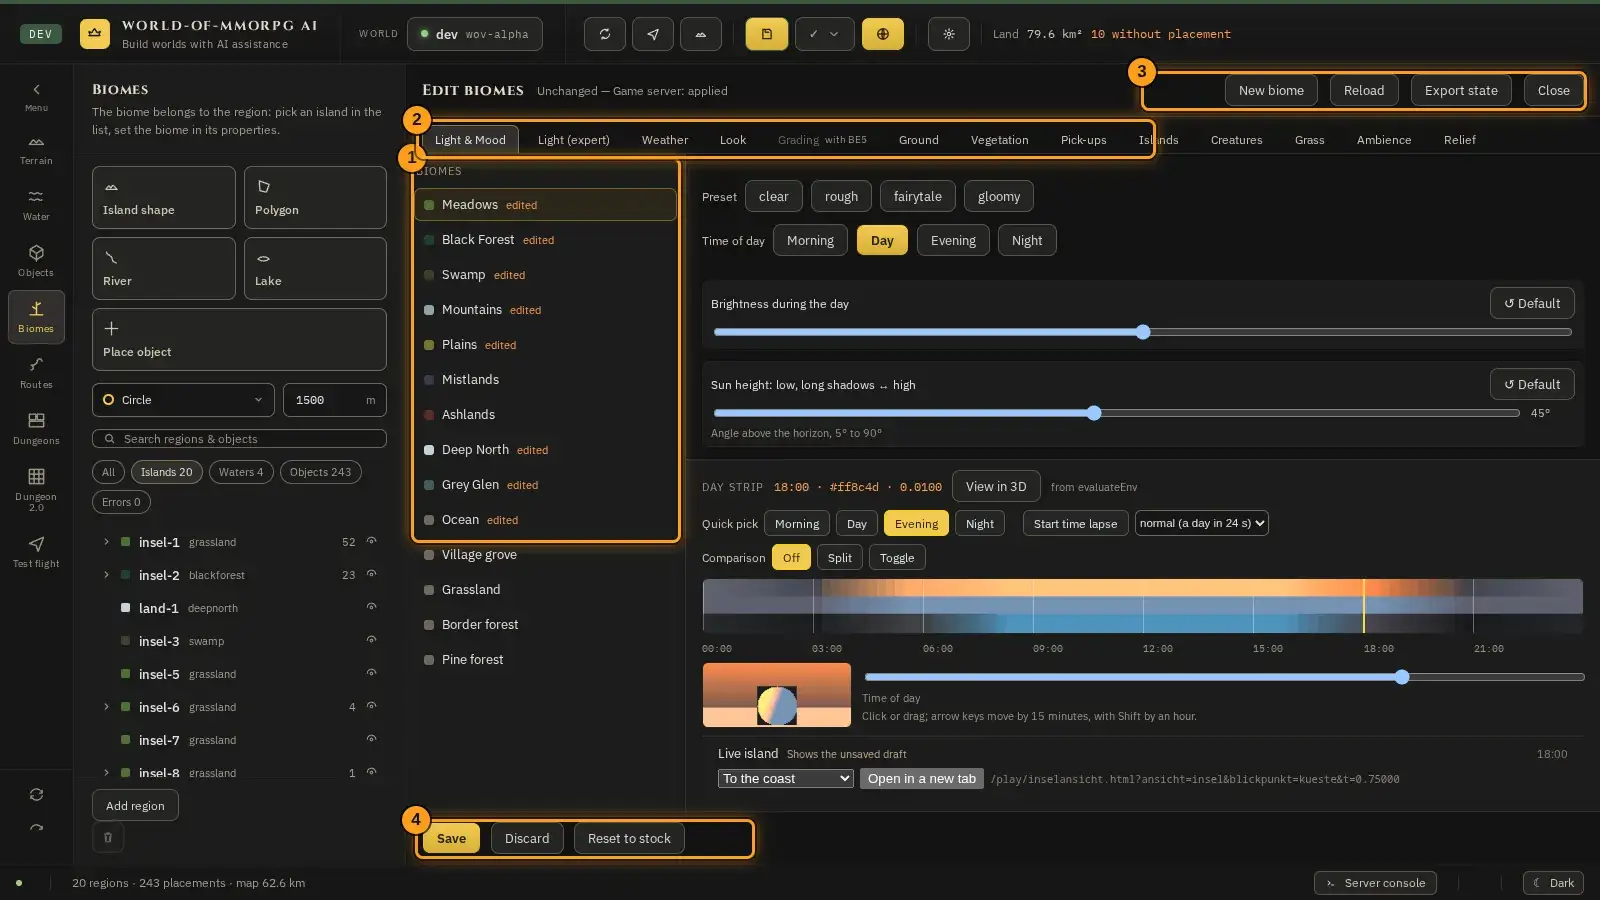
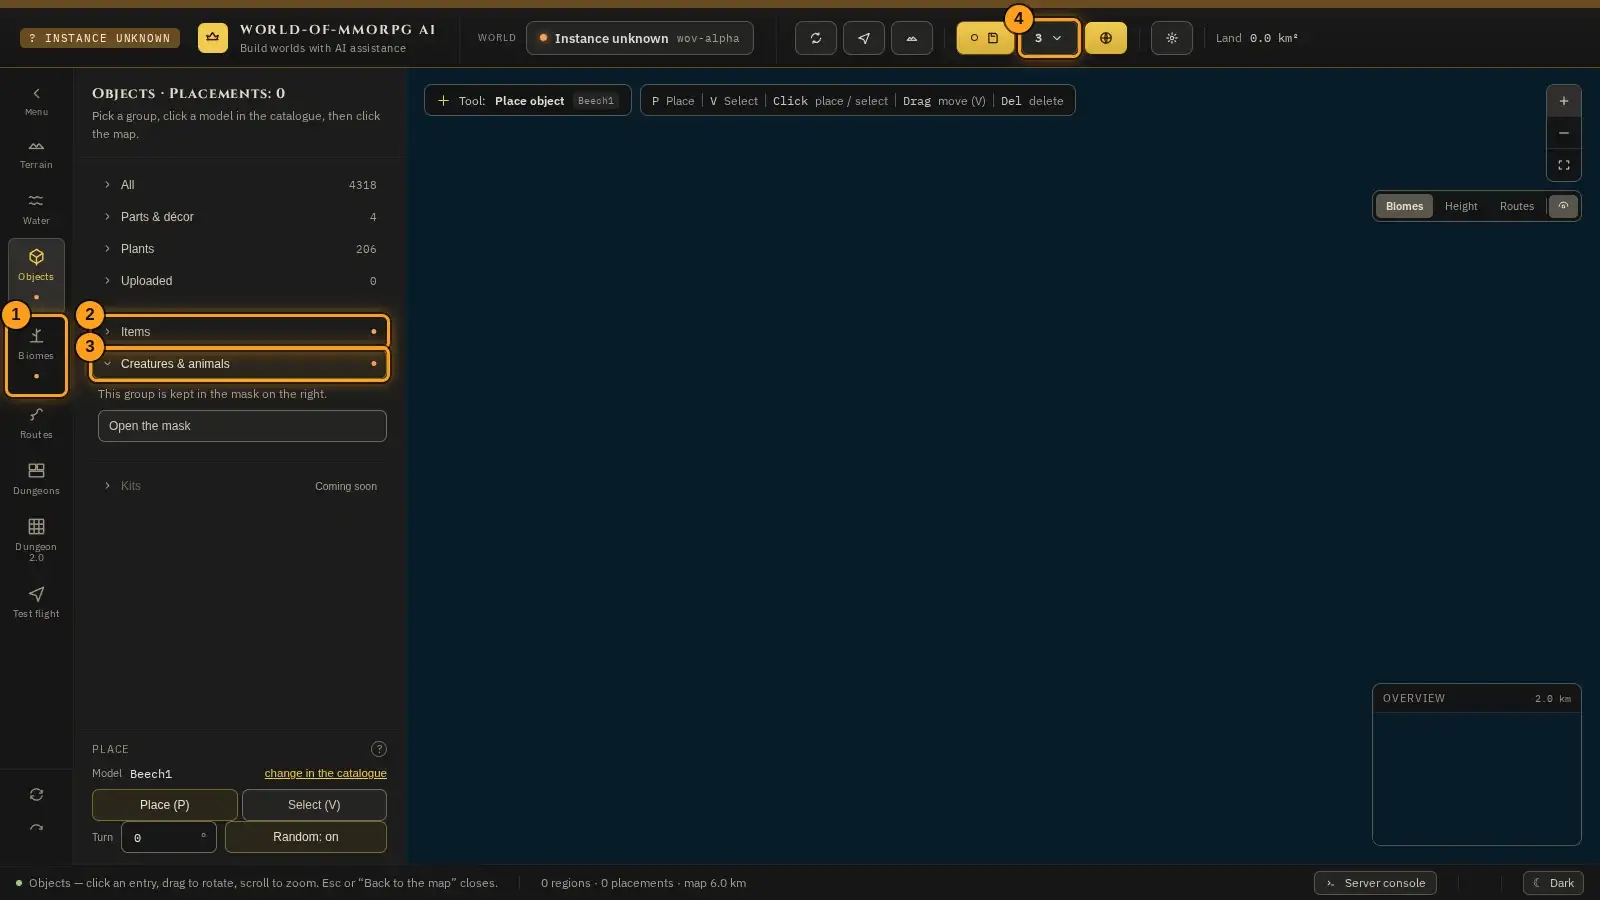
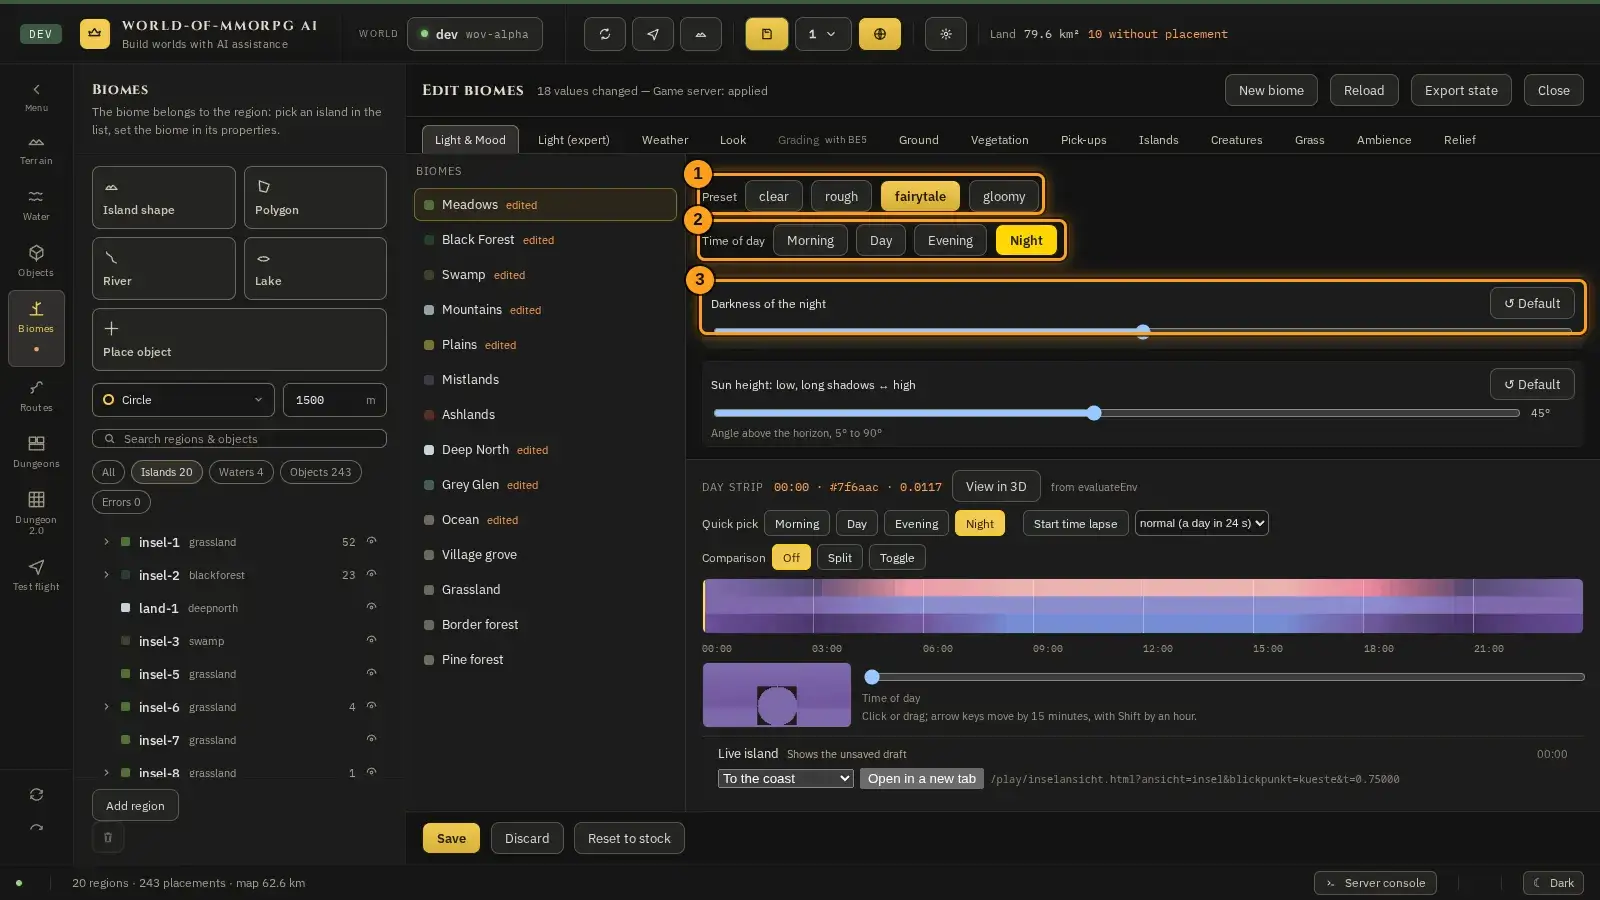
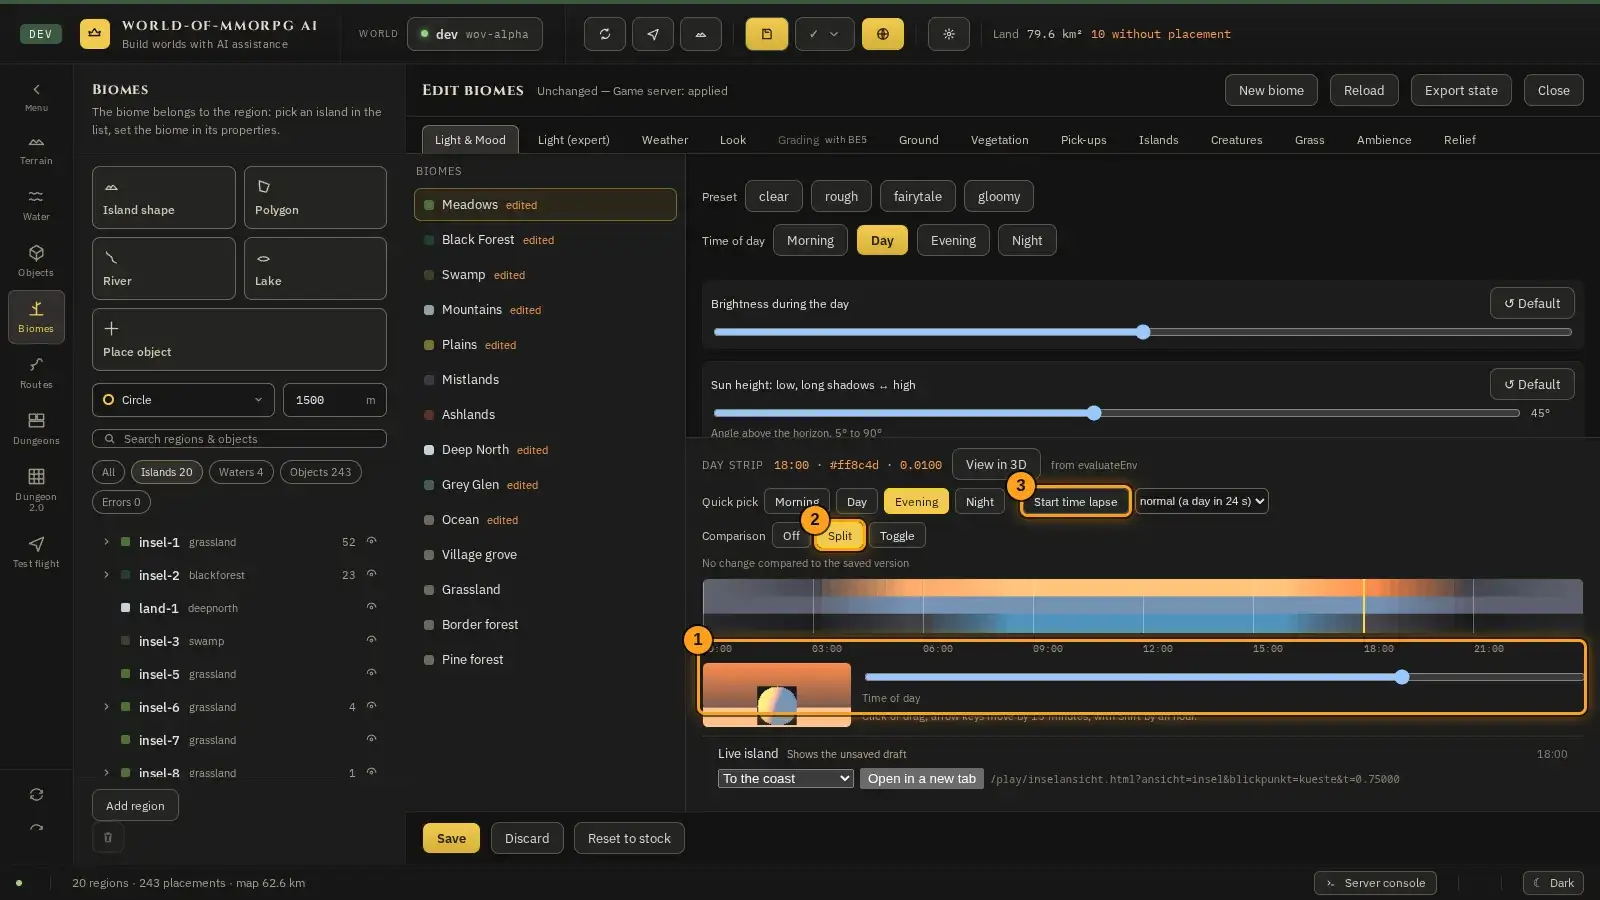
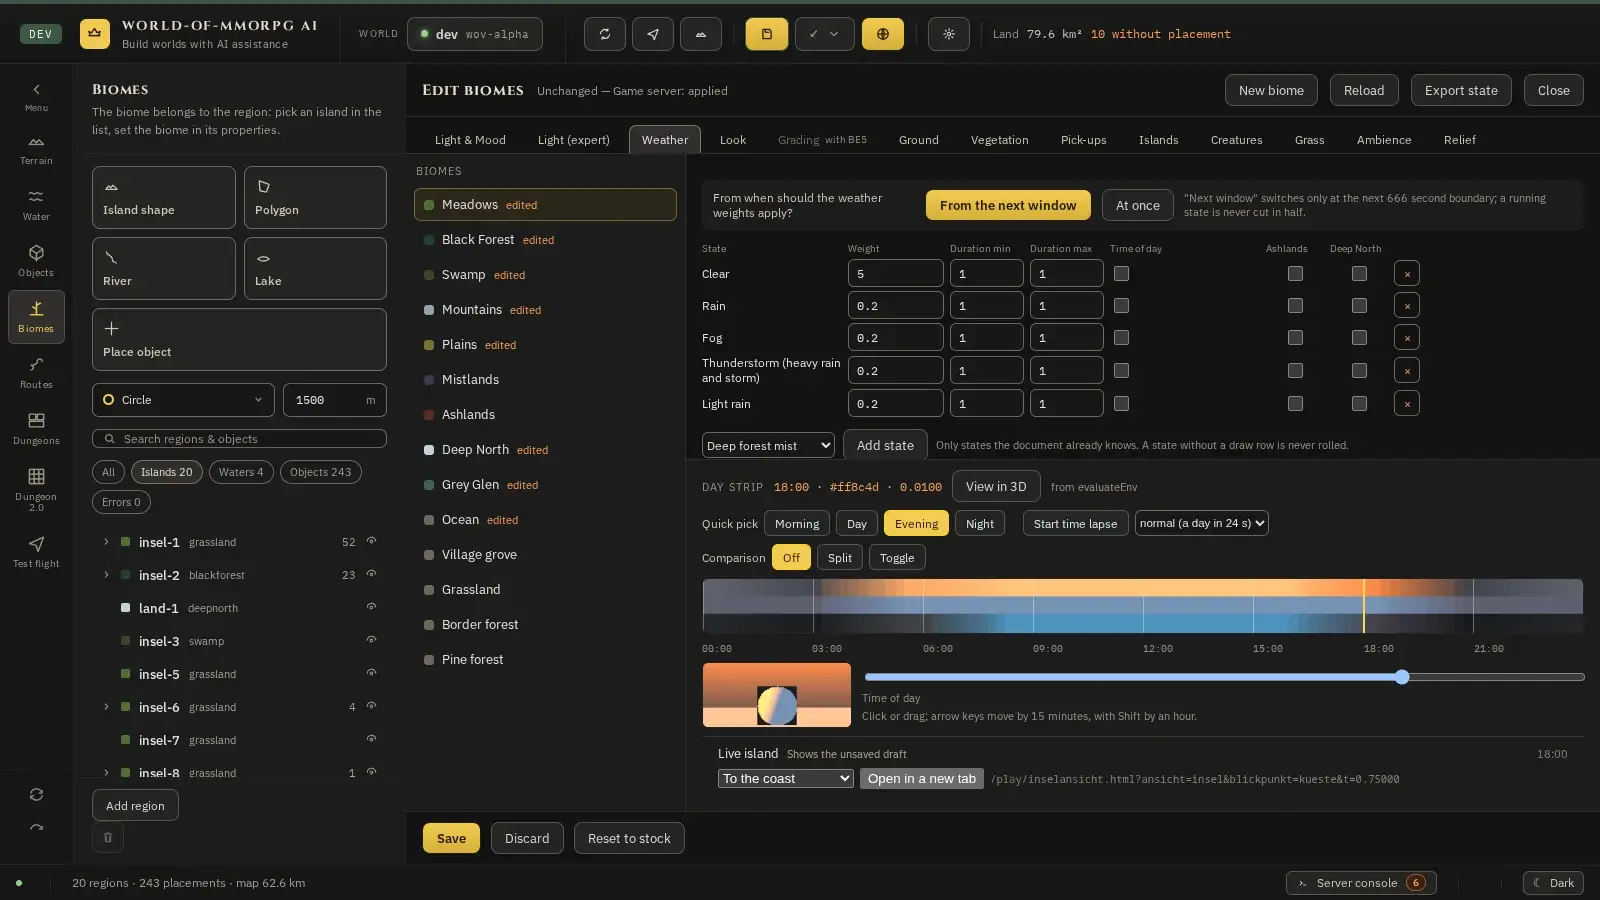
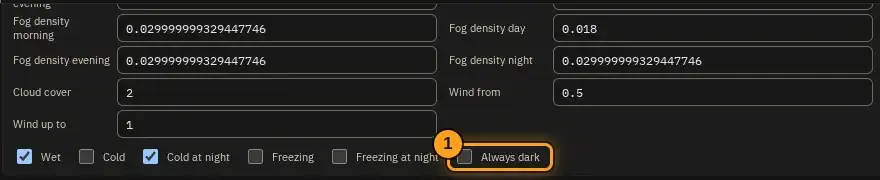
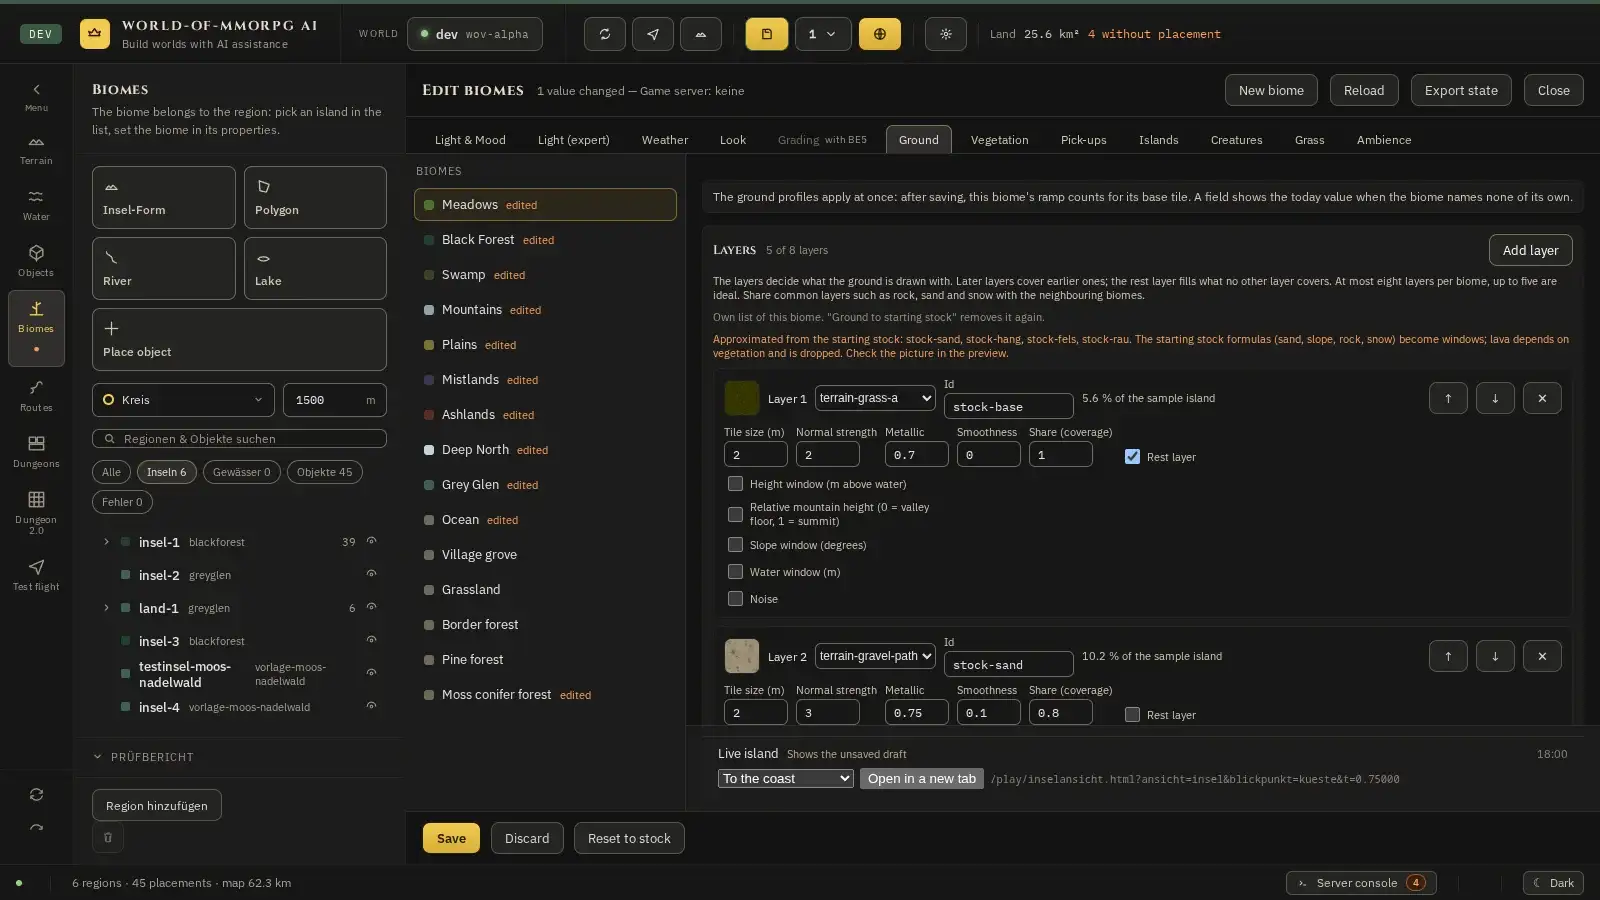
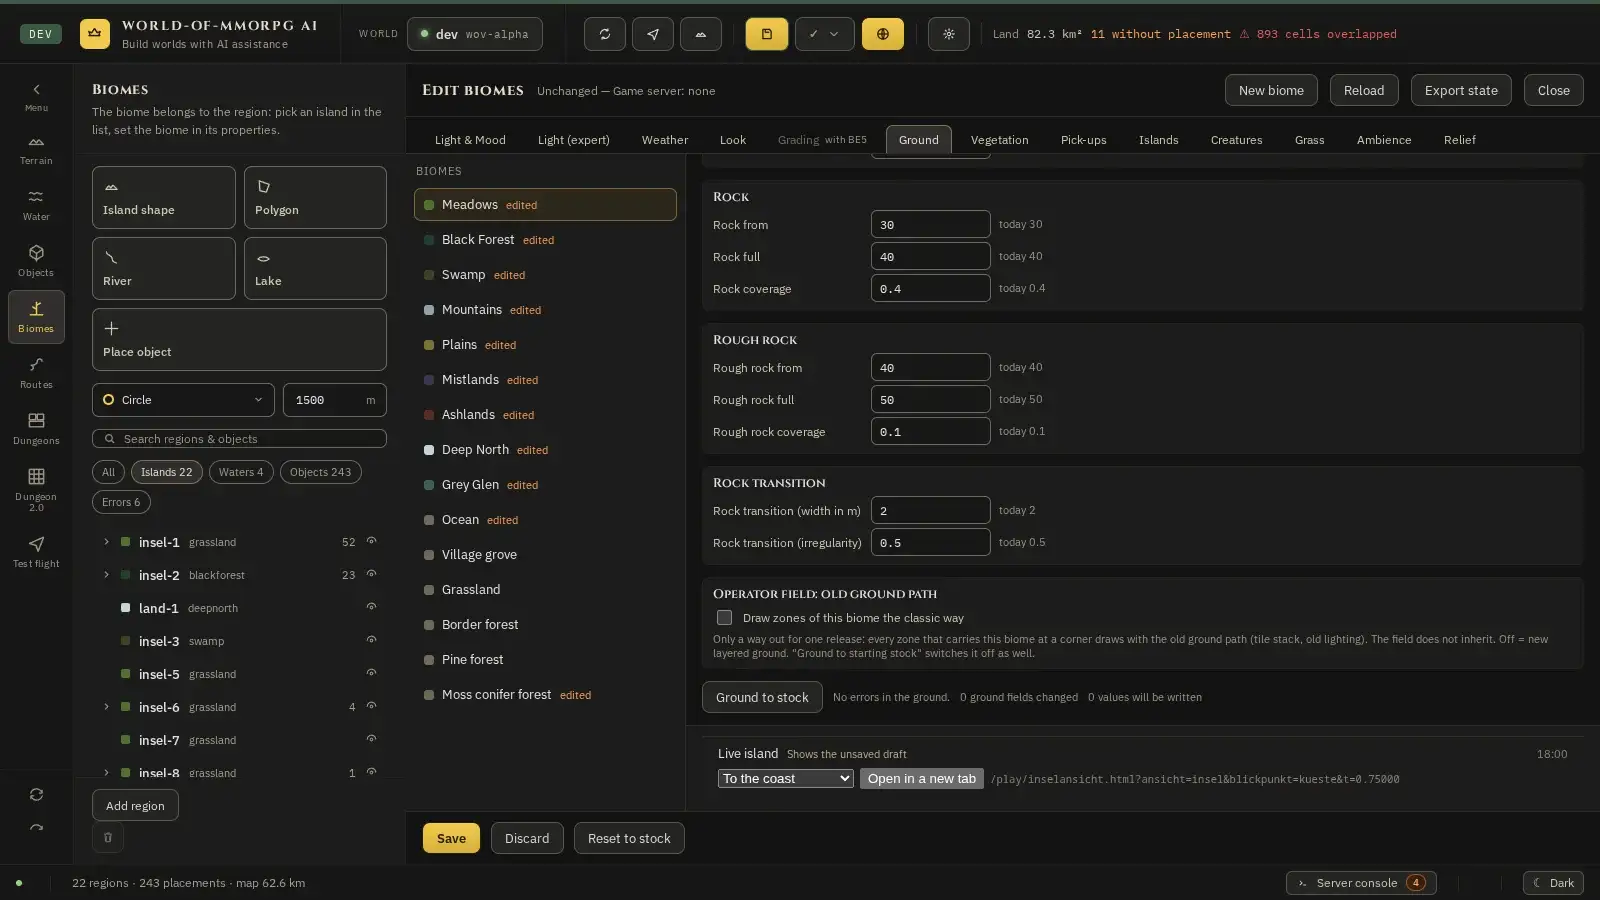
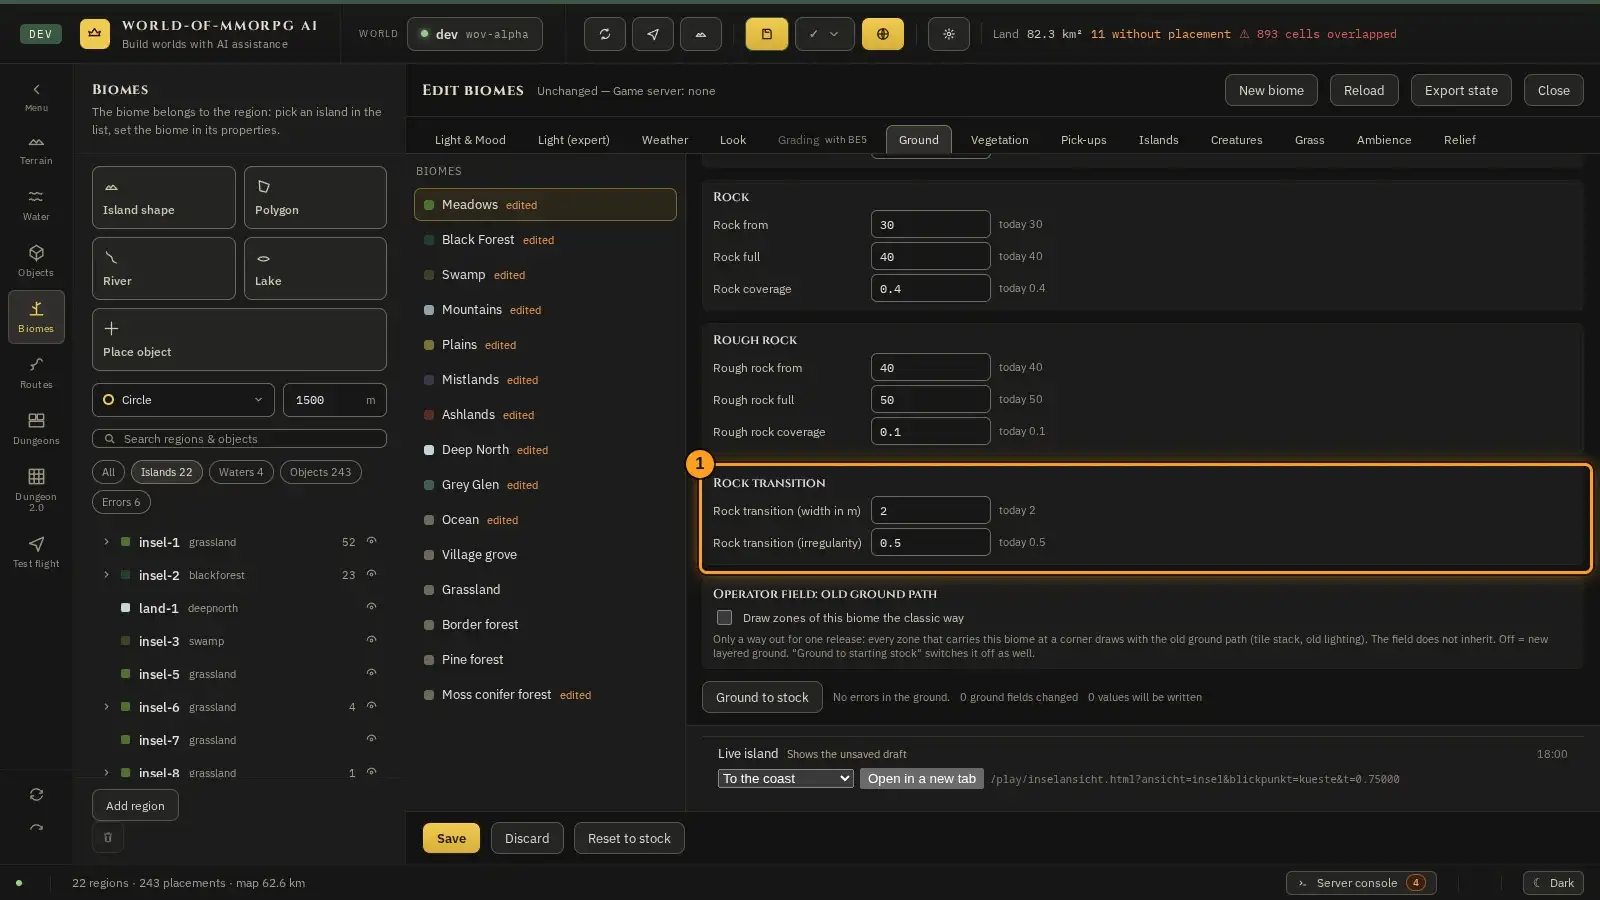
The pictures show the editor with sample data. The orange frames and numbers refer to the steps in the text.
Opening the biome form
What for?
A biome is a type of landscape such as meadow, Blackpine or swamp. It decides what the land looks like. Every island has exactly one biome.
How it works
- Pick the “Biome” mode on the left. The form opens over the map; the modes on the left stay visible.
- In the list on the left (1) you choose the biome you want to edit, for example “Meadows”, “Swamp”, “Grassland” or “Pine forest”. Grassland and pine forest are biomes of their own; they inherit from “Meadows” and from Blackpine, and so do village grove and border forest. So you only change what should differ.
- With the tabs above (2) you switch between fourteen areas: Light & Mood, Light (expert), Weather, Look, Grading, Ground, Vegetation, Pick-ups, Islands, Creatures, Grass, Ambience, Sound and Relief. The Grading tab is still locked.
- At the top right (3) you create a new biome (“New biome”), reload the state (“Reload”), export it (“Export state”) or close the form (“Close”). “Reload” never discards unsaved input: if you changed something and the server still holds the same state, your changes stay and the mask says “Reloaded: the server holds the same state”. If somebody else saved the biome file meanwhile, your changes stay as well; the banner names the fields that are new on the server (only light fields are named individually, any other difference shows as “different state”), and the button “Take server state (discard changes)” loads the server state instead and drops your input. If you save without choosing, the mask asks as usual. If you changed nothing, “Reload” takes the server state without asking. While “Reload”, “Take server state” or a save is running, “Save” does nothing and “Take server state” is locked; “Reload” does nothing while a question is open. If you close the mask with unsaved input, the input is kept: the editor’s change list keeps listing the biome mask, and the browser asks before you leave the page. “Save all” also writes input from a closed form; reopening the form shows the draft. While this mask is open, no key without Ctrl, Alt or Meta triggers an editor shortcut behind it, not even with the focus on a button or on a free area: Delete, Backspace, P, V and T leave the object selected on the map alone. Esc and Tab are the exceptions: Esc closes the mask, Tab moves the focus.
- At the bottom (4) you save your changes (“Save”), discard them (“Discard”) or reset everything to the original state (“Reset to stock”). If someone else saved in the meantime, the mask asks whether to write onto their state. The question shows beforehand what would happen: “Your values” names what you changed and “New from the server” names what the other person changed. This holds for every tab: light, weather (every weather row by its name and every weather layer field by field, for example the row Weather row Rain with its field Weight), ground (“Ground: …”), the block of the mood sliders (one line, “Light & mood (sliders)”), vegetation (one line “Vegetation …” per model, “Vegetation preset: …” per preset), pick-ups (“Pick-ups …” per model), creatures and islands. A line of its own, “The server changed this meanwhile as well — your version overwrites it”, names the fields where “Write my version” replaces a value of the server with yours or undoes a change of the server. For the weather this means: if both sides set the same field of a row to different values, yours wins (for the time-of-day window every value counts on its own: if you change “from” and the server changes “to”, both stay and “Time of day” is not listed under “overwrites”; also when the server removed the time-of-day window of a row but you changed its values, your window stays); if you removed a row it stays removed even when the server changed it (the line then names the field the server changed, also a changed value of its weather layer); if the server removed a row you changed (even just one value of its weather layer, such as the cloud density) or whose switches you flipped, it comes back with your version (“row removed”). If both sides set a field to the same value nothing is lost and it is not listed. A field only one side changed (also Cinderfell, Deep North or the time of day of a row) keeps that change, and a row only the server removed stays removed. A row only one side has added is listed once as “Weather row … (new)”, without its single layer fields. If both add the same layer, every part of the row you did not touch keeps the value of the server; what you set wins and is named. If the server reordered the weather rows, “Weather: order of the rows” is listed under “New from the server”; after “Write my version” the order of your version applies, and the line is then also listed under “overwrites” (if both reordered the same way, nothing is lost). “Reset to stock” also after this question sets the weather of the biome to the original state: weight, duration, time of day and switches of the weather rows and the values of the weather layers (colours, numbers, switches). “Your values” names them, and what the server changed on these layers is listed under “overwrites”; weather rows only the server has are dropped and named there as well. If you create a new biome and someone else has taken its id in the meantime, the mask does not ask but stops and says so (“Someone else has taken the id … in the meantime. Nothing was written.”): the “New biome” dialog then opens with your draft and refuses the taken id; choose another one and save again. The dialog also refuses, as soon as it opens and while you type, every id the server has taken in the meantime. If you cancel the dialog, your draft stays as it was and the next save stops again until you have chosen a free id or discarded the draft with “Discard draft” (next to “New biome”); discarding writes nothing. If you have already entered something in the tabs of the draft, the mask asks first and drops those entries with it; “Cancel” leaves everything as it is. If you create a new biome while the biome shown so far has unsaved entries, they are not lost: light, creatures, vegetation, pick-ups and islands are written together with the new biome in one write; entries in the weather or ground tab of that biome stay unsaved (the mask keeps counting them as changes) and are written when you show that biome again and click “Save”. A second click on “New biome” while the mask is still checking or the dialog is open does not open a second dialog. “Reset to stock” asks first when the shown biome has unsaved entries in tabs it resets (light & mood, weather, ground, creatures, vegetation, pick-ups): the question “Reset to stock?” names exactly those tabs; “Reset to stock” resets them, “Cancel” leaves everything as it is. Without such entries the mask does not ask. While a question of the mask is open, “Save” does nothing. After “Reset to stock” in the ground tab the biome can be saved again. If you kept weather or ground entries of another biome and somebody else changed the same field meanwhile, the mask rebuilds those entries on the new state when you save the shown biome: your values and the foreign changes to other fields stay. When you then save that other biome, the question appears with the fields “Write my version” overwrites; “Cancel” writes nothing. For single fields (weight, window, time of day, Cinderfell, Deep North of a weather row; ground values) the question names only those you still change: if you set a field back to the value of the server, or its tab is not written at all, the mask does not ask about it. Weather rows added or removed by hand, the order of the rows and the values of the weather layers are still asked. If you type into a tab of the shown biome (light & mood, weather, ground, vegetation, pick-ups, creatures, islands) while “Save” is still writing, that newer entry stays and keeps counting as a change; if you switch the biome meanwhile, it stays with the biome you left as an unsaved entry and is written when you show that biome again and click “Save”; if you type into the biome you chose while “Save” was writing, that entry stays there too, as does a weather or ground entry you had already kept for it; the status line then does not say “Saved” but names the open changes, and the next “Save” writes it. What “Save” has just written does not count as a change. “Weather back to starting stock” and “Ground to stock” are greyed out and locked while “Save” is still writing. “Discard” does nothing while the mask is saving, loading or waiting for an answer. “Discard” takes back all entries of the shown biome, the ground tab included, and clears such a question with them. After “Save” the light & mood of the shown biome also stands at “unchanged”; saving a second time sends nothing. If somebody else has removed or renamed a biome meanwhile while the mask still holds unsaved entries for it (in the shown biome or as a kept draft of a biome you left, in any tab), the banner names the biome and the discarded values with their field names (for example the field “Sun strength day” with the typed value; for lists such as creatures, vegetation and pick-ups it names the list) and clears the draft: the change count and the save bar are right again afterwards. This applies when saving and after “Take server state”. This also applies to islands (the banner names the island) and to entries you typed in a newly chosen biome while saving. The banner stays across tab and biome switches and after “Reload” until you close the mask; a long banner scrolls. “Reload” and “Take server state (discard changes)” are locked while “Save” is still writing. If nothing was left to write after clearing, the status line says “Nothing saved” instead of “Saved”. There is no restore; entries are never dropped silently. If nothing is left to write after clearing, “Save” does not send a second time. If a biome holds two weather rows with the same weather layer, the banner at the top says on load “Weather row … in the biome … appears twice, please remove one.” The mask does not pair or merge the rows; you can keep saving, and the notice stays until only one of the rows is saved. If you confirm the question with “Write my version”, the changes of all tabs are written, the islands included; saving a second time by hand is not needed.
- With “Export state” you download the state of the biomes as a file. Beforehand the editor compares it with the starting stock in the repository, the state that ships with the game. If your state has lost keys — also inside a biome — the dialogue “Export state” opens with the question “The working copy has … keys fewer than the starting stock in the repository. Export anyway?” and the buttons “Export anyway” and “Cancel”. With “Export anyway” you accept the loss on purpose; with “Cancel” it says “No export: the loss against the starting stock was not confirmed.” If the comparison could not be made (completely), the dialogue asks in the version “It could not be (fully) determined whether the working copy loses keys of the starting stock in the repository. Export anyway?” After the export the editor reports “State exported: …” with the number of biomes, the losses against the starting stock and a hash.
- Biomes, creatures, animal animations and items keep unsaved input as a draft when closed, on Esc and when switching masks, without asking. Reopening shows the draft. A dot on the menu entry marks unsaved input; the Objects tile collects the item and creature dots. “Save all” also writes drafts from closed masks. Only “Discard” or “Discard draft” explicitly removes input. Drafts belong to this editor session: closing a mask is not saving, and you must save before leaving or reloading the browser page.
Tip: Next to a changed biome it says “edited”, and at the top the editor shows how many values you have changed. That way you never lose track of a change.
Setting light and mood
What for?
This is where you decide whether a biome feels bright and friendly or gloomy and rough, separately for morning, day, evening and night.
How it works
- Open the “Light & Mood” tab and choose a biome.
- Under “Preset” (1) you pick a ready-made look: clear, rough, fairytale or gloomy. Afterwards you can adjust everything further.
- Under “Time of day” (2) you choose Morning, Day, Evening or Night. The sliders below apply to that time of day.
- The sliders (3) change, for example, the brightness, the sun height (low means long shadows), the fog and the colour mood. “Default” next to a slider resets it.
- The day strip at the bottom shows right away how your biome changes over the whole day. It only appears in the tabs “Light & Mood”, “Light (expert)” and “Weather”, because only there do the controls change what it shows. In the other tabs (Ground, Vegetation, Pick-ups, Creatures, Islands) it is gone and the form uses the room for the tab itself. If you like the result, click “Save”.
Tip: Try the presets first and only then fine-tune individual sliders. That is a faster way to find the mood that fits your story.
If something does not work
- A question appears: “Values edited by hand would be overwritten”.
- You set individual values yourself in the “Light (expert)” tab. The preset or the slider rewrites those values. Choose “Yes, overwrite” if that is what you want, otherwise “No”.
Time band, time lapse and comparison
What for?
The day strip at the bottom of the form shows how your biome looks over 24 hours. That lets you check transitions without going into the game. It is only in the tabs “Light & Mood”, “Light (expert)” and “Weather”; if you switch to another tab and back, the time you picked stays.
How it works
- Click into the strip (1) or drag the slider below it to pick a time. The arrow keys move by 15 minutes, with Shift by an hour.
- The “Quick pick” jumps straight to morning, day, evening or night.
- “Start time lapse” (3) plays a whole day. Next to it you choose the speed, for example “normal (a day in 24 s)”.
- With “Comparison” (2) you set your state against the saved one: “Split” shows both together, “Toggle” switches between them with a click, “Off” hides the comparison.
Setting the weather
What for?
The weather decides how a biome feels when it rains, snows or the wind blows. For every weather situation you set whether and how strongly it occurs there.
How it works
- Open the Weather tab and choose a biome.
- Every row is a weather state, for example “Clear”, “Rain” or “Misty”. The “Weight” says how often it occurs: the higher, the more frequent.
- “Duration min” and “Duration max” decide in time windows how short and how long a state lasts; one window takes a little over eleven minutes. The “Time of day” tick box limits a state to a time window of the day. The two tick boxes “Cinderfell” and “Deep North” are special switches for those regions; leave them unchanged unless you know exactly what you are doing.
- With the selection below you add another state (“Add state”). The small cross on the right removes a state again.
- At the top you choose when the weights apply: “From the next window” waits for the next time limit, “At once” takes effect right away.
- Below the table every weather state has further values: sun colour, ambient light, fog, cloud cover and wind. The tick “Always dark” pins a state to night light all day (meant for caves); for rain, light rain, thunderstorm and swamp rain it is off, so the day looks grey and only the night is dark. At noon it is there (sun strength times sun colour) about as bright as in clear weather: rain 65 percent, light rain 77, swamp rain 64, thunderstorm as a dark-grey day about 40 percent. In the three rain states (light rain, rain, thunderstorm) cloud cover now acts on sky and sun: the denser the clouds, the more the sky (zenith and horizon) moves towards the grey fog colour, the weaker the sun disc and halo become, and the softer the shadows get, at about the same brightness. Light rain is overcast (cloud cover 0.8) instead of sunny rain. All other weather states, including clear weather, keep their sky and sun unchanged. Rain density has three levels: light rain 0.4, rain 0.8, thunderstorm 1.0 (fixed in the program, not yet adjustable). The wind of a weather state also drives the trees: up to wind strength 0.35 they sway as before; above that the crowns swing further (about 30 percent more at strength 1) and faster (about 80 percent at strength 1), and the foliage flutters at the crown tips, the more the stronger the wind blows. Conifers sway with only 60 percent of the deflection of broadleaf trees. Distant trees and the grass follow the same wind; the wind direction stays the same for everything.
- When it rains, the ground in the game gets wet: it turns darker and shiny like at the shore (in about 40 seconds under full rain), and small drops splash up within 14 m. When the rain stops, the ground dries in about 3 minutes. Snow, ash, lava and dungeons stay dry; there are no puddles. The effect depends on the weather state alone: a state with rain as its precipitation wets the ground, one without rain does not.
Tip: A weather condition you remove from the table is never picked in that biome. That is the simplest way to switch a type of weather off there.
Setting the ground
What for?
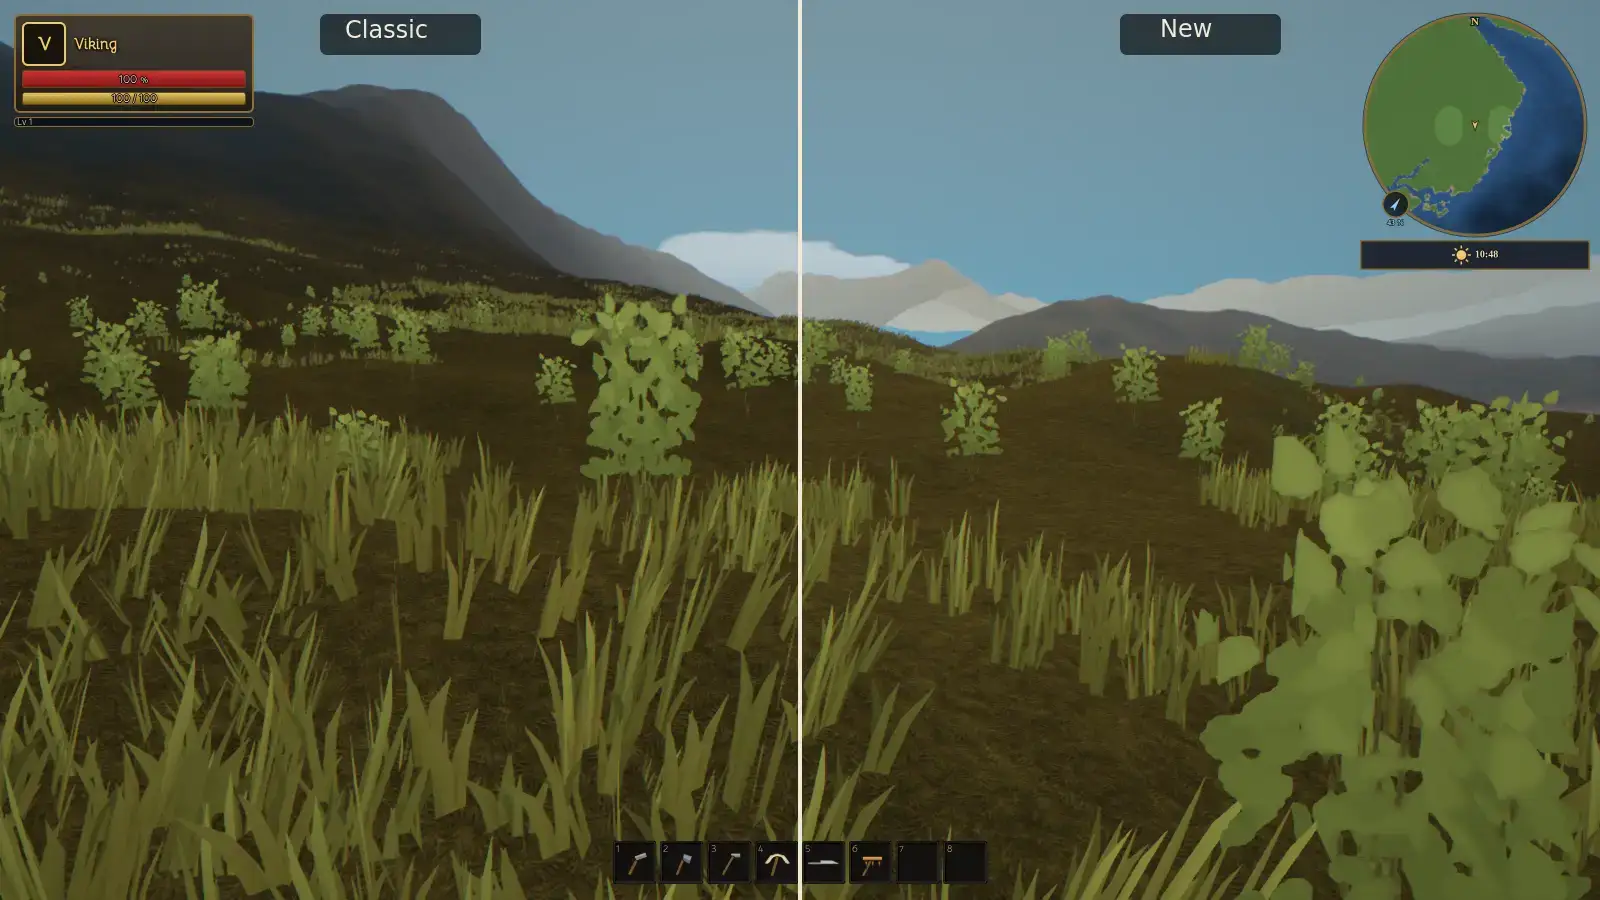
The ground decides what the terrain looks like: which layers there are, how they blend by height, slope and water, from what steepness grass turns into a slope and where rock begins. Every biome has its own settings. The game draws the ground of every biome with the new ground: up to eight layers per zone, in the light of the time of day. The tab shows the layer list of the biome, the ramp values and the operator switch for the old ground.
How it works
- Open the Ground tab and choose a biome.
- At the top is the layer list, from the lowest to the topmost layer: later layers cover earlier ones. Every layer shows a preview picture of its tile and the share it has on the sample island (a round hill of about 200 m from the water to the heights; the percentages are the mean coverage and add up to 100). If the biome has no list of its own, the tab shows the starting stock (for a created biome the list of its parent) for viewing only; the fields are locked and nothing is written.
- “Create own list” takes the shown list over as the own list of the biome; only then can the layers be edited. For the starting stock this is an approximation: sand, slope, rock and snow become windows, lava depends on vegetation and is dropped, the rock noise factor is dropped, and the tile `terrain-moss-dark` is called `terrain-moss` in the catalogue (the same picture). This can change the ground noticeably: on the sample island the snow in Deep North drops from about 81 to 9 percent, in Cinderfell the lava disappears and the slope rises from 32 to 57 percent, in Grey Glen the slope falls from 37 to 16 percent and the rock rises from 29 to 50 percent; the moss rock of the starting stocks (tiles 5, 14 and 19) becomes `terrain-rock-rough`; for the Grey Glen tile 19 this is an approximation (it has a picture of its own). Look at the shares of the starting layers before you create the list and at the shares of the new list afterwards. The affected rows are named in the note under the heading; check the result in the 3D preview. “Ground to starting stock” removes the own list again.
- For each layer you set: tile (choice from the catalogue: grass, gravel, moss, dark moss `terrain-moss-dark` (in the game it looks exactly like `terrain-moss`; the catalogue preview of `terrain-moss` is lighter than the picture in the game), four rock images, including the light grey rock `terrain-rock-light` for steep walls and the earthy olive moss rock `terrain-rock-moss` for the foot of a mountain, and the snow `terrain-snow-albedo-smoothness`; for the snow, metallic 0.95, smoothness 0.03 and normal strength 1 fit, which you set per layer yourself), id, tile size in metres, normal strength, metallic, smoothness, share (coverage from 0 to 1) and “rest layer” (fills what no other layer covers; at most one per list). Optionally a height window (metres above the water), a “Relative mountain height” window (0 = valley floor, 1 = summit: measured against the lowest and highest ground height in the square of ±256 m around the point, water counts as valley floor, spans under 20 m count as 20 m; so mountains of similar width can be styled the same whatever their height, e.g. dark rock on top and moss at the foot; very wide mountains or long slopes do not quite reach 1 at the top), a slope window (degrees), a water window (metres) and noise (scale, strength, offset). Height, mountain-height and slope windows need “from”, “to” and “soft” (0 is a hard edge). ↑ and ↓ reorder the layers, ✕ removes one (the last one stays), “Add layer” adds up to eight layers. A wrong field turns red and names the layer and field; nothing is silently clamped, and a list with an error is not saved.
- A zone carries at most eight layers. Under “Neighbouring biomes” it says with which other biomes the union of both lists gets too large (layers with the same material count once), how many layers drop out there and how much area they carried; the three worst pairings are shown. The world map decides who really is a neighbour. Rule of thumb: up to five layers per biome, and share common layers such as rock, sand and snow with the neighbours.
- Below are the ramp values in the groups “Slope step”, “Rock” and “Rough rock”. They control from what steepness slope tiles and rock begin and how strongly the rock covers, and apply to the derived starting layers. To the right of every field it says “today …” with the value that currently applies; if the biome names no value of its own, the field shows that current value. Without typing, the document stays unchanged.
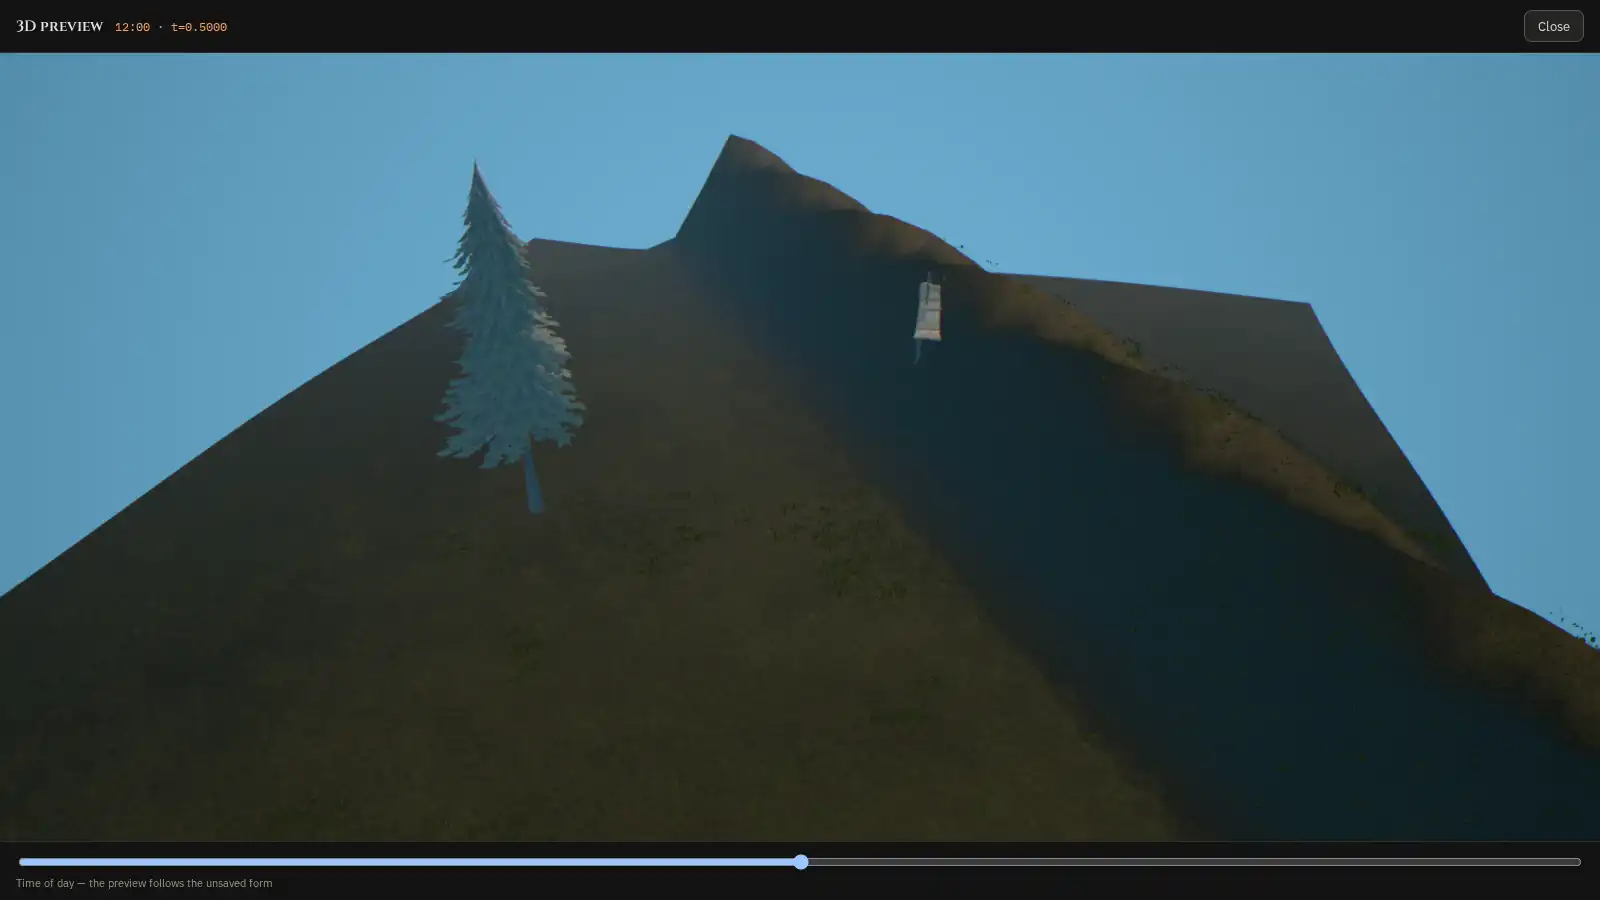
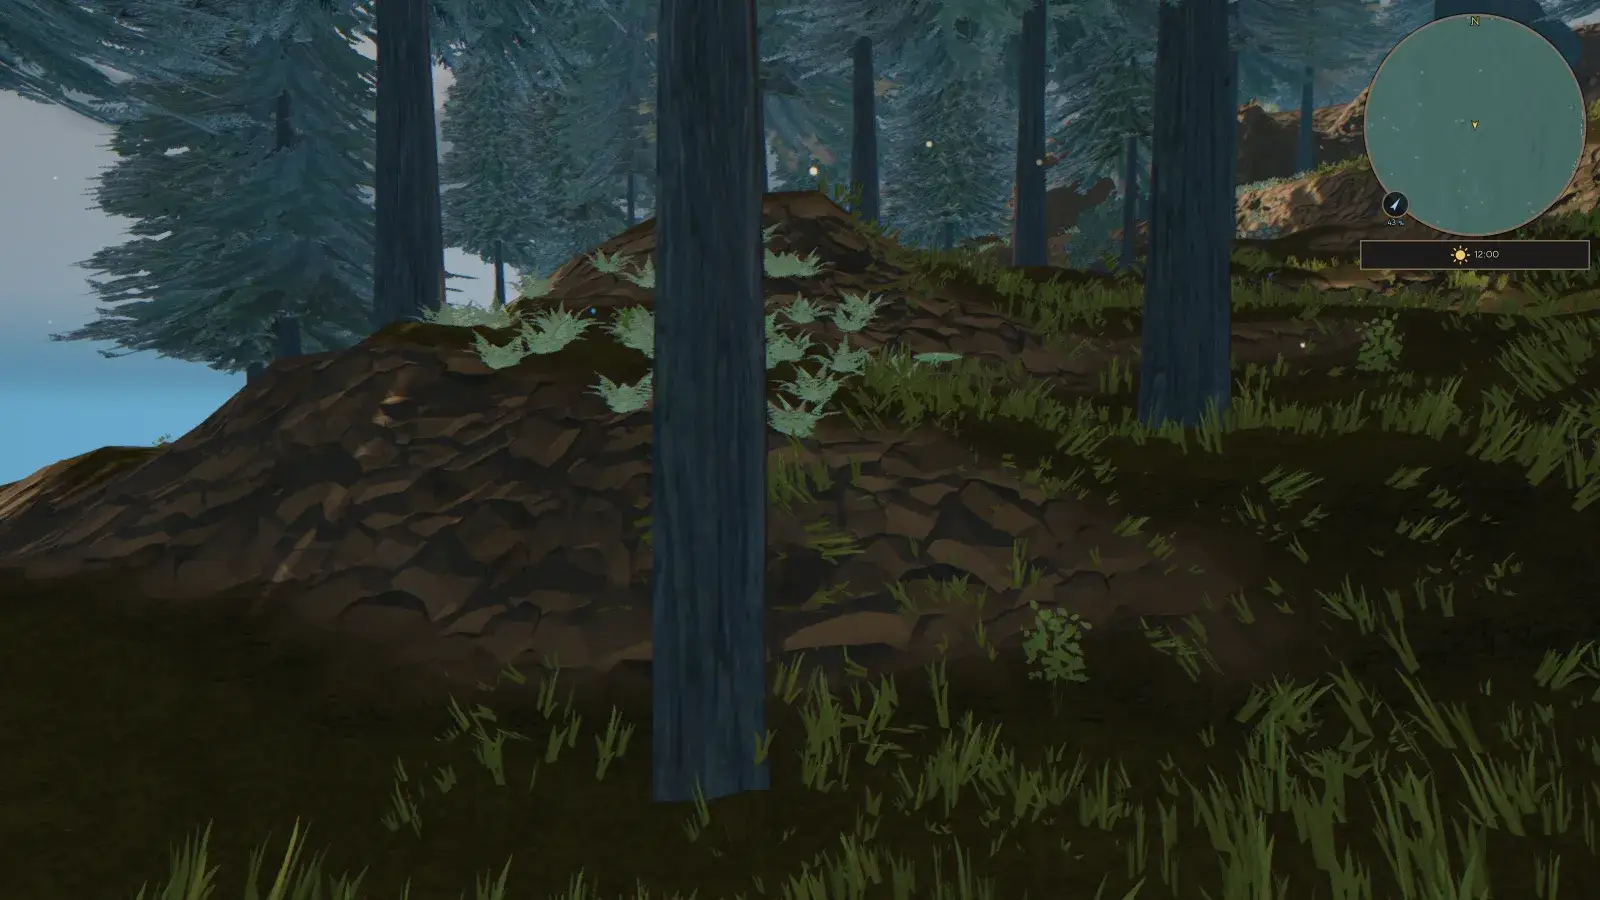
- The ground profiles are taken over immediately: after saving, the new setting applies to the biome. The 3D preview shows the unsaved ground with the new ground, like the game: change the ground, switch to the “Light & Mood” tab and choose “View in 3D” (the fourth picture shows the preview at noon); it uses the exposure and tone curve of the game. It falls back to the classic ground while the ground stack is not loaded, when the player chose “Ground: classic” or when the biome carries “classic”. If another editor changes the document at the same time, your list is kept when it reloads and is named “Ground: layer list” in the conflict dialog.
- What the new ground looks like: every layer has a tile, a tile size, a normal strength, and metallic and smoothness values. Metallic layers mirror the sky and turn brighter or bluish with the time of day; matte layers (metallic 0) only take sun and sky light. Per pixel only the strongest layers count; at the lowest level of detail in the settings the game draws only the first four layers of a zone. The layer list lives in the biome document (`boden.schichten`) and is described for the AI.
- Back to the old ground (valid for one release): players switch on “Ground: classic” in the settings under Graphics I; switching back to the new ground applies without a restart. If the game was started with “Ground: classic”, the new ground is only loaded and built when you switch classic off; until it is ready for a zone, the old ground keeps drawing. Operators tick “Draw zones of this biome the classic way” in the Ground tab under “Operator field: old ground path” (document field `boden.klassisch`); then every zone that carries this biome at a corner is drawn with the old ground (even if the other corners carry another biome). The field does not inherit and applies per biome only; an island override is rejected. “Ground to starting stock” switches it off as well.
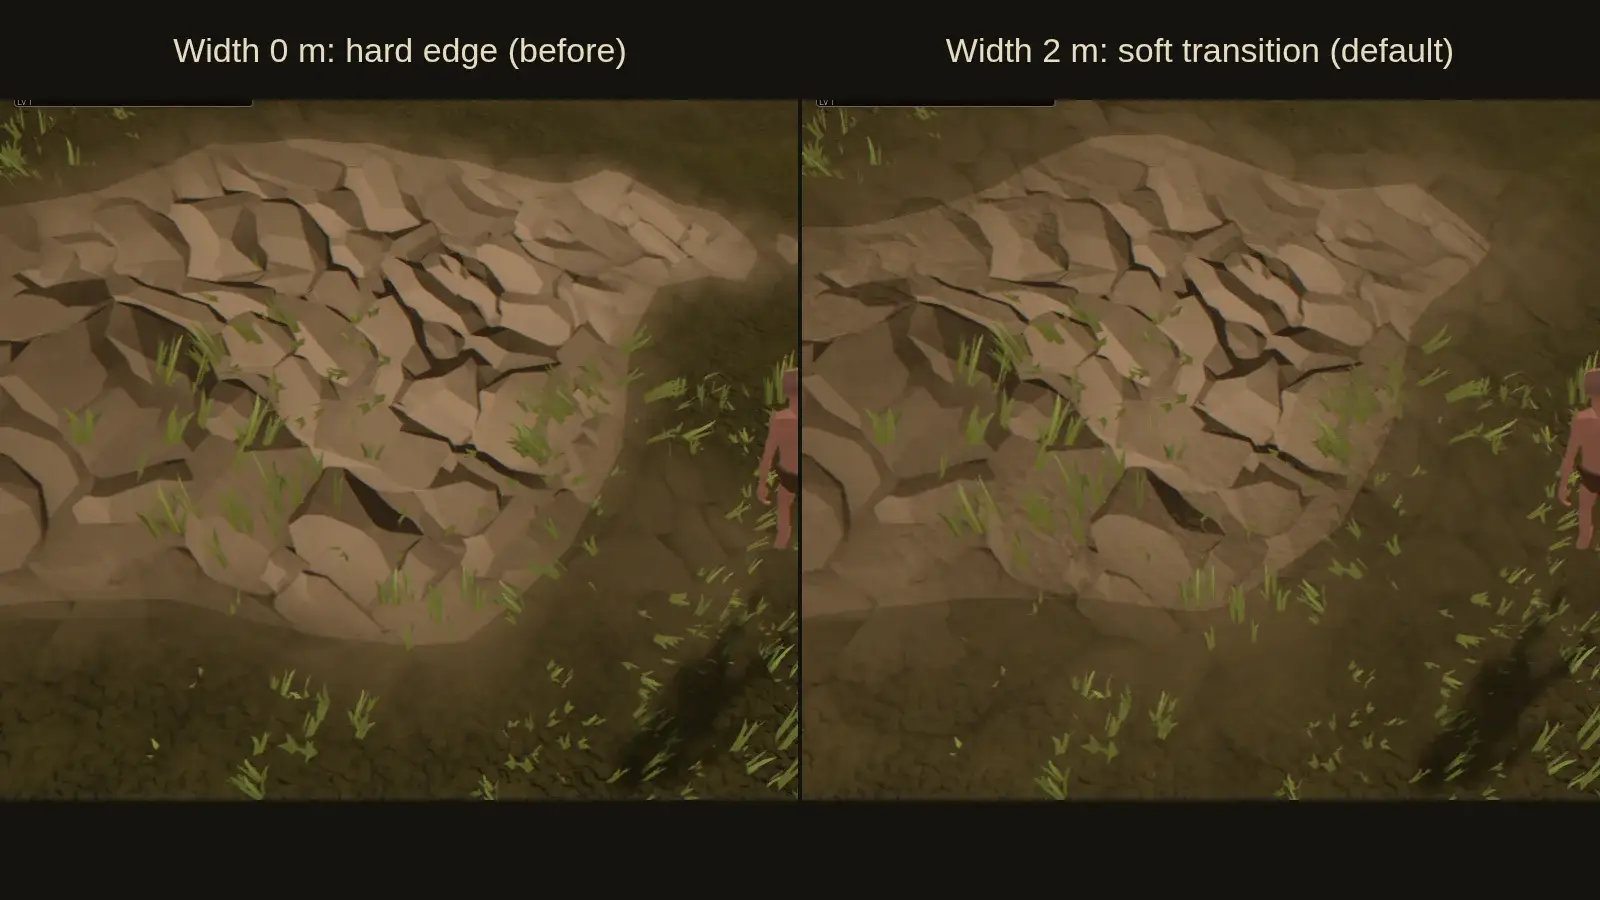
- At the very bottom of the Ground tab is the group “Rock transition” with two fields. “Rock transition (width in m)” (0 to 12, default 2) decides how softly the ground turns into a patch of rock: at 0 the hard edge of the former ground stays, which follows the height lattice of the terrain; at higher values the rock fades out over at least that many metres, evenly from no rock to full rock. The rock area stays the same on average (measured: at most 10 percent deviation); the textures themselves are not blurred, only the weight of the rock layer becomes softer. “Rock transition (irregularity)” (0 to 1, default 0.5) ragged-edges the border so that it does not follow the lattice: 0 only smooths, 1 makes it strongly ragged. Both fields act on the rock and rough-rock steps of the derived starting layers and on every layer of the own list that has a slope window (for example light rock from 28 degrees) in the chosen built-in biome (a created biome inherits from its parent, and its own list follows the value of the parent too); painted cells stay as painted, and the old ground (“classic”) does not know the transition. For small rock patches a large width makes the patch fade out because the area stays the same: then prefer 1 to 3 m. If the biome names no value of its own, the default applies, which is the soft look, and the field shows it with “today …”. After saving the game rebuilds the affected zones. “Ground to starting stock” removes both fields. The document fields are `boden.felsUebergang` and `boden.felsUnregel`.
- Ashlands only: the “Lava (Ashlands only)” block in the Ground tab sets the lava surface of the lava lakes (document field `boden.lava`, per biome only; an island rejects it). “Rendering” chooses between “alt” (today's uniform glow; this is the default, and without the field the ground stays bit for bit as before), “Cracks” (dark plates with glowing cracks that widen towards the lake centre; lava exists only where a lava lake lies) and “Plates” (crust and melt from image maps: a temperature ramp from dark red to yellow-white, melt that flows slowly, plates with their own pulse, lava that is cooler towards the shore with more crust, a warm glow on crust and shore rim, and a glow that the fog swallows less). Six numbers belong to mode “Cracks”; pulse, pulse rate and night glow also apply in “Plates”: crack width (0.05 to 2 m, default 0.35), plate density (0.02 to 0.5 per metre, default 0.12; the plate size is the reciprocal, about 8 m at 0.12), glow (base strength 1 to 8, default 3; it lies above 1 so the tone curve does not swallow the pulsing), pulse (swing 0 to 0.6, default 0.25; every plate has its own phase), pulse rate (0.2 to 4 Hz, default 1.2) and night glow (factor 1 to 3, default 1.5; the glow is that much stronger at night, smooth with the sun height). At the lowest detail level in the settings there is no pulse and no warping of the plate edges, only the cracks. Five more numbers act only in mode “Plates”: tile width (3 to 20 m, default 7; the width the game assumes for one tile of the lava maps, smaller means finer plates), flow speed (0.02 to 0.5 Hz, default 0.08; cycles of the flow per second), glow strength (factor 0.5 to 6, default 2; above 1 the bloom carries the glow), fog resistance of the glow (0 to 1, default 0.6; at 0 the fog swallows the glow like any surface, at 1 not at all, and it tints the fog above the lake slightly warm) and edge cooling (0.5 to 8 m, default 2; the width over which the lava cools towards the shore and gains crust). In mode “Plates” the game needs five image maps (albedo, normal, mask, flow, temperature ramp); without them one line is logged once and the game draws “Cracks”. At the medium detail level the flow, the second tile scale and the glow on the crust are dropped (one sample per map), at the lowest the game draws “Cracks” without pulse. An empty field removes the value (the default applies), a wrong value turns red and is not saved, and “Ground to starting stock” removes the whole block. The set of sliders applies to all lava areas of the game (only the Ashlands biome carries the block). Before rolling the server back, remove the block with “Ground to stock”, otherwise an older server rejects the document. If the block carries a field the game does not know, or a value outside its range, the editor shows the warning line “The game ignores this block” and says in plain words what is wrong (for example “Pulse rate (Hz): value outside the range 0.2 to 4”; the game then draws as in mode “alt”). The starting stock sets the field for the Ashlands to “Cracks” and also brings embers, smoke and ash dust there (Surroundings tab); an older world gets this with `daten ergaenzen`; a picture of the cracks and plates follows once it is taken with the graphics card.
Image effects and sky colours
What for?
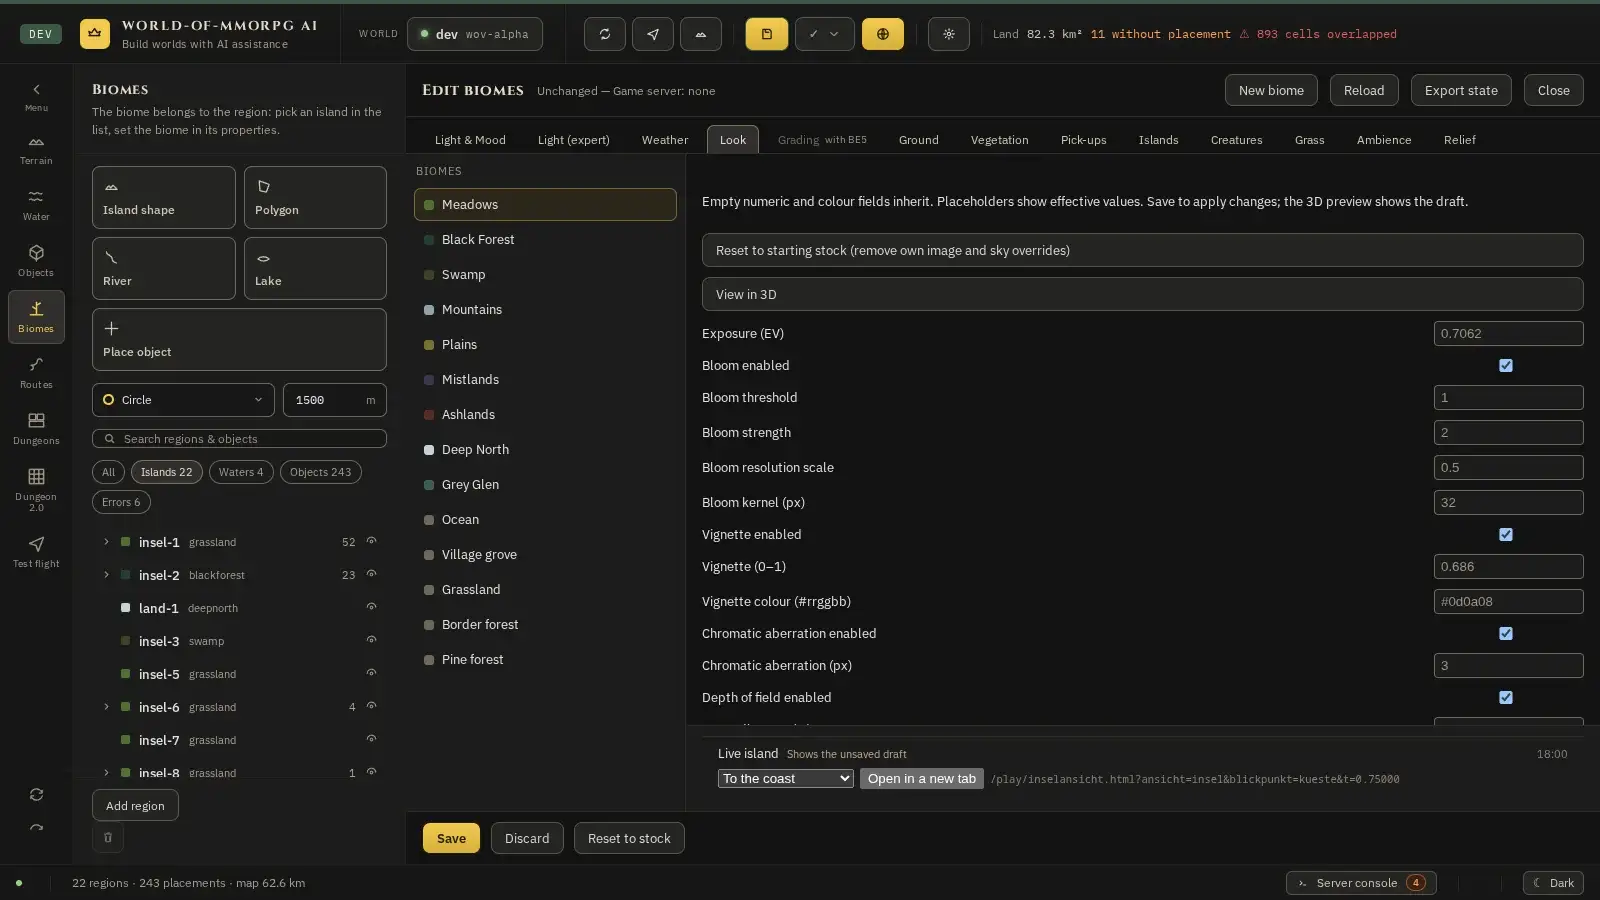
Give each biome its own image mood: bloom, vignette, depth of field, chromatic aberration, exposure, sky and clouds.
How it works
- Open Biomes → Look and select a biome. Empty numeric and colour fields inherit along the parent chain; placeholders show effective values. Without overrides, the global profile is unchanged.
- Exposure uses EV: +1 doubles the light multiplier, −1 halves it. Bloom offers enabled, threshold, strength, resolution scale and kernel in pixels (1–128); on a biome change the kernel moves to its target in power-of-two stages (1, 2, 4 … 128), while the scale switches only at the end of the blend. Vignette darkens image edges (0–1) and has a hex colour. Chromatic aberration shifts colour channels in pixels. God rays (sunbeams through the air) can be switched on or off per biome; strength ranges from 0 to 2 (starting stock 0.18), while angle and reach stay global.
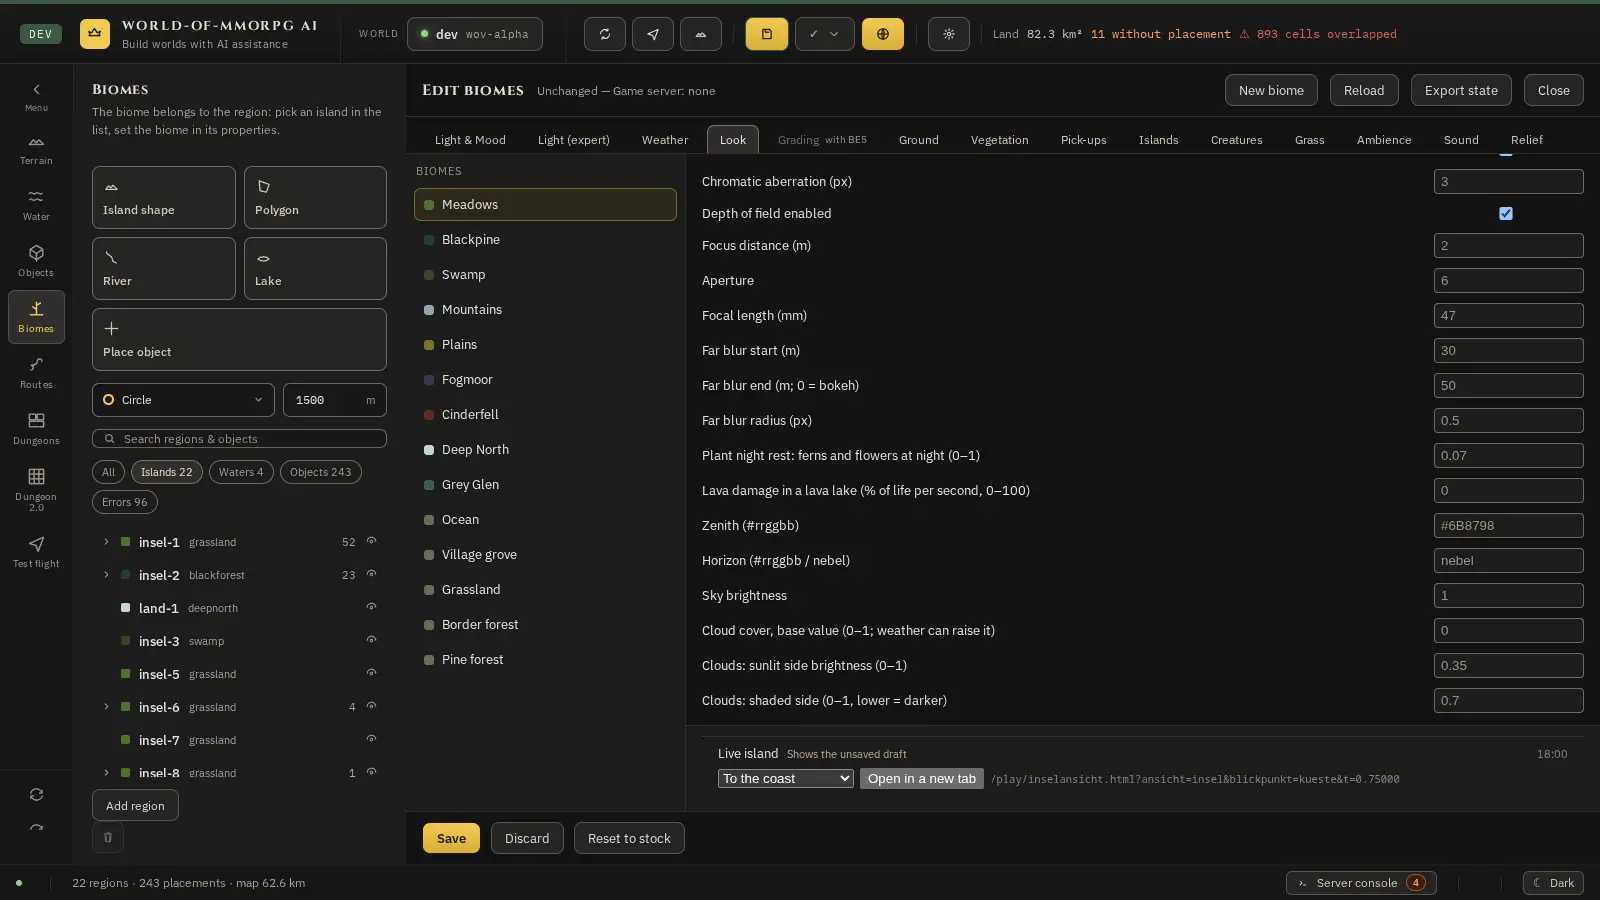
- Depth of field: focus and far-blur start/end in metres, focal length in millimetres, aperture and maximum far radius in pixels. If the far end is at or below the far start (for example 0), the bokeh path applies. Player graphics options still apply: a disabled effect stays disabled.
- Zenith and horizon use #rrggbb colours. Horizon “nebel” follows the current fog colour; sky brightness 1 is unchanged. Clouds: cloud cover (0–1) is a base value of the biome; weather can raise it but never lower it (0 = weather alone decides). “sunlit side brightness” and “shaded side” (0–1) set how bright or dark the clouds look; a lower shaded side gives gloomy rain clouds. Biome changes blend over the same duration as grading. Use “View in 3D” or the live island for a preview; only Save adopts the draft.
- Plant night rest (0–1): how much of the night light stays on ferns and flowers. 0 removes it completely and they turn almost black; 1 leaves it as it was and they glow brightly at night. Empty inherits along the parent biomes; an explicitly entered 0 is a value of its own and stays 0, it does not fall back to the parent value. On an island the value from its own look block beats the biome’s (island before biome before parent biome). If nothing is set anywhere in the chain, 0.07 applies: a fern is about two to three times as bright as the ground at deep moon (a readable silhouette, no glow) and does not drop below the brightness of the ground even without a moon. The value has no effect by day. When the biome changes in the game it is blended like the other values; the 3D preview shows the draft. Bushes, trees and needles are not part of it, and neither are the ferns and lilies of the grass cover (grass tufts): they keep the fixed night deduction of the grass and do not follow the control, not even at 1.
- Lava damage in a lava lake (0–100, percent of the maximum life per second): a player standing in the lava lake of a biome loses that much life every second; at 20 a player with full health is dead after five seconds (death works like any other: lying time, then revival). The default is 0 (no damage) and empty inherits along the parent biomes. The field only acts in the biome Cinderfell (and biomes created below it): the lava lake is exactly the area the ground draws as lava, that is, where the lava dominates the ground and the ground lies below the lava surface. Cracks and the shore never hurt; creatures take no lava damage. What counts is whether the feet stand in the lava: the lava surface lies at 36 m, the lake floor between 33.5 m and 36 m. There is damage as long as the feet are below 36.5 m (lava surface plus a 0.5 m margin), also for a small hop or on a low jetty just above the lake floor. Whoever stands higher, for example on a building or a bridge over the lake, at the top of a high jump or in admin flight, takes no damage; neither does anyone during a dodge roll (the roll makes invulnerable, as against every damage). After a revival and at the first appearance in the world there are five seconds of grace without lava damage, so nobody is stuck in a death loop when the bed or the start point lies at the lake; it counts from the revival and belongs to the figure of the player, not to the connection: reconnecting does not give a new grace as long as the figure stays logged in or was away for no more than ten minutes. Whoever disconnects during the lying time and returns later gets the five seconds from the first appearance after the death. This holds for signed-in figures with a valid session; a guest without a sign-in (or anyone who deleted the saved token) gets a new identifier with every connection and so the first-appearance grace every time. Every lava hit that does not kill makes the figure flinch (bystanders see it too). Lava counts as damage of the surroundings and starts no fight, not even when you die in the lava: no combat music, no direction arrow and no boss marked as the attacker. Whoever dies in the lava never gets up in the lava: if the bed or the world spawn lies in the lava lake, the revival point is moved to the nearest land point within 50 m (the bed stays set); without one the world spawn is used, and if that lies in the lake too, its nearest land point. A bed cannot be placed in the lava lake in build mode (the message reads: Im Lavasee kannst du kein Bett aufstellen, shown in German), but on the shore or on a jetty above the lava surface it can. The value applies as soon as the draft is saved, without a restart. Inheritance: biomes created below Cinderfell take the value while their own field is empty, and an own value in a child biome applies to that biome only; every island can override it in its own Look block, and the island value beats the biome value (island before biome before parent biome).
- “Reset to starting stock” in the Look tab removes only the own image and sky blocks instead of writing a copy of defaults. Inheritance applies again. Closing and reopening keeps the unsaved draft. Empty fields inherit; invalid numbers or colours disable Save. The ground style in the “Relief” tab does not take effect at once in the running game: it applies to server and game together only from the next game server restart (see chapter “Relief”).
Ambience: butterflies, fireflies, birds and more
What for?
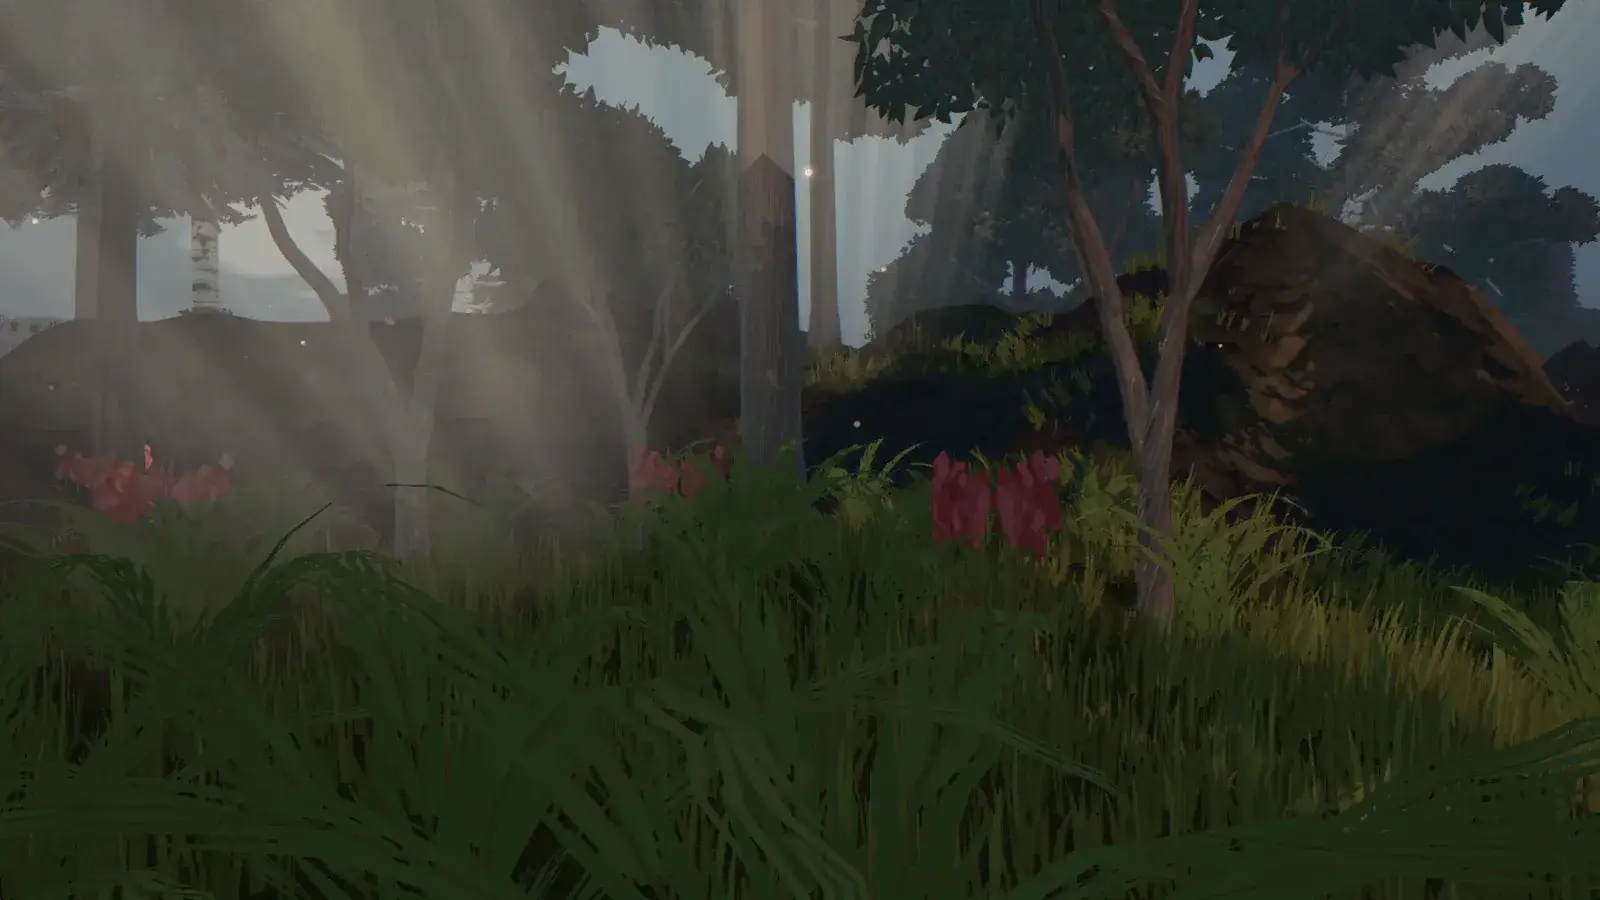
Give a biome living air: butterflies, floating dust, sun beams, light motes, fireflies by night, a flock of birds high above the crowns and crows on the ground, all around the player's camera.
How it works
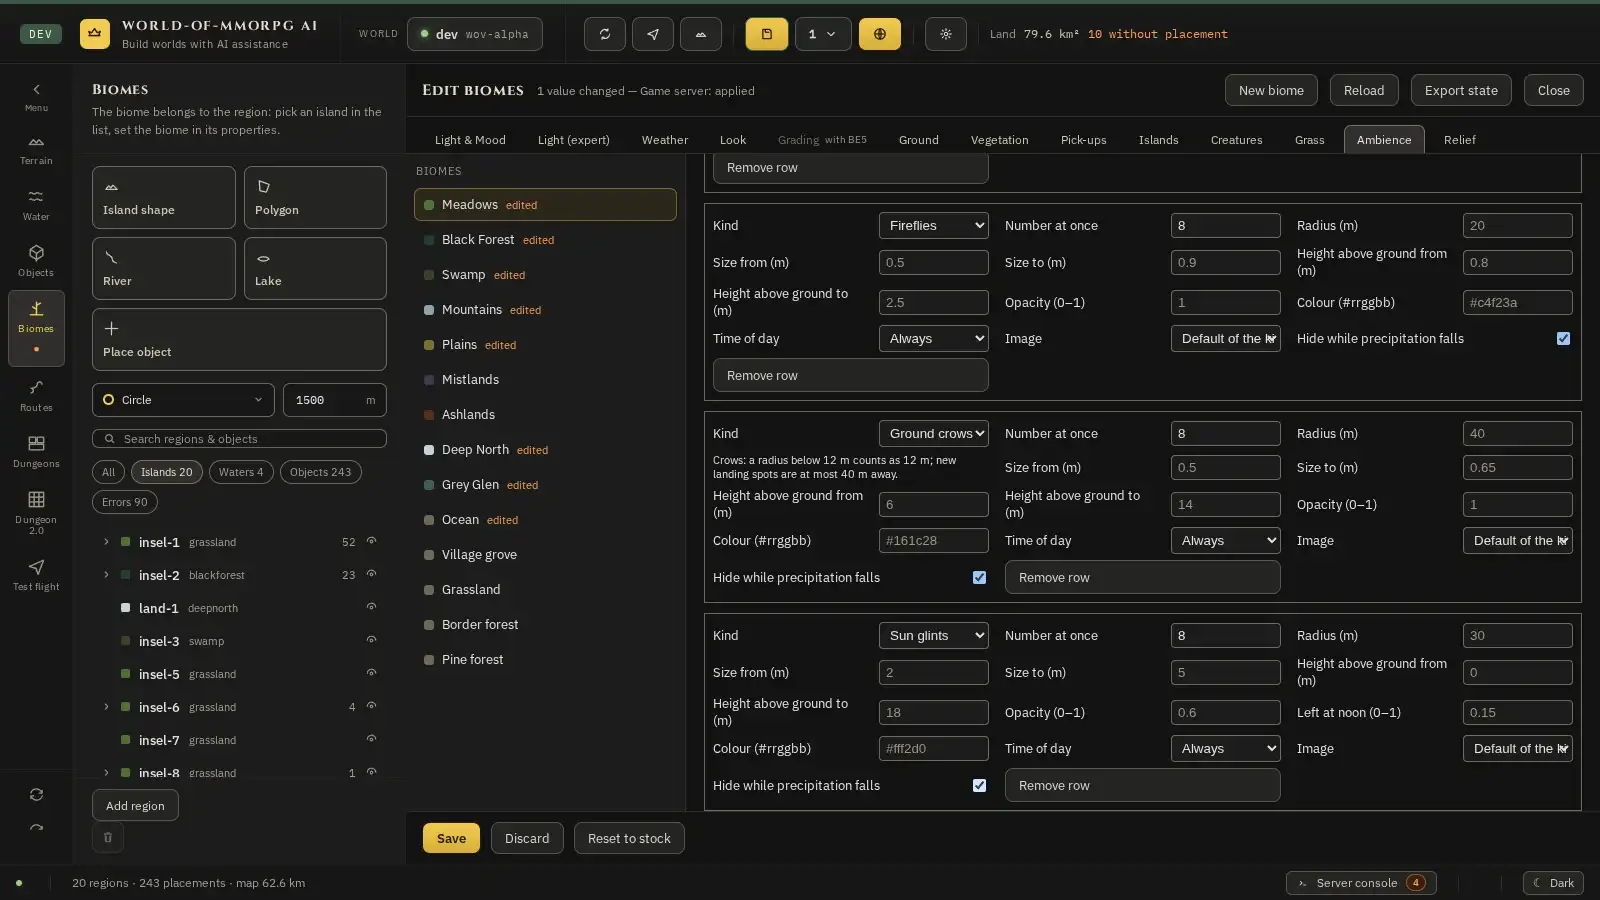
- Open Biomes → Ambience and select a biome. If it says “This biome has no list of its own”, it inherits the effects of its parent biome (the number is shown); without a parent list the biome shows no effects at all, exactly as before. “Create own list” replaces the inherited list, and so does an empty list of its own: it turns everything off. “Inherit again” removes the own list.
- Each row is one effect. Kind: butterflies, dust, sun beams, light motes, fireflies, bird flock, ground crows, gnat swarms, dragonflies, jumping fish, hares, squirrels, frogs at the shore, foxes, deer (see the ground-animals step below), falling leaves, embers or smoke (see below). “Number at once” (0–200) is the number in the air inside the radius, not a rate; 0 turns the row off. Radius (5–80 m) is the circle around the camera. Size from/to is the wing span (butterflies, flock birds), the body length (crows), the glow diameter including its halo (fireflies) or the diameter including its small halo (light motes), the flake size (dust), the width (sun beams), the point diameter (gnats), the wing span (dragonflies) or the length (fish) in metres, height from/to the height above the ground (0–60 m); for crows it is the height they climb to when startled, for sun beams the lower value is the height of the foot and the difference between the upper and the lower value is the length of the shaft. The flock circles in troops of eight inside the height range (default 25–60 m). Colour is a #rrggbb tint, opacity 0–1. For butterflies they also apply to the wings of the model: the colour tints the wings (the default white leaves the model unchanged), the opacity makes them more see-through (1 = full). Only sun beams have (and accept) one more field, “Left at noon (0–1)”: the share of the strength that is left with a high sun (default 0.15; 1 = as clear at noon as with a low sun, 0 = no beams at noon). Empty fields take the value of the kind; the placeholders show it.
- Time of day: always, day only, night only or twilight only. “Hide while precipitation falls” is on by default; without the tick the effects also run in the rain. An effect fades in or out within a few seconds on biome change, on day/night change and on rain. No ambient effects run in tombs and dungeons. “Image” picks one of four butterfly kinds. Fireflies drift slowly, glow yellow-green and pulse one by one; set their row to “Night only”. Light motes are small, sharply drawn cyan lights (about 15 to 20 cm including the small halo in the pilot) that drift slowly, grow out of nothing, shine and vanish again (life 5 to 10 s, additive, no shadow); they are meant for the day, fireflies for the night. Dust is fine bright flakes that sink slowly, turn and twinkle as they do (life about 3.5 to 6.5 s). Sun beams are long, soft shafts of light that follow the direction of the sun and turn only around their own axis to face the camera; they show most with a low sun (morning and evening), are only a faint breath with a high sun (field “Left at noon”), weaker with every bit of cloud (they start fading at a cover of 0.2 and are gone at 0.7), off at the horizon and at night (they rise from the horizon up to about 7° of sun height), fade out softly towards the edge of the radius and shortly before the camera, and get weaker when you look straight along the shaft. Sun beams only appear where the sun really reaches: if a mountain or hill stands between a beam and the sun, the beam fades out within half a second (partly covered: weaker) and shows up again at a sunny spot inside the radius; this also holds with shadows switched off in the graphics settings. The terrain as well as rocks and cliffs are checked (rock models from 1.5 m in height, on a coarse one-metre raster); smaller stones and buildings do not hide beams. A beam is checked again only when it was laid anew, when the sun has turned by more than 0.5°, or when the terrain or rocks nearby change. The images of sun beams and dust come from the files umgebung-strahl.png and umgebung-staub.png; if they are missing the game draws a simple substitute. Crows sit in groups of two to five on the ground, peck, and fly up as soon as the player comes nearer than 6 m; they fly off, vanish and land as a new group in a ring around the camera: inner edge 8 to 20 m (half the radius, at least 8 m, at most 20 m), outer edge 40 m or the radius of the row if that is smaller; a radius below 12 m counts as 12 m (the editor shows a note on the radius field of crow rows), and the landing is at least 8 m from the player (client only, no collision).
- The effects hang on the camera, not on fixed places: they cost only what the rows of the biome ask for, not the size of the world. Keep the numbers small: 10 to 20 butterflies inside the 40 m circle already feel alive. By default (template import) the butterflies run; in the pilot biome moss conifer forest about 30 fireflies by night, a flock of 8 birds and 6 crows by day come on top. In addition 5 very faint sun beams (opacity 0.15) under the crowns, 120 dust flakes and 24 cyan light motes by day. In other biomes sun beams, dust and light motes are in the list with number 0, so they are off, and you turn them on with “Number at once”. Players can turn all ambient effects off in the settings (Graphics II) with “Ambient effects”. Changes apply after saving; invalid numbers, colours or a list that is too long block saving: 16 rows at most, and together at most 200 butterflies, 100 sun beams, 200 fireflies, 60 birds (flock and crows together), 400 gnat points, 40 dragonflies, 30 fish, 20 hares, 20 squirrels, 20 frogs, 4 foxes, 8 deer, 60 ground animals together, 240 falling leaves, 240 embers and 40 smoke plumes per block. If the limit of a kind is exceeded, a red message with the limit appears below the rows and saving stays blocked until the sum fits. If the wing model of the butterflies does not load (for example after a network error), simple drawn wings run; the game tries to load it again every 30 seconds at most and then switches to the model without a reload.
- Water life: gnat swarms, dragonflies over water and jumping fish need water nearby (water is ground below the water line; the search runs only when the groups are laid, not every frame). Gnat swarms: “Number at once” counts points over all swarms (at most 400 per block); they dance in clouds of about 1 to 2 m, 15 to 40 points per swarm, 0.5 to 2 m above the ground, preferably at the shore. With no water in reach, about a third of the swarms stay on damp forest floor. New rows are set to “Day only”; that includes the twilight, the gnats are off at night (“Twilight only” can still be chosen). A point is never drawn smaller than 4 pixels on screen, so the swarms can be seen from 20 to 30 m. They are off in rain, and in strong wind from strength 0.8 on (storm and thunder; in a clear sky, light rain and light wind they stay), once the world’s weather reports the wind. Dragonflies: 2 to 6 per group (at most 40 together), by day, in fast straight runs with a short hover between them, 0.3 to 1.5 m above the water surface (height from/to); they stay over the water and never fly more than about 3 m from the shore over land. Jumping fish: “Number” counts fish (at most 30); each one jumps about every 4 to 10 s in an arc 0.8 to 1.3 m high (height from/to), a jump lasts at least 1 s, out of deep water (at least 0.6 m), with a clear splash (6 drops) on leaving and entering, never nearer than 2 m to the player (jumps start 3 m from you at the earliest). New fish are 0.6 to 1 m long. With no water in reach there are no dragonflies and no fish. Dragonflies, fish and their splashes are lit by the scene’s light and are dark at night. The pilot biome Moos-Nadelwald gets about 150 gnat points by day and at twilight, and 8 dragonflies and 6 fish by day.
- Falling leaves: foliage that sinks slowly near the camera, turns on the way down and drifts sideways in the wind. Two images are on offer: blatt-a (orange, the default) and blatt-b (green); for mixed foliage add two rows, one with each image. “Number at once” (0–200 per row, at most 240 together per block) is the number of leaves in the circle around the camera; radius (default 20 m) is the circle; size from/to is the leaf length in metres (default 0.08 to 0.2 m); height from/to is the band above the ground the leaves fall through (default 0.5 to 15 m): at the top they grow out of nothing, at the bottom they shrink away and start again at the top at another place. A leaf sinks at 0.5 to 1.1 m/s, turns at 15 to 90 degrees per second around the vertical, tumbles up to about 50 degrees around the other two axes and drifts sideways with the wind: 0.25 m/s in calm air up to 3.25 m/s in full wind (a factor of 0.6 to 1.4 per leaf). New rows start on “Day only”; “Hide while precipitation falls” is on by default, so the leaves fade out within about 2.5 seconds when it rains. Colour (#rrggbb) multiplies the image: white keeps the colours of the image, another tint recolours them. Opacity 0–1. All leaves of a row are one draw call; the leaves ride on the camera and cost only what the rows of the biome give. If the environment block carries a field this editor does not know (for example from a newer version), the tab shows a yellow note naming the field as soon as it opens: while the field is there, no change in this area can be saved, and the field itself is not lost as long as you change nothing here.
- Embers and smoke: embers are small glowing points that rise, flicker and glow out upwards (additive, default colour #ff7a1a, size 0.05 to 0.12 m, height 0.3 to 6 m, radius 25 m; they rise at 0.5 to 1.4 m/s, live about 2.4 to 5.6 s and drift sideways with the wind). Each point flickers in brightness with a phase of its own and shows one of three shapes (dot, spark with a tail, flake). Smoke is big soft plumes that rise slowly (0.4 to 1 m/s), swell from a third to their full size on the way and fade out (not additive, default colour #3a3532, size 2 to 6 m, height 1 to 25 m, radius 40 m, opacity 0.45, life about 9.6 to 14.4 s); its image is a frame sequence of 16 frames. “Number at once” is the number of points or plumes in the air at the highest detail step (at most 240 embers and 40 smoke plumes together per block); the player’s setting “Level of detail” lowers it: Low 20 %, Medium 60 %, High and Very high 100 % each (“Very high” counts like High). New ember rows start with 60, new smoke rows with 8. Height from/to is the band they are born in; they rise from there. Embers only have “Closeness to lava (0–1)”: 0 spreads the embers evenly around the camera (as before), 1 lets them be born only over lava, in between that share is born over lava (with no lava in reach they stay spread evenly); and “Glow strength (1–4)”: the colour factor of the embers, 1 as before, higher values give a bright core that reaches the bloom. Smoke only has “Smoke columns (0–12)”: that many fixed places over lava in reach the smoke rises from as a column (the places belong to the world, not to the camera; 0 = spread as before; with no lava in reach no smoke rises) and “Lava glow on the smoke (0–1)”: how strongly the lava lights the foot of the smoke warm from below and brightens it at night (0 = off; no effect on the low detail step, where the smoke also shows one fixed frame instead of the sequence). Below the list are two fields for the whole block: “Ash fall: brightness (0–1)” and “Ash fall: amount (0–1)” dim the falling ash flakes of the biome in weather with ash fall (1 = as before, empty = 1); they apply to the whole biome, not per row. The game first draws the images itself (embers 128 × 128, smoke 256 × 256 pixels); once the published sheets umgebung-glut-funken.png and umgebung-rauch.png are in the asset store they replace these stand-ins. Each row is one draw call, and the effects ride on the camera. Sparks over the lava without an ember row and heat haze do not exist here.
- Ground animals: hares, squirrels, frogs at the shore, foxes and deer are drawn animals that are shown on the client only (no server objects, not touchable, no collision, no combat, no loot). They stand or walk on dry land and never in water; frogs sit at the shore only, that is on land with water within about 2.5 m. When the player (not the camera) comes nearer than the flight distance they flee: hare 6 m (in a zigzag), squirrel 5 m (in arcs), frog 3 m (short hops), fox 12 m, deer 15 m (far away). One that is far enough or has run for 14 s vanishes and appears again 2 to 7 s later in a ring around the camera, at least 8 m from it (and outside the player's flight distance); animals beyond 1.15 times the radius are taken away as well. New animals fade in over one second. The behaviour is computed on every client from world position and time: two players see similar but not identical animals, nothing is synchronised. Fields as in the other rows: "Number at once" (hares and squirrels at most 20, frogs 20, foxes 4, deer 8; at most 60 ground animals together per block, an overrun shows a red message under the rows and saving stays blocked), radius, colour, size from/to (body length in metres), height from/to (hop height), time of day (new rows: hare, squirrel and deer by day only, fox at twilight only, frog always), "Hide during precipitation" and opacity. A radius below 9 m acts like 9 m, because the animals appear only from 8 m away. A note above the ground-animal rows names the same flight distances. The animals are images (silhouettes) without a shadow; there are no models. Note: the pilot biome moss pine forest does not hold these rows yet; add them with "Create own list" and the kind.
Sound: ambience, effects and music
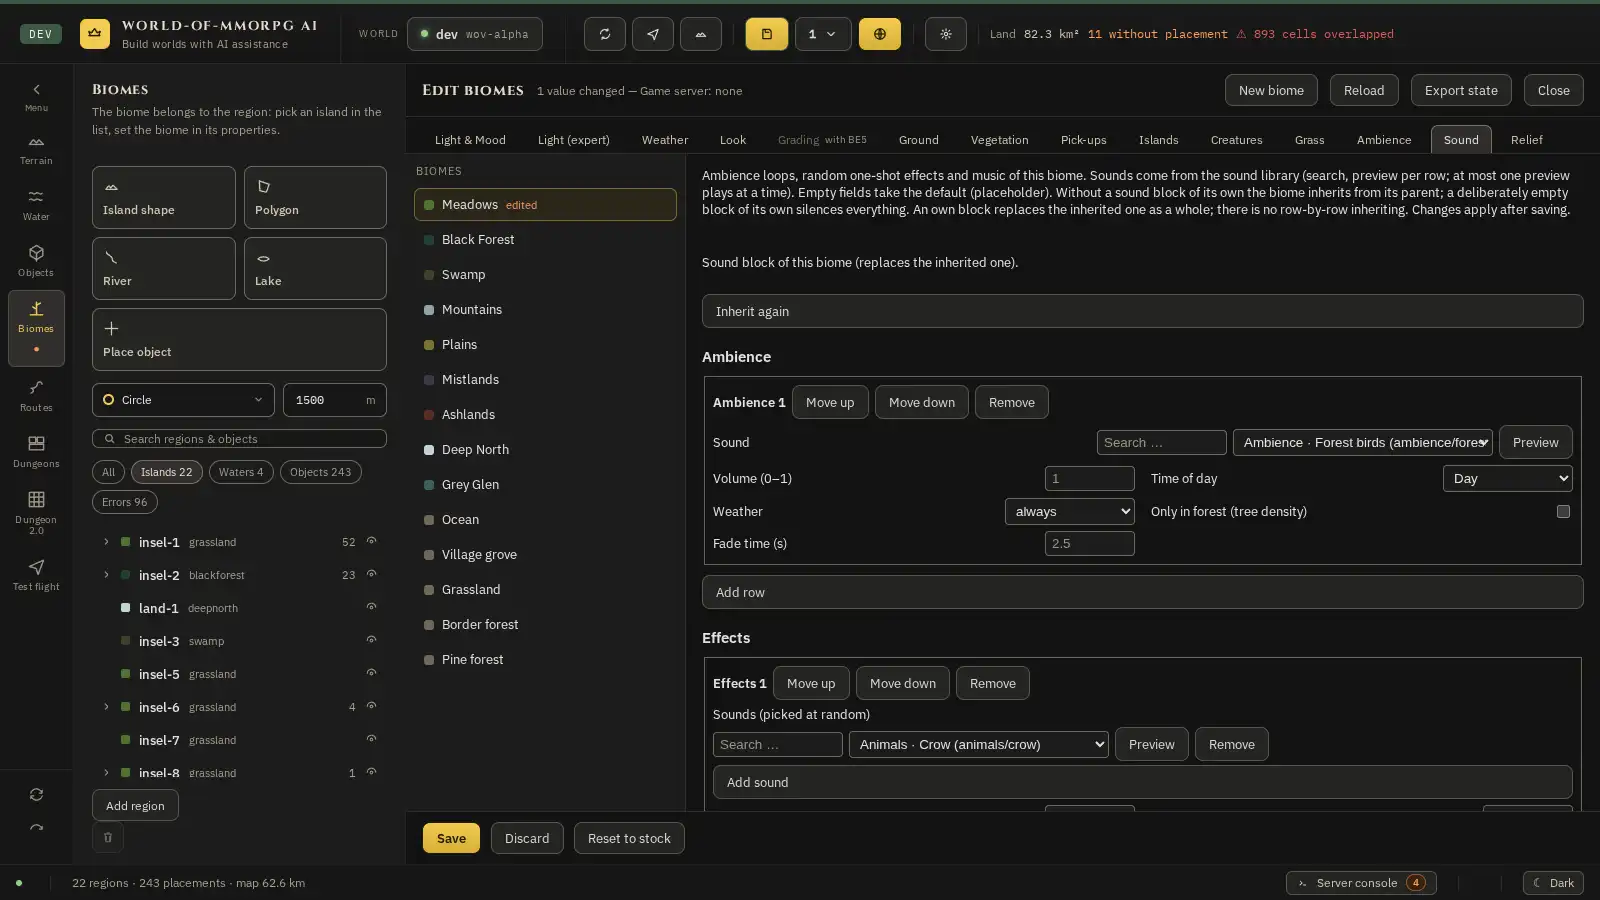
What for?
Give a biome its sound: loops as ambience (for example birds by day, wind at night), single effects at random times (crows, gusts of wind) and music. You pick the sounds from the sound library and listen to them right in the tab. You upload your own sounds (Ogg Opus) in the part “Own sounds” where the operator has allowed it.
How it works
- Open Biomes → Sound and pick a biome. The line at the top says where the sound comes from: if the biome has none of its own, it names the parent biome it inherits from, with the number of ambience rows, effects and music states; if nothing on the whole parent chain has a sound, the game behaves as before (forest rule and the fixed background loop). “Create own sound block” replaces the inherited sound as a whole; there is no row-by-row inheriting. An own empty sound block makes the biome silent on purpose. “Inherit again” removes the own sound block.
- Ambience rows are loops (at most 6 rows). Pick the sound with the search box and the list, which is grouped by folder (ambience, animals, music and so on); the names are translated from the file names, the file name is shown in brackets. “Preview” plays the sound: for a group with several clips every click plays the next one, a second click on the same clip stops it. If you pick a single clip (such as Animals › crow-01), the game plays exactly that clip too; if you pick the group, a loop takes the first clip of the group. Volume 0–1 (empty = 1) and fade time 0.1–30 s (empty = 2.5 s). Time of day (always, day, night, twilight) and weather (always, clear, rain, snow) decide when the row plays; fog and storm can be entered but never play in the game yet. “Only in forest” fades the loop in only when trees stand nearby. Ambience plays only sounds from the ambience folder; a sound from another folder stays silent in the game, and the tab warns about it.
- Effects (at most 8 rows) are single sounds at random times. A row has up to 12 sounds, one is drawn each time it plays. If an entry names a group, the draw is from its clips; if it names a single clip, exactly that clip plays. “Pause at least” and “Pause at most” (1–600 s) are the limits of the gap between two plays, “Distance from” and “Distance to” (0–200 m) are the ring around the camera where the sound is placed in space (default 5 to 40 m). Volume, time of day and weather work as for ambience; “Off while precipitation falls” switches the effect off while it rains or snows. Effects play sounds from the animals, combat, creatures, sources and footsteps folders, not from ambience or music (the tab warns about it). If “from” is larger than “to”, the tab blocks saving.
- Music has three states: “free” (normal play), “dungeon” and “combat”. All three work in the game. Combat: the list plays while you fight, that is for two seconds after a blow you land, a parry on you, a blow you take or your death. A blow on an animal that never strikes back (peaceful or fleeing, such as cow, chicken or deer) is hunting and does not count; an enemy that attacks does. A teleport or world change ends the fight at once. A single blow already switches, because the two-second window is longer than the time until combat starts (default 1 s, 0 to 30 s); the time until it ends (default 2 s, 0 to 60 s) is the calm time after it, so the music ends about four seconds after the last blow. You set both times in the section “Music in combat”: “Combat starts after (s)” (0 to 30, empty = 1) and “Combat ends after calm (s)” (0 to 60, empty = 2). They apply to the whole biome, are stored in the music block of the file as kampfBeginnS and kampfEndeS, and only take effect when the “combat” state exists. Without a “combat” state the free state (in the dungeon the dungeon state) simply plays on. A block without a “dungeon” row is silent in the dungeon, except in a fight when the block has a “combat” row: then that one plays. The music cross-fades; no piece is cut off, but at most four pieces fade out at once, and in a very quick change the oldest is ended hard. The game’s old background music fades out over three seconds while the biome has a music state and a piece can really play; if the game finds no piece (sound not yet unlocked, piece not in the sound library), the old music plays on. It returns when no block applies. The biome’s random sounds follow the player slider “Effects”; “World” does not mute them. “Add state” creates the list of pieces (at most 24 pieces; one piece is picked at random, a pause follows when it ends), plus pause from/to (empty = 3 to 5 s), fade in and fade out (empty = 3 s) and optionally the time of day. For music the list offers single pieces only, no group names: the game finds music only by the single piece, a group name would stay silent (if one is still in a row from an older state, the tab warns). Music is streamed and not loaded into memory as a whole.
- Volume factors: one factor from 0 to 1 each for ambience, effects and music of this biome, applied on top of the player’s sliders (empty = 1).
- Errors and warnings are listed below the rows. Red and saving blocked: a row without a sound, a value outside its limits, or “from” larger than “to”. Yellow, a hint only: a sound that is not in the sound library (it stays silent in the game), a sound from the wrong folder for ambience or an effect, or a group name in music (both stay silent in the game; music may instead take any single clip from any folder, and the tab does not warn about that), a limit that has been reached, a load size above 120 MB (the sum of all ambience and effect clips in memory; music does not count because it is streamed) and a large clip (10 MB or more in memory) that sits on more than one path (ambience, effect, music) and would then be loaded more than once. The load size in MB is always shown below. At most one preview plays at a time; it ends as soon as you leave the tab, change the biome, the tab is redrawn or you close the biome mask. A field this editor does not know (for example from a newer version) is kept and does not block saving; the tab shows a yellow note naming the field, because the export of the stand refuses a stand that carries one. Changes apply after saving.
- Uploading your own sounds: below the rows there is the part “Own sounds” (it appears as soon as the operations service answers, also for a biome without a sound of its own). It carries the note: “Only upload sounds you have the rights to. Uploaded sounds stay on this server only and are not published.” Only Ogg Opus is valid, at most 4 MiB, between 0.1 and 300 seconds, with one or two channels. The server checks the content of the file page by page, not its name and not its type, and refuses everything else (WAV, MP3, Ogg Vorbis, damaged or cut-off files); nothing is converted. Pick the file, the use (“Ambience (loop)” for ambience, “Effect (world)” for effects, “Music” for music), a name in German and one in English, and tick “I have the right to use this sound”; without the tick nothing is uploaded. The sound then appears in the sound picker under “Own sounds” (with your name) where you can choose and preview it; in the game the row that names it plays it. The sound gets an identifier of twelve characters made from the content: the same sound a second time gives the same identifier and no second entry, and the message says that it already existed; uploading the same sound with another use is refused by the server. The server holds at most 200 sounds and 200 MiB. “Remove” deletes the sound and its file together, but only while no biome names the sound in ambience, effects or music; otherwise the server refuses and the tab names the biomes. The working copy of the biome data is checked, else the start stock; if it cannot be read, nothing is removed. A biome that names a sound a server does not have stays valid: the game skips it, the tab warns in yellow. Uploading is off as long as the switch “ton-hochladen” in the section “uploads” of the server settings is not switched on (default: off; creating files on the server is a decision of the operator) and always on the live instance; the part then only shows the list and the reason. Older game clients do not know own sounds and do not play them, otherwise nothing changes for them. New screenshots for this part will follow.
Tip: Defaults of the biomes (as of BK-3, only sounds from the sound library): forests (Blackpine, Grey glen, moss conifer forest, moss broadleaf forest, fairy-tale forest) play exploration music (exploration-02, -03, -06); ambience: birds by day and wind gusts by night, both only in the forest; effects: a crow by day (every 20 to 60 s, off during precipitation) and wind by night (30 to 90 s). Dark biomes (swamp, Fogmoor, Cinderfell, dead lands, gloom march) play temple and dungeon music (temple-01 and -02, dungeons-01 to -03); ambience: a crow or wind loop; effects: wind and crow. Villages (Dorfhain, village valley) play tavern and town music (tavern-01 and -02, town-01 and -02); ambience: town voices by day; effects: rooster, chicken, cow and cat by day. The other biomes (grassland, mountains, plains, deep north, northern mountains, ocean) play exploration music (exploration-01, -04, -05) with birds, wind or crows depending on the biome; the ocean has music only. Every biome: combat plays combat-01 to -03, in a dungeon dungeons-01 to -03 play. The biomes Grasland (the child of grassland), Nadelwald and Grenzwald have no sound of their own and take the one of their parent biome. The largest load of any biome is 96 MB (forest, grassland), below the warning threshold of 120 MB. The game keeps at most 110 MB of decoded sound in memory: when you walk through several biomes, what has not played for the longest time is released again and loaded anew when needed; a sound that is playing right now always stays, and so does one that has just been loaded and is about to start (it is reserved until it starts, for at most 10 seconds after it has loaded). Putting the defaults into a running world is done by an operator tool; it leaves a biome that already has its own sound unchanged and warns with one line when an existing block lacks parts (for example the dungeon music; an empty list counts like a missing part). If the connection breaks or a gateway answers 502 or 504 after it has sent the write, it reports that the result is unknown, with its own exit code 3; then check the state with a dry run.
Relief: rugged ground
What for?
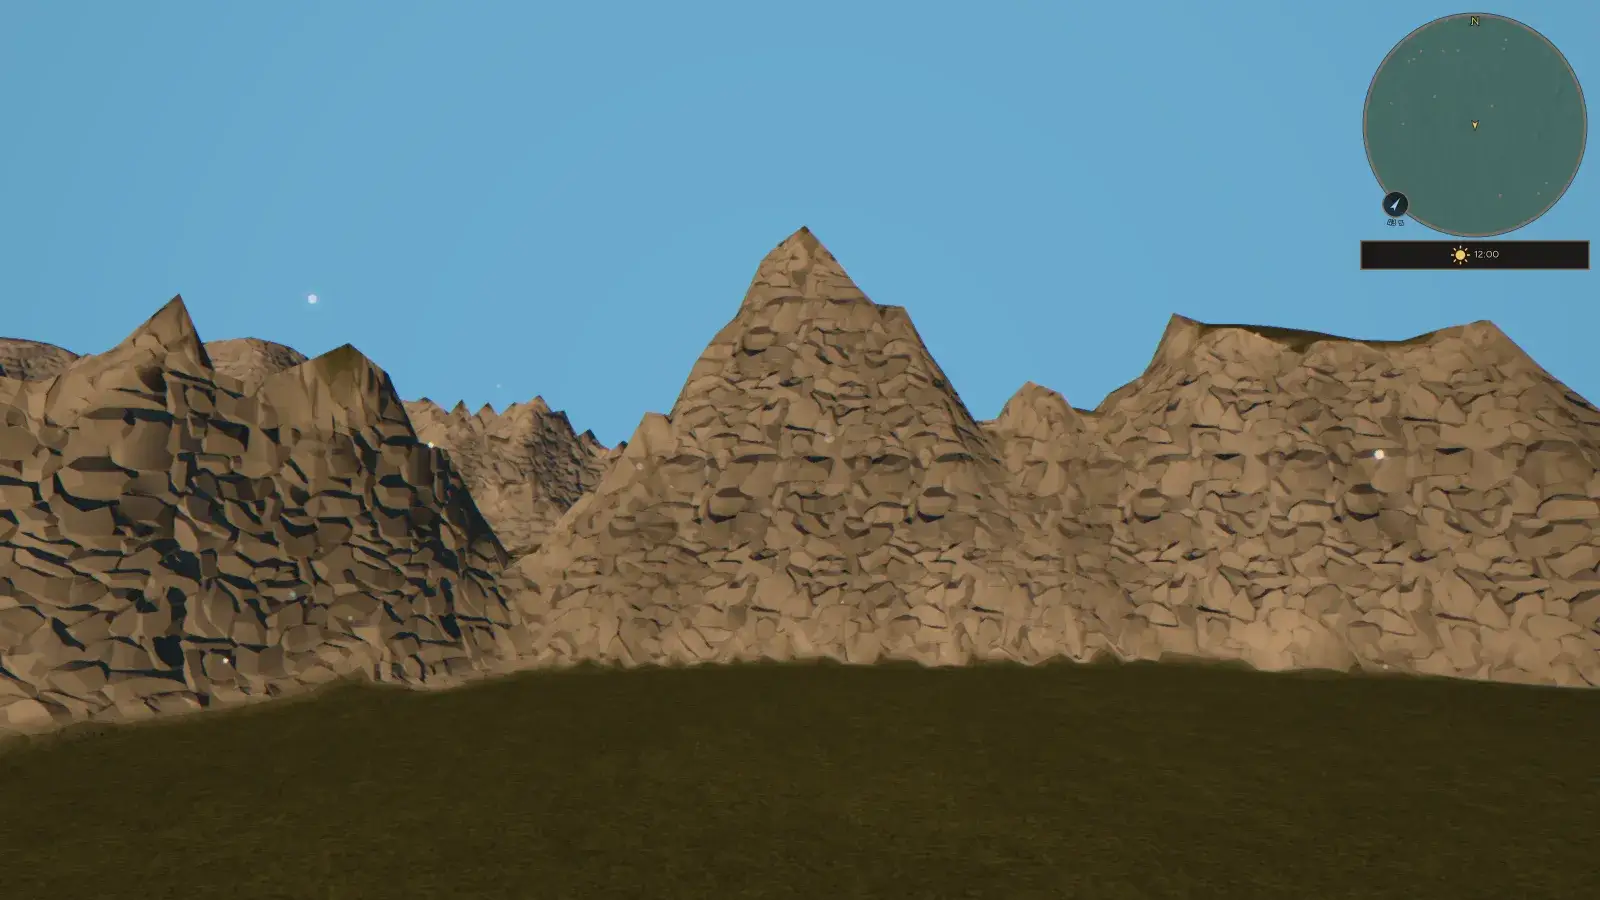
Give the islands of a biome rugged ground: crests, gullies and steps on the terrain. The biome sets the style; each island switches it on or off and sets the strength. Without relief the ground stays exactly as it was, bit for bit. Cinderfell: the ground of the Cinderfell biome is walkable land with basalt ledges at heights of 36 m + n × 6 m and lava lakes. A lava lake is a basin whose floor lies below the fixed lava line of 36 m (6 m above the water line) and never lower than 33.5 m; no water stands there. A relief block for Cinderfell sits on this shape like on any other biome; if you set one, choose a step height of 6 m so its steps fall on the same heights.
How it works
- Open Biomes → Relief and select a biome. Above it says where the style comes from: “This biome has its own relief block”, “This biome inherits the relief block of …” or “No relief: the ground stays as it is”. “Add relief” creates a block of its own: an inherited block is copied, without an inherited block it starts switched off (ruggedness 0). The nearest block on the parent chain replaces everything above it; single fields are never mixed between biomes, and a block with ruggedness 0 ends the inheritance on purpose. “Back to starting stock (inherit again)” removes the own block. The “Choose a preset (prefill for newly created islands; existing islands keep their own ruggedness; the shape of the other fields applies to every rugged island of this biome, from the next server restart) …” list writes the fields of the chosen preset into the block and leaves all other fields alone: “gentle (about 1.4 % steeper than 44°)” (ruggedness 0.15), “undulating (about 7 % steeper than 44°)” (ruggedness 0.4), “rugged (full standard strength, about 18 % steeper than 44°)” (ruggedness 1; this stays the unchanged standard), “cliff country (about 24 % steeper than 44°, many steep steps, no cliff models yet)” (ruggedness 1 with more steep steps (about 19 instead of 13 per hectare); step height as in the standard, edges a little softer; it makes steep edges in the ground, but no cliff models yet) and “values after the template (level 2) (about 15 % steeper than 44°)” (ruggedness 1; the values follow the template, without a claim that the ground is better for it; an extra choice, the “rugged” standard does not change; on the terrain of the moss coniferous islands it gives about 15 % steeper than 44° as the mean over eleven inland windows, single windows vary a lot (about 7 to 21 %); like every preset it only acts on islands that have ruggedness switched on themselves). A preset is the prefill for newly created islands (shape and strength). Existing islands keep their own relief: every island with ruggedness stores its strength itself, and an island without a relief block is off. The strength of an existing island therefore does not change through the preset, not even with “gentle” or “undulating”; it is changed on the island itself (step 4). The other fields (steps, edges) apply to every rugged island of this biome, from the next server restart, built-up islands included. It is not the same as the “Ruggedness” of a single island (step 4): the preset sets the style of the biome, an island only sets switch and strength.
- Each field has a slider and a number box; an empty number box takes the default (grey number). Ruggedness (0–1) is the master control: 0 = off, 1 = full standard strength, 0.5 = half. Crest height (0–20 m) is the height of the crests and gullies; more height makes crests taller, not steeper. Wavelength (12–120 m) is the distance between the largest crests, Swirl (0–1) bends straight crests into meanders. Step height (2–30 m), Edge sharpness (0 = soft, 1 = wall), Step share (0–100 %), Step grain (40–300 m, size of the patches with steps) and Tallest wall (3–40 m, the largest height of a single edge) shape the terraces. Edge sharpness decides how much slope over 60° appears; from 60° up the ground cannot be walked. “Flat near water” (4–30 m) is the height above the water line from which the relief acts fully; below it beach and river bed stay smooth. Offset (whole number) shifts the pattern without changing its shape. Wall share (0–1) and Wall steepness (45–88°) add steep walls and canyon edges: the wall share is a control for the amount of walls, not an area: only a part of it becomes really steeper than 60°, the rest are transitions; the default is 0 = no walls, and then the ground stays exactly as it was, bit for bit. The wall steepness is the slope of the walls in degrees (default 70°) and only counts when the wall share is above 0; from 60° up the ground cannot be walked, so no wall can be either. The wall height is “Tallest wall”; the walls leave gaps (ramps) so no basin closes, but many walls lower walkability (key figures, step 3). Walkability here means connectedness: you must be able to get everywhere; steep walls are allowed as long as there is a way around them. The relief may lower it by at most 8 points against the same ground without relief (mean over at least 100 places). The deciding measure is a movement probe: sampled ways are walked with the movement code of the game itself, and the share of the walkable ground that can be reached counts, as a mean over six fixed world seeds with 100 places each. The fast arithmetic measure with the body width (capsule 0.4 m) and 1° of reserve at the 60° limit is only a first upper bound; measured with it, a wall block with wall share 0.3 and wall steepness 75° breaks the 8 points on Mountains (15 points), Deep North (15) and Cinderfell (8.4); Fogmoor already loses 9.7 points (measured after movement: 7.4, within the 8) with ruggedness 1 alone. These numbers of the arithmetic measure are an upper bound: the measure is strict, and in the game many ways it counts as not connected can still be reached. On these grounds choose a smaller wall share. The wall share works together with the ruggedness (ruggedness 0 switches the walls off too, 0.5 halves them) and applies to every rugged island of the biome, old ones too: as soon as the biome sets a wall share above 0, islands that already lay in this biome before inherit the walls. Invalid numbers block saving.
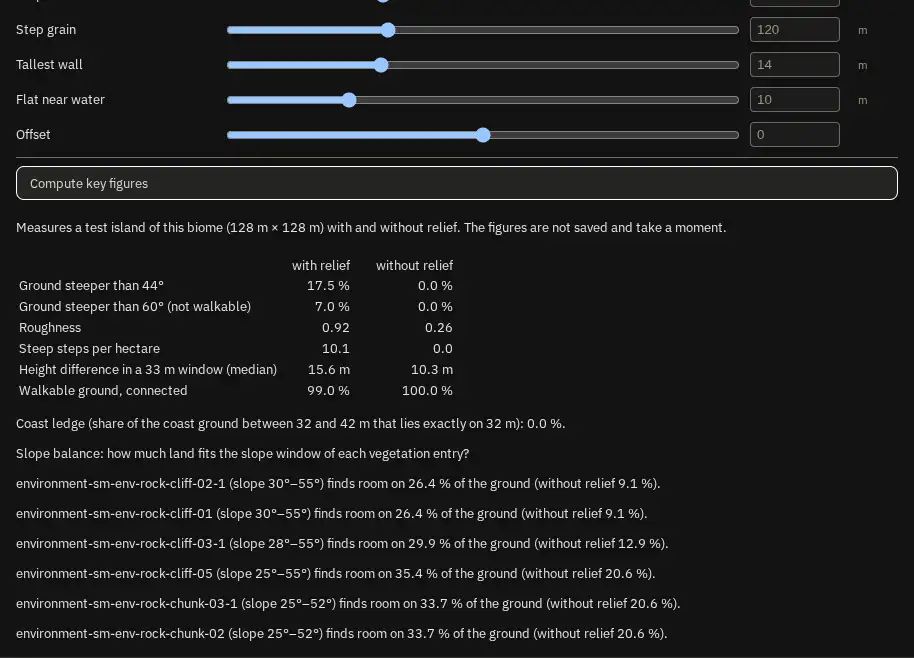
- “Compute key figures” measures a test island of this biome (128 m × 128 m) with and without relief and shows both side by side: the share of the ground steeper than 44° and steeper than 60° (not walkable), the roughness, the steep steps per hectare, the height difference in a 33 m window, and how much walkable ground is connected. The coast ledge gives the share of the coast ground between 32 and 42 m that lies exactly on 32 m: if a warning stands there (over 5 %), flat ledges form on the coast; then lower the crest height or “Flat near water”. The slope balance tells for each vegetation entry on how many percent of the ground its slope window fits, with and without relief: an entry with a small largest slope finds less room on rugged ground. The key figures are not saved; after every change of the block you compute them again.
- When you create a new island (tools “Island shape” and “Polygon”), the sidebar shows the “Ruggedness” row with a switch and a strength (0 to 100 %, step 5 %). It is pre-set from the style the biome of the new island defines: if its block has a ruggedness above 0, the row is “on” with that strength, otherwise “off” (in the starting stock this is “off” everywhere, so the island is created without a relief as before). The island only stores “on/off” and the strength; it always reads the style (crest height, wavelength and the other fields) live from the biome. When the style changes in the biome, the ground of all islands of this biome changes with it, built-on islands too, but only from the next game server restart: server and game apply the new style together, and until then both keep computing with the style of the last start. “Save” alone therefore does not change the ground in the running game; “Publish” restarts the game server and applies the style (the test flight in the editor, the map and the island view show the saved new style at once, namely at the next start of the test flight or the next time you open the view). Warning: placements on a built-on island may stand in the ground or float after a style change. Islands that carry a fully copied block from an earlier version keep the fields named there; only their unnamed fields follow the biome. Your choice holds for the current editor session and is not saved. Existing islands stay as they are; on them you switch the relief on with “Apply template” (this sets the strength from the style of the biome) or with the “Ruggedness” slider in their properties; that slider also switches on and off and changes the strength later. If you choose “Apply template” on an existing island, its relief stays unchanged when the template brings none; if it brings one that differs from the island's relief and the island already has a relief or placements, the map asks first, and on “Cancel” everything stays unchanged. In the properties of an island on the map (tab “General”) there is the “Ruggedness” slider: “off” to 100 %, the strength of the island; the biome supplies the style. If placements already stand on the island, the relief changes the height of the ground: before you apply, the map then shows a warning with the number of placements; snapping placements follow the new height, others may stand in the ground or float. Changes to the biome apply in the editor only after saving, and in the game additionally only after the server restart. If the relief block carries a field this editor does not know (for example from a newer version), the tab shows a yellow note naming the field as soon as it opens: while the field is there, no change in this area can be saved, and the field itself is not lost as long as you change nothing here.
Example: setting up Cinderfell
What for?
This chapter shows, as a recipe, how the look of Cinderfell (the ashlands) comes from the tabs of the biome editor: which field is set to which value, the range you may change it in and what you see in the game. All numbers are the starting stock; where a tab already has a chapter of its own, the detail is there.
How it works
- Light and day (tab “Light (expert)”, biome Cinderfell): the sun height `sunAngle` is 60° (range 5 to 90). The light strength is 0.9 by day (`lightIntensityDay`) and 0.76 at night (`lightIntensityNight`), range 0 to 4 each. The sun colours are red-green-blue values from 0 to 1: morning (0.92 | 0.46 | 0.3), day (0.9 | 0.5 | 0.34), evening (0.88 | 0.4 | 0.25). In the game a muted, reddish-orange light lies over the land.
- Haze (same tab): the fog densities are 0.04 in the morning, 0.032 by day, 0.04 in the evening and 0.036 at night (`fogDensityMorning`, `…Day`, `…Evening`, `…Night`; range 0 to 0.25 each). Cinderfell therefore lies in dense haze and the view into the distance is short.
- Night (same tab): the ambient colour of the night `ambColorNight` is (0.6 | 0.3 | 0.27), a warm light that stays even in shadow. The fog colour of the night `fogColorNight` is the night sky: (0.1157 | 0.171 | 0.1841), range 0 to 1 per channel. The starting stock carries the value but does not mark it as “edited”; only when you set the field yourself does it act in all weather layers with colour and brightness, before that the colour of the respective weather layer applies. In the game the night is medium bright and the ground stays readable.
- Grading (tab Grading): grading is on (`grading.an`). The shadows are tinted `#d6def5`, the midtones `#ffd8b0`, the highlights `#fff0c2`; the shadow offset `grading.schattenOffset` is −0.05 (range −1 to 1). In the game shadows look slightly bluish, the midtones brown-orange and the bright spots yellowish.
- Weather (tab Weather, biome Cinderfell): six layers with these weights (range 0 to 1,000,000 each): Ash rain 6, Ashlands clear 2.5, Ash fog 1.5, Cinder rain 0.5, Meteor shower 0.25, Ash storm 0.25; the sum is 11, so Ash rain is the most frequent layer (a little over half). Each layer lasts “from 1 to 1” time windows (range 1 to 1000, whole numbers). In the game it mostly rains ash; cinder rain, meteor shower and storm are rare.
- Relief and lava lakes: this terrain is fixed and not a field in the editor. The lava line lies at 36 m (6 m above the water line); a lava lake is a basin whose floor lies below that line, never lower than 33.5 m, without water. The basalt steps are 6 m high and are counted from the lava line. If you also add a relief block for an island (see chapter “Relief”), choose a step height of 6 m so its steps fall on the same heights.
- Lava damage (tab Look, field “Lava damage in a lava lake”): range 0 to 100 (percent of maximum life per second), starting value 0, so no damage. At 20 a player with full health is dead after five seconds. The damage hits only players standing in the lava lake; cracks and shore never hurt, creatures take no lava damage.
- Lava cracks in the ground (tab Ground, block “Lava (Ashlands only)”): “Rendering” is “alt” (uniform glow) in the starting stock. If you choose “Cracks”, the lava lake shows dark plates with glowing cracks. Six numbers then act: crack width 0.05 to 2 m (default 0.35), plate density 0.02 to 0.5 per metre (default 0.12), glow 1 to 8 (default 3), pulse 0 to 0.6 (default 0.25), pulse rate 0.2 to 4 Hz (default 1.2) and night glow 1 to 3 (default 1.5).
- Embers and smoke (tab Ambience): the starting stock of Cinderfell does not yet carry any ambience rows. You add them: “Embers” (new row: count 60) rise as small, flickering sparks, default radius 25 m, colour `#ff7a1a`, size 0.05 to 0.12 m, height 0.3 to 6 m. “Smoke” (new row: count 8) forms large, soft plumes, default radius 40 m, colour `#3a3532`, size 2 to 6 m, height 1 to 25 m, opacity 0.45. The count per row lies between 0 and 200; over all rows at most 240 embers and 40 smoke are allowed. The detail quality in the game settings shows 20 percent (Low), 60 percent (Medium) or 100 percent (High and Very high) of the ember count.
Tip: Work from top to bottom: first light and grading, then weather, lava damage and ground, ambience last. After each tab check once by day and once by night in the test flight.
Grass and ground clutter
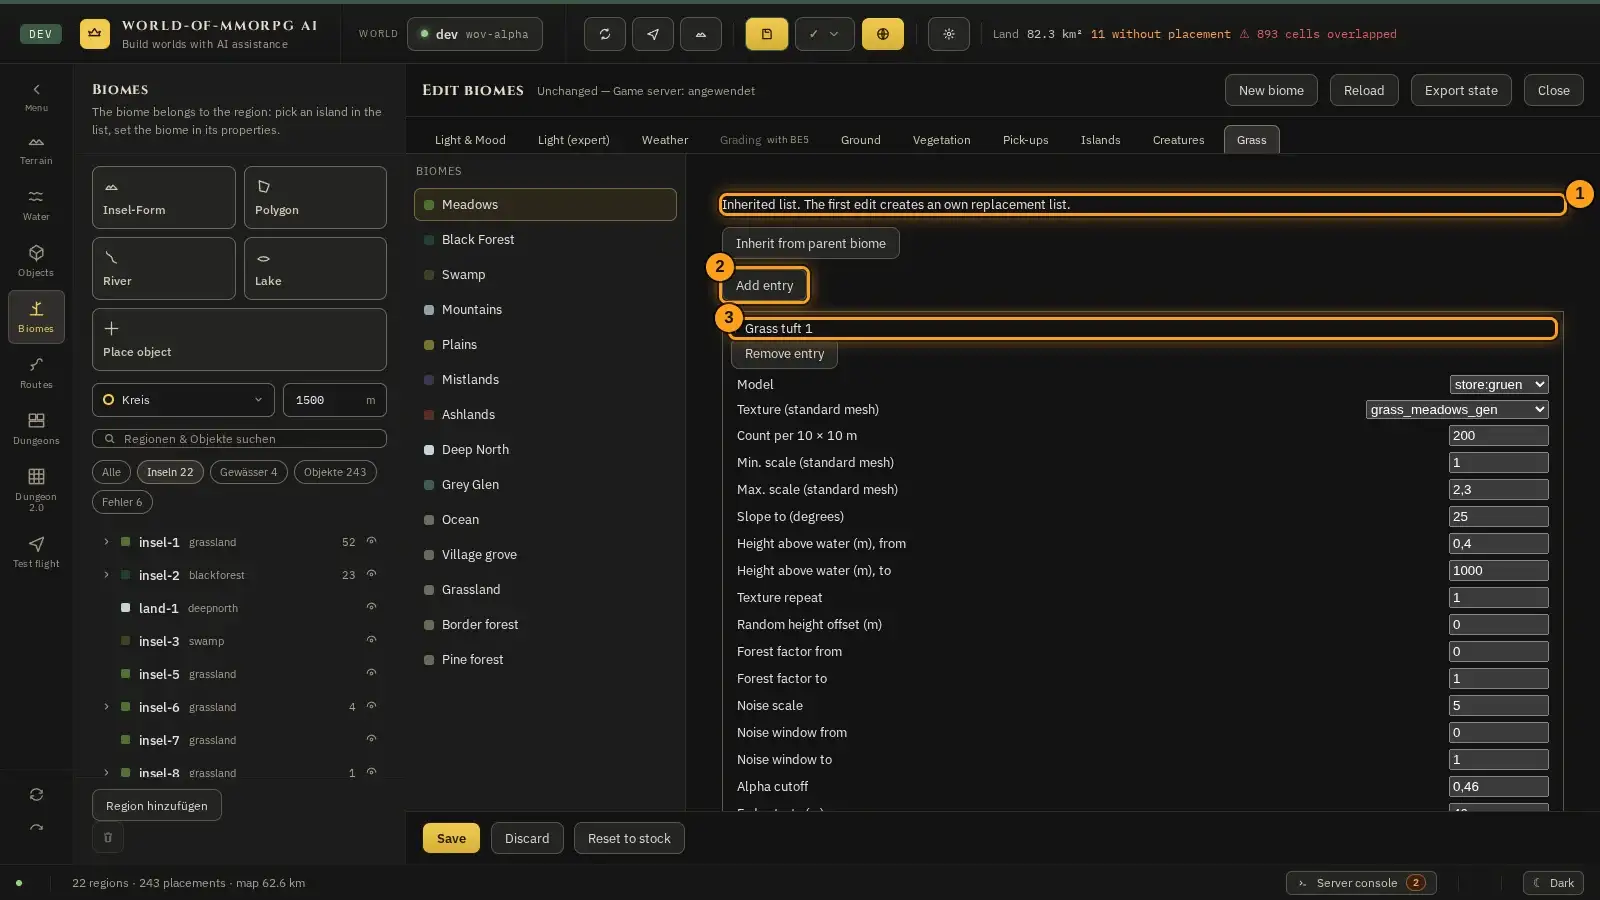
What for?
Grass, flowers, ferns and reeds are small terrain details, independent of the large vegetation scatter table. They do follow the painted density and the removal circles (chapter “Painting vegetation”).
How it works
- Open the “Grass” tab and select a biome. Without an own list a created biome inherits its parent’s list. The first edit creates a replacement list. “Inherit from parent biome” removes that list; an empty own list instead means no grass.
- Use “Add entry” and “Remove entry” to maintain the list. Choose an existing clutter mesh or one of the four store grass variants. Texture selection applies to clutter meshes; store variants bring their own atlas.
- “Count” is candidates per 10 × 10 m, at most 500 per entry; filters reduce the visible number. Up to 32 entries are allowed. Each 40 × 40 m cell builds at most 32,768 instances, shared evenly across the 16 patches (at most 2,048 per patch). Within a patch the entries share that room fairly by demand: every entry with a “Count” above zero gets a share, so the list order no longer decides which entry shows up nowhere. What one entry does not need (for example because its filters reject candidates) goes to the other entries. “On cleared ground” and “On uncleared ground” decide where an entry grows; with both off the entry grows nowhere (the row stays in the list but is switched off) and the row shows the note “Both off: this row grows nowhere.”, which disappears as soon as one of the two switches is on. Large lists build across several frames; grass edits keep old cells visible until their replacements are ready. Light and weather edits do not rebuild grass. “Reset to stock” restores inheritance for created biomes and biomes with a parent. Set scale, height above the water surface in metres, slope in degrees, forest and noise windows. Store meshes use the store scale fields; other meshes use the standard mesh scale fields.
- Visibility has two values: “Fade starts” begins the transition, “Invisible at” ends it. Both are metres up to 70 m; graphics quality, fog and the irregular fade edge further affect the actual range. Starting stock remains unchanged (at most 56 m). The view distance of a single tuft varies by ±30 % around “Invisible at”, and from “Fade starts” on the tuft shrinks with distance to the camera. Wind sway is in metres at the tip; the engine multiplies it by the factor 3 and the wind strength. “Push distance” is the distance to the camera within which grass is pushed aside, at most 0.6 m at the tip (in model metres; the tuft’s scale applies on top). Color is a tint.
- “Save” writes the grass list together with the other tabs. Edits survive biome switches and closing the form. On a conflict the question names “gras”: your version deliberately replaces that biome’s entire grass list; other blocks stay intact. Invalid input blocks saving. If the grass block carries a field this editor does not know (for example from a newer version), the tab shows a yellow note naming the field as soon as it opens: while the field is there, no change in this area can be saved, and the field itself is not lost as long as you change nothing here.
Vegetation: what grows on a biome
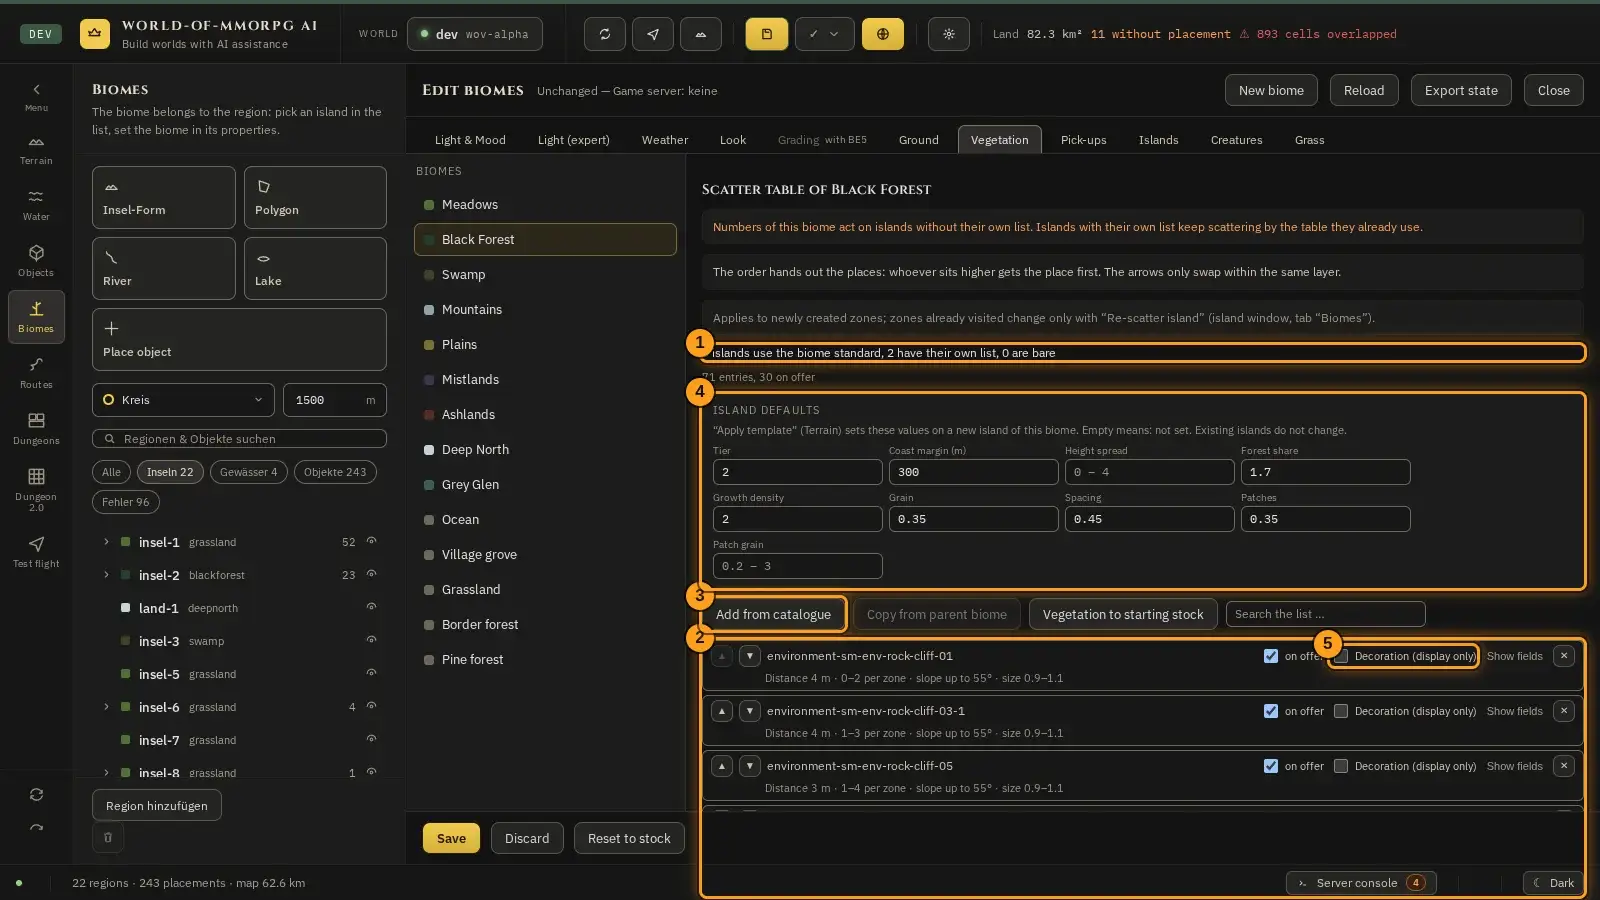
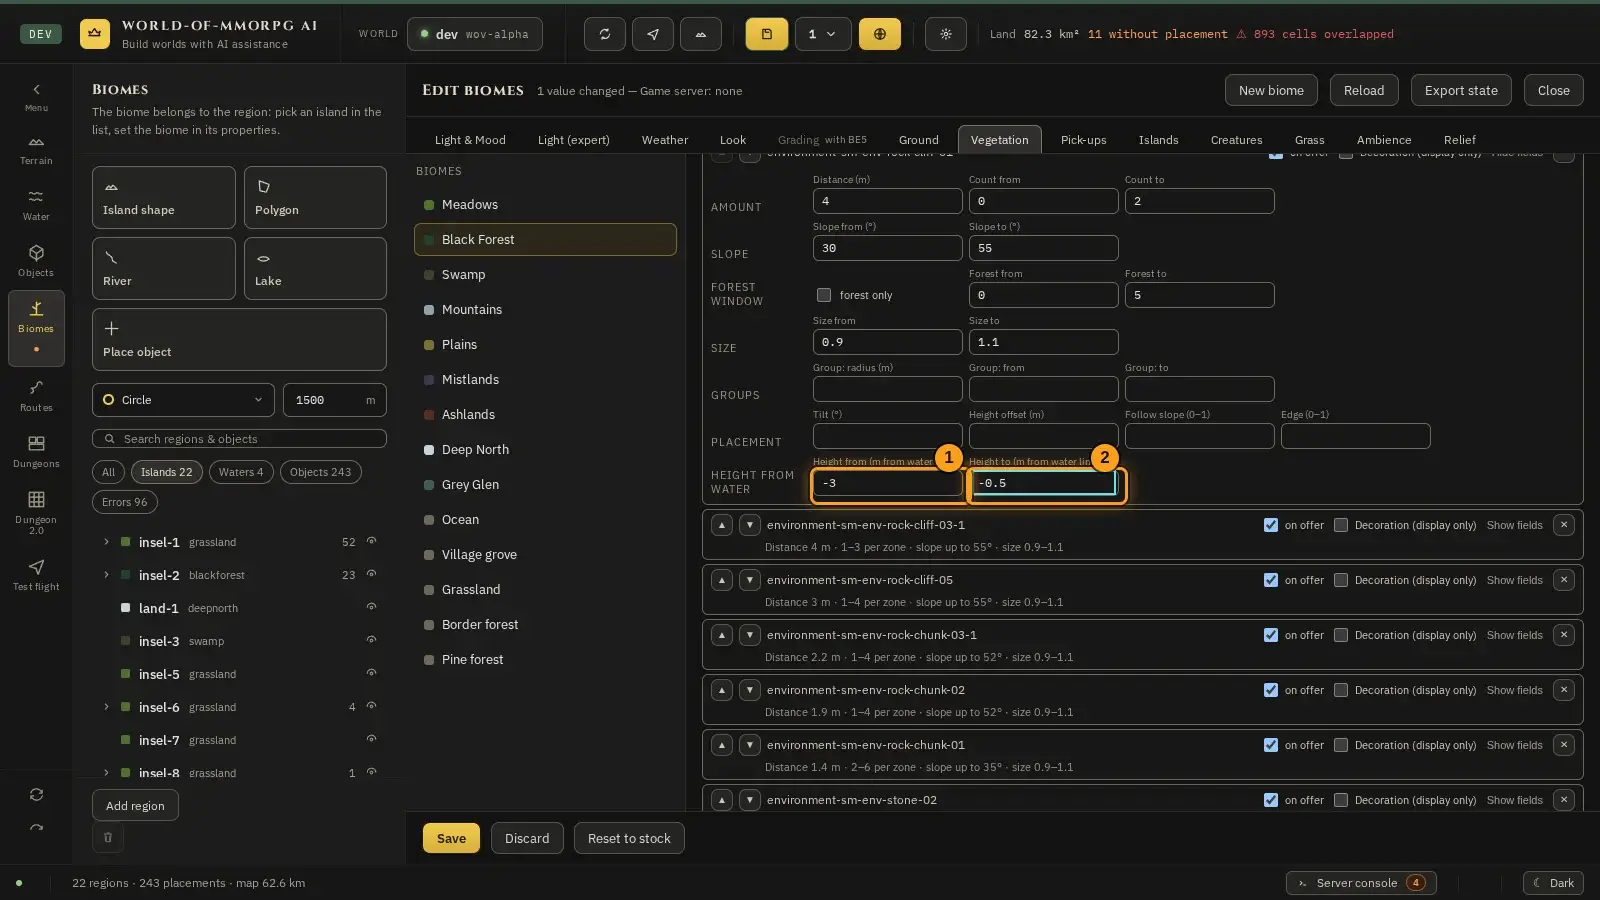
What for?
The “Vegetation” tab decides which plants, bushes and stones are scattered on a biome — and in which order they take their places. This is the only source: there is no fixed plant list built into the program any more; only the starting stock is shipped, which you can restore with “Vegetation to starting stock”.
How it works
- Open the biome form, choose a biome on the left and click the “Vegetation” tab at the top.
- The counting line (1) says how many islands use the biome standard, how many have a list of their own and how many are bare. Below it you see how many entries the list has and how many of them are on offer.
- The table (2) lists the models in their order. Every row shows the name, the “on offer” tick and a short form of its values. “Show fields” opens radius, amount per zone, slope, size, group and height offset.
- The arrows ▲ and ▼ move an entry. They only swap within the same layer. The order hands out the places: whoever sits higher gets the place first.
- The “on offer” tick makes an entry appear in the biome standard. If you clear it, the entry stays in the document and keeps scattering on islands with a list of their own, but it is missing from the standard. The “Decoration (display only)” tick turns an entry into pure decoration: the client scatters it for display only, the server creates no object. Details and limits are in the last step.
- “Add from catalogue” (3) opens the searchable list of models; one click appends the model at the bottom of the table, and a new entry carries the mark “new”. “Copy from parent biome” replaces the list with that of the parent biome (it asks first), “Vegetation to starting stock” resets it to the delivered state. Nothing is written until you click “Save”.
- Under “Island defaults” (4) stand the values that the section “Apply template” in the terrain writes onto the chosen island: Tier, Coast margin (m), Height spread, Forest share, Growth density, Grain, Spacing, Patches and Patch grain. There is one button per biome, labelled with the biome’s name. Empty means: not set. If you only change the defaults here, no existing island changes — only a button in the “Apply template” section writes them onto the island currently chosen. Note: that button replaces the island completely, including its biome and its own plant list; afterwards it follows the biome standard again.
- Sliders such as “Growth density” and “Spacing” belong to the island, not to the species table: they also act on an island with a list of its own and change the amount and the distance of the plants there, not the species. Which species are scattered is decided by this biome’s table only on islands without a list of their own. In the island window the “Vegetation” section says which list an island uses (“Biome standard”, “Own list” or “Bare”), and “Edit in the biome” leads here. “Re-scatter island …” first counts the zones, then shows a preview, and only a second click scatters anew; zones with player buildings stay untouched.
- Decoration in detail: the “Decoration (display only)” tick is meant for small, walk-through things (pebbles, ferns, flowers, mushrooms, bushes, dead wood). Trees, rocks, cliffs, gems and everything pickable stay without the tick; a tree row with the tick would be walked through without collision. Decoration has no collision, casts no shadow and cannot be felled, mined or picked up; there is no switch for it in the game settings. The client scatters it by the same rule and seed as the server, where the server would have placed an object, as far as it knows the clear areas (placements, locations already received, removed vegetation). It lacks a location it has not yet received and the hulls of uploaded models; until a location arrives, decoration may stand there and is then placed anew. A change applies to newly created zones. In zones already visited, switching to decoration shows the old object and the decoration twice; switching from decoration back to an object leaves the area empty, because the server never created an object there. In both cases “Re-scatter island …” in the island window (tab “Biomes”) helps; it works only where re-scattering is released, and zones with player buildings stay untouched. Nothing is deleted automatically. Known gaps: small ground changes by players that fall between the probe points (a 16 m grid per zone) are not noticed; the decoration stays at the old height until the zone is rebuilt, and whoever joins later sees it on the new ground. Layout changes (such as “Remove vegetation” in the test flight or new placements) reach the decoration in the game only after the next login. Worlds without a layout (radial world) have no decoration. Decoration does not make way for player buildings. How far you see decoration depends on the model’s height times the largest size in the zone: under 0.6 m up to 64 m, under 2 m up to 96 m, larger things up to 128 m. The ranges are applied again only after you have moved more than 16 m, so decoration can appear up to 16 m later than the figure says. All pieces of a model in range are drawn together (one draw per model, not per zone), including those behind you. The preview in the test flight shows decoration rows like normal objects, with collision.
- Cliff suggestion: the “Add cliff suggestion” button in the tool row appends a completely normal entry to the end of the list (cliff model rock stack 01, minimum distance 4 m, 300 attempts per zone, slope 55–90°, edge 0.5, alignment to the slope 1). Afterwards you can change, move or remove it like any entry. If the cliff model is already in the list but without an edge, the button is called “Align existing cliff row to edges”: after a confirmation that names each changed field with its old and new value, it sets slope, attempts, alignment to the slope and edge in that one row to the values of the suggestion and changes nothing else. Afterwards the cliffs of this row appear only at relief edges: on islands and in biomes without a relief the cliffs of this row that existed before disappear. If the model is already in the list with an edge, the button is disabled (“A cliff row with an edge is already in this list; change it there.”), and so is it when the list is full. The button is attached to nothing: relief presets do not bring cliffs, and existing worlds change only when you save the entry. The field “Edge (0–1)” in the group “Placement” is the threshold for the edge strength of the relief; empty = off. A row with an edge stands only where the edge strength is at least this value (1 = only the strongest edges, not “none”) and looks downhill, with a spread of ±10°. It does not grow on an island without relief; if the biome has no relief, the hint on the button says so. How many cliffs appear depends on the rest of the vegetation: trees and other entries take up room first, and the minimum distance applies between all of them. Measured on an island with the standard relief (ruggedness 1) and the full vegetation of the biome, with three island seeds, per hectare: when aligning the existing row (the case in Blackpine, Grey Glen and mountains) about 9 to 11 cliffs in Blackpine, 6 to 10 in the Grey Glen and 12 to 14 in the mountains; when appending a new row (measured on the same three biomes by removing the row and appending it again) about 4 to 5 in Blackpine, 5 to 9 in the Grey Glen and 10 to 13 in the mountains. The lever if you want more: raise the attempts per zone. In biomes that produce hardly any steep edges even with a relief (swamp, Cinderfell without relief), none appear. 100 % of the cliffs stand on edges; the facing differs from the direction of the fall by a few degrees on average.
- Height from water: in the group “Height from water” each entry has two optional fields, “Height from (m from water line)” and “Height to (m from water line)”. They set the band above or below the water line in which the entry gets places; both bounds are inclusive. Negative values are under water (−12 to 50 m are allowed). The two fields belong together: fill both or none; if only one is filled, the other is red (“the height window needs both bounds”), and “from” must not be above “to”. If both stay empty, the standard window applies as before: the entry grows from 0.5 m above the water and upwards without limit, so it never stands in the water; existing entries and worlds do not change. Examples: from −3 to −0.3 m for grass in shallow water, from 0.5 to 2 m for a strip on the beach. A window ends at 50 m above the water line at most; if you only need a lower bound you cannot set no upper limit (leave both fields empty for the standard window instead). The number of plants under water is not capped here: “Count to” applies per zone, and groups and the island slider “Growth density” multiply it. A limit by quality level comes with a later step. For entries under water, those with the “Decoration (display only)” tick suit best, because they create no server objects. The window acts where the ground lies under water (on coasts and lakes); the ground deeper than about 8 m is probably hardly visible any more (not measured). Note: this step only sets where the scatter pass hands out places. How the client draws things under water (current, selection in the water pass) comes in a later step.
- Stones on the shore and in the water: in every biome with a vegetation list, three stone entries stand at the end of the list, all using the group “Height from water”: pebbles on the shore (0.5 to 2.5 m above the water line, in small heaps), small to medium stones in shallow water (−2 to −0.3 m) and medium stones on the bottom (−8 to −2 m, sparse). These stones are real world objects, not decoration: they can be mined with the pickaxe and give stone. The character walks along the bottom of a water body (it does not swim), so it reaches the stones on the bottom as well. No stone is higher than 2 m. Biomes without a vegetation list (plains, Fogmoor, ocean) do not get them. Measured on a test coast of about 1,060 zones: about 380 pebbles, 70 stones in shallow water and 110 on the bottom, at most 18, 5 and 7 per zone. The entries stand at the very end of the list so that the rest of the vegetation does not shift; you can change, move or delete them like any entry. You set more or fewer stones with “Count to” of the respective entry; to have a biome without stones, delete the three entries. Note: a model can appear only once in the list, so using the same stone models for another height band needs a different model.
- At most pieces per zone: in the group “Amount” every entry has the optional field “At most pieces per zone”, a whole number from 1 to 10,000. It is an absolute cap per row and zone, including the re-seeding (painted growth density above 100 %: base and re-seeding together are at most that number). Several rows with the same model, or the sum of all rows, are not capped together. What counts is what is actually placed in one zone (64 × 64 m), i.e. after the island slider “Growth density” and after the groups, which multiply “Count to”. Once the cap is reached the further finds of this entry in this zone are dropped; the first ones stay, so the same world always gives the same plants. If the field stays empty there is no cap, and existing entries and worlds do not change. Why: models without a distance level (LOD) cost many triangles at high density; the cap keeps the load per zone bounded. Example: a model of 400 triangles with the cap 10 places at most 4,000 triangles per zone from this row, even at growth density 4 and painted density 200 %; if the same model stands in several rows, each row counts on its own. In the re-seeding the pieces of other rows with the same model count as well; the re-seeding of a capped row can therefore turn out smaller, never larger. A decimal number or a value outside 1 to 10,000 turns the field red and is not saved.
- Triangle budget per zone: in the box “Triangle budget (rows without far stage)” below the island defaults there is the optional field “Most triangles per zone”, a whole number from 100 to 10 000 000. It limits the sum of pieces × triangles of the model over all rows of this biome whose model has no far stage (LOD), per zone (64 × 64 m), counted after the island slider “Growth density”, the groups and the re-seeding. Rows with a far stage are not counted and not limited by this field. A far stage is exactly what the game switches off as well: an embedded far shell whose bounding box lies inside the bounding box of the near stage (most trees and pines). If the far shell lies outside, the game draws both stages; the model then counts with all its triangles (the “-dark” trees of the biomes Ice, Gloommarch, Northern mountains, Deadlands and Fairytale forest, about 15 800 to 23 300 each), and a budget below that number shuts them out completely. The rows fill the budget in the order of the list: a piece that no longer fits is dropped, a cheaper piece of a later row may still fit; if earlier rows fill the budget, later rows can stay out completely; base pass and re-seeding share the same budget, and a find counts in the zone where it is generated (even if its group reaches over the zone border). The triangles per model come from a fixed table that server and game use alike; a model missing there counts 0, and the editor names it below the field. The budget applies per biome and per zone, not as a sum over the whole zone: in a mixed zone where two biomes have a budget, each biome counts for itself, and the zone sum can reach twice the value (measured 7 834 with budget 4 000 in both biomes, Northern mountains and Deadlands, density 4, re-seeding 200 %); a neighbour biome without the field stays unlimited. The budget works only in worlds with regions (layout worlds): in a world without regions a point has no biome identifier, and the field has no effect there. If the field stays empty, no budget applies and existing worlds do not change. Measured on the ice biome (36 zones × 3 seeds, all rows including the “-dark” trees): without a budget up to 117 488 triangles per zone at density 1 and up to 697 376 at density 4 with re-seeding 200 %; with the budget 4 000 the maximum stays at 4 000 or below in all measured cases. A value outside 100 to 10 000 000 or a decimal number turns the field red and is not saved.
Tip: This biome’s table decides the species only on islands without a list of their own; the sliders of the island defaults act on every island. If a single island should grow differently, change its list in the island window and re-scatter it there — the biome standard then stays untouched.
If something does not work
- One field is red and “Save” stays locked.
- A value lies outside the allowed range, or a “from” sits above its “to”. The error line below the list names the row and the field; correct the value or remove the entry.
Underwater and shore: plants below the water line
What for?
A vegetation row can also grow under water: sea grass, stones and bushes on the bottom and at the shore. How many of them are drawn depends on the vegetation quality of the player.
How it works
- In the "Vegetation" tab open the row and enter a height window against the water line under "Height from" and "Height to" (−12 to 50 metres; negative means under water). Both fields belong together: both or neither.
- Switch "Decoration" on for the row so the plants are only drawn (no collision, not fellable). Only then do they show under water in the game.
- With the herb brush you can paint the density there, as on land.
- The number of plants drawn under water is limited by the vegetation quality (settings), per 64-metre zone: Low: none. Medium: at most 40 per model and 160 per zone, visible up to 25 metres, at most 3 meshes at once in the water view. High and Very high: 120 per model, 400 per zone, 40 metres, 6 meshes. The first finds stay, the rest is dropped; the scatter itself does not change.
- A changed quality level takes effect at once, without reloading the world. Dry plants are not affected. Swaying in the current is not built in yet. On the shore the ground is wet up to 0.20 m above the water surface: there it is darker and glossier, in a cartoon style, and this applies to every ground type.
- Inland lakes, ponds and rivers have no sea swell, only light waves depending on wind strength. The open sea and bays keep the swell.
- At the sea, individual cartoon-style foam lines run up the beach and linger briefly at the shore before fading. Lakes and rivers only get a thin foam fringe at the water line.
- About every seven seconds a wave runs from the sea towards the beach: foam bands travel to the shore, and on a flat beach the waterline moves one to three metres up and back. Only this strip gets wet; the sand above it stays dry, and after the backwash the sand dries within a few seconds. This applies to beaches on the open sea; on inland lakes, ponds and rivers the waterline stays calm and only a narrow rim is wet.
Tip: The values of the levels are plan values and will be tuned against frame time. Pictures for this chapter follow.
If something does not work
- I do not see my plants under water.
- Check that "Decoration" is on, both height fields are set and the window really lies below the water line, and that the vegetation quality is not on "Low" (no plants under water there).
Pick-ups: what lies on the ground
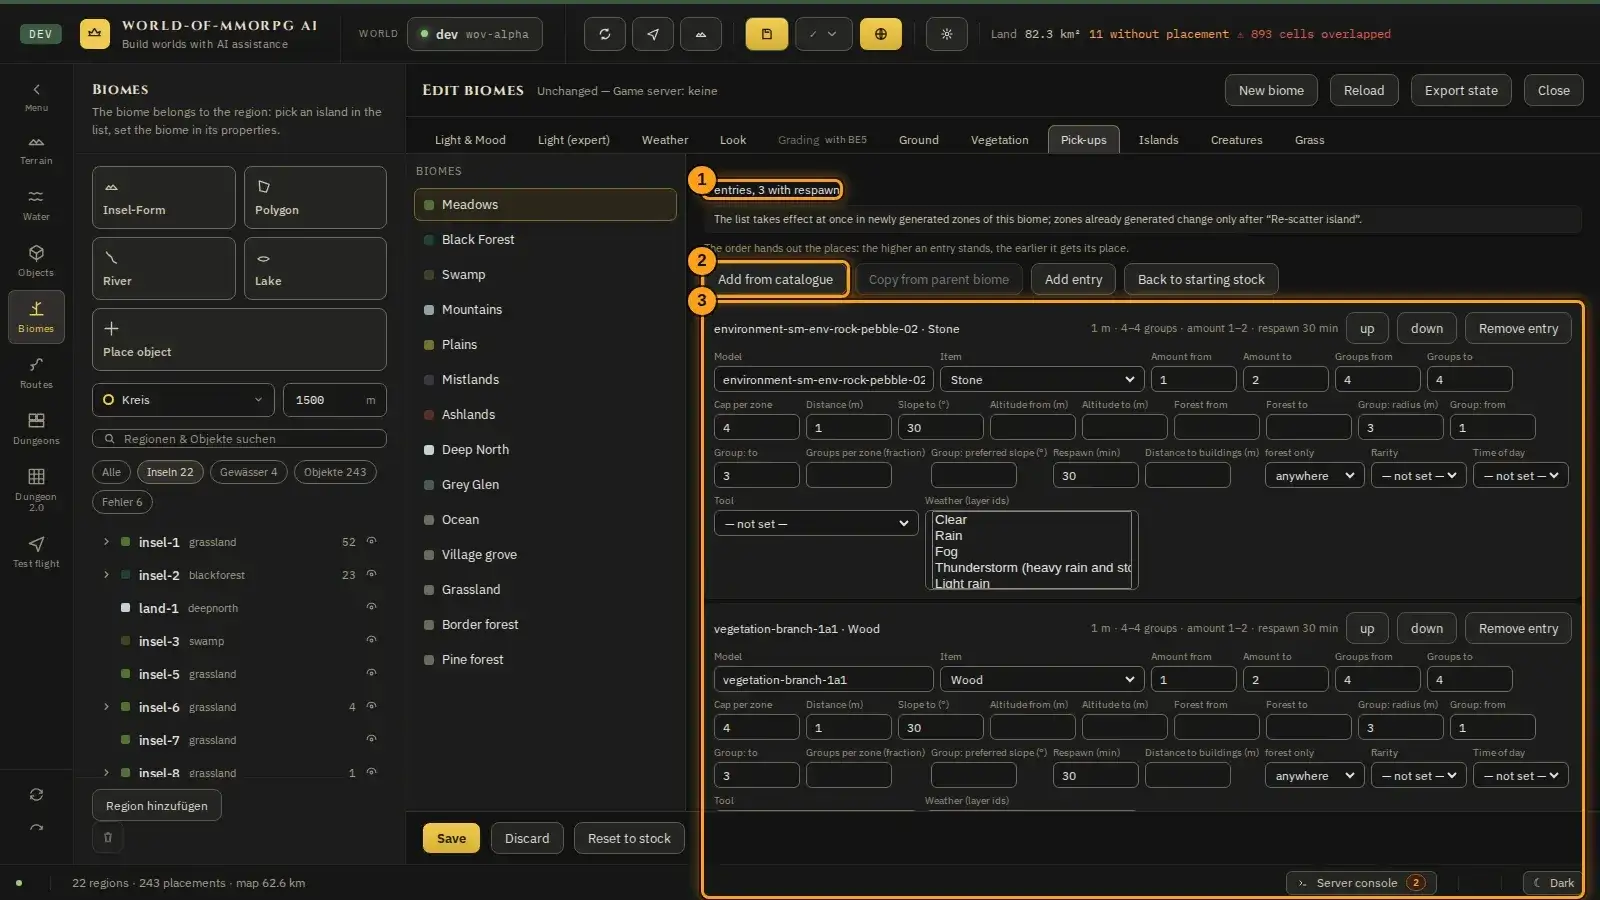
What for?
The “Pick-ups” tab sets which things — mushrooms, flint or branches, for example — lie scattered on a biome, how many there are and when they come back after being picked up. This too is set only in the biome, nowhere else.
How it works
- Open the biome mask, choose a biome on the left and click the “Pick-ups” tab at the top.
- The count line (1) says how many entries the list has and how many of them come back (“Respawn”). If the biome has no list of its own, the line above names the parent biome whose list it uses; an edit or a copy then creates its own, and a confirmed emptying also creates an own, empty list (see step 6). An own list replaces the inherited one completely — single lines do not add to it.
- Each row of the list (3) is an entry: model, item, amount, distance, slope, respawn in minutes and further conditions such as rarity, time of day, altitude range, forest, tool and weather. The arrows ▲ and ▼ move an entry; the order hands out the places — the higher an entry stands, the earlier it gets its place. An item you just created in the item editor appears in the list as soon as you enter the “Pick-ups” tab; the mask reads the item document again then. “Forest from” and “Forest to” (with the switch “forest only”) as well as “Group: radius (m)”, “Group: from” and “Group: to” each belong together: such a window is either filled in completely or left empty; for a half-filled one the error line says “is required” at the empty fields. For stones that should lie in groups you enter the group (radius, from, to — for example 6 m and 2 to 10 stones) and set “Groups per zone (fraction)”: the number of group centres per 64 m zone, also as a fraction. 0.35 means on average one group every three zones, about 108 m apart; with this field the count fields per zone no longer apply to the group centres. “Group: preferred slope (°)” makes the centre of a group lie preferably on a slope of at least this angle; the scatter tries up to eight centres and the last one stands if none fits, so a group is never lost. Both fields need a group (radius, from, to), otherwise the error line says “is required”. An entry with “Groups per zone” may fill a whole group (up to the group size “to” instead of the otherwise valid cap of 4 pieces per zone). The same seed and the same zone always give the same groups. The import from the template writes stones of 0.3 to 1.3 m as such groups: 2 to 10 stones within 6 m, together at most 0.35 groups per zone on average over all stone models, centre preferably on a slope. Pebbles under 0.3 m stay decoration, larger rocks and cliffs stay server objects.
- The field “Weather (layer ids)” is a multiple choice from the weather layers of the biome and its parent biomes, at most 16 layers per entry. A layer the biome does not (or no longer) know stays selected and is marked with a warning (“Layer unknown — this item can never be picked up in the game”); create the layer in the Weather tab or choose a known one. Saving stays possible. Layers whose id contains a comma or a semicolon cannot be chosen here; an entry that carries such layers keeps them unchanged as long as you do not touch the weather field.
- “Add from catalogue” (2) opens the searchable model list; a click appends the model to the list. “Add entry” creates an entry with default values. “Copy from parent biome” replaces the list with the parent’s (after a question; if that list is empty, the mask also asks “Empty the list?”). “Back to starting stock” inside the tab resets only this tab to the shipped state — the button “Reset to stock” at the foot of the mask resets the whole biome instead; if the biome has no pick-ups in the starting stock, the tab button asks before it empties the list.
- If you remove the last entry, the mask asks “Empty the list?”. If you confirm with “Empty the list”, the empty list is a deliberate statement: it is written on saving as an own, empty list — also for a biome that had none before and therefore inherited from its parent biome — and islands without their own list get no pick-ups. If you decline, the entry stays. The operations service writes an emptied list that had entries before only with this confirmation; otherwise it refuses to save and changes nothing.
- Nothing is written before “Save”. The list takes effect at once in newly generated zones of this biome; zones already generated change only after “Re-scatter island”.
Tip: You choose items and tools from the editor’s item document. If an id is not (or no longer) there, the field gets a red border: create the item in the item editor or choose another one.
If something does not work
- A field is red and “Save” stays locked.
- A value lies outside the allowed range, a “from” stands above its “to”, or a required field is empty. The error line below the list names row and field; correct the value or remove the entry.
- On saving, the operations service says it needs a confirmation.
- A list that had entries is being emptied without the question “Empty the list?” having been confirmed. Remove the last entry in the mask and confirm the question; then the empty list is written.
Letting a single island differ
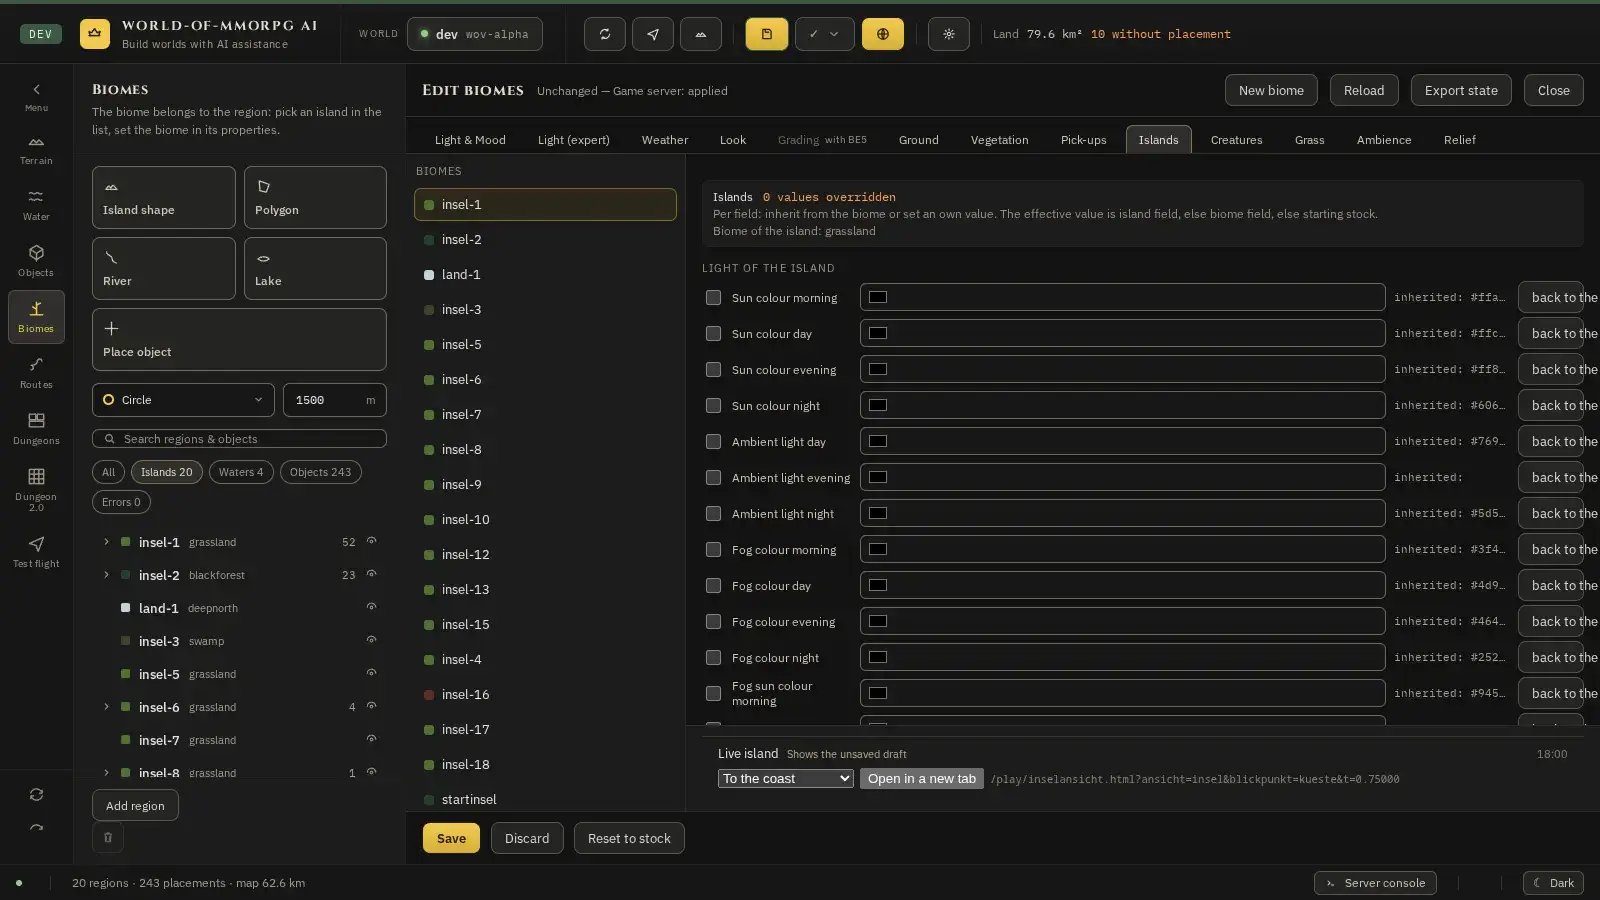
What for?
Sometimes an island should look different from its biome. Then you override individual values for that island only.
How it works
- Open the Islands tab and choose a biome.
- At the top it says how many values the island overrides (“0 values overridden”) and which biome it belongs to.
- Under “Light of the island” every value has a tick box. Tick it and enter your own value, for example a different sun colour in the evening.
- Next to it you see what the island inherits (“inherited: …”). “back to the biome” removes your value again. The order is: first the island’s value, otherwise the biome’s, otherwise the starting stock.
Creatures: which kinds appear where
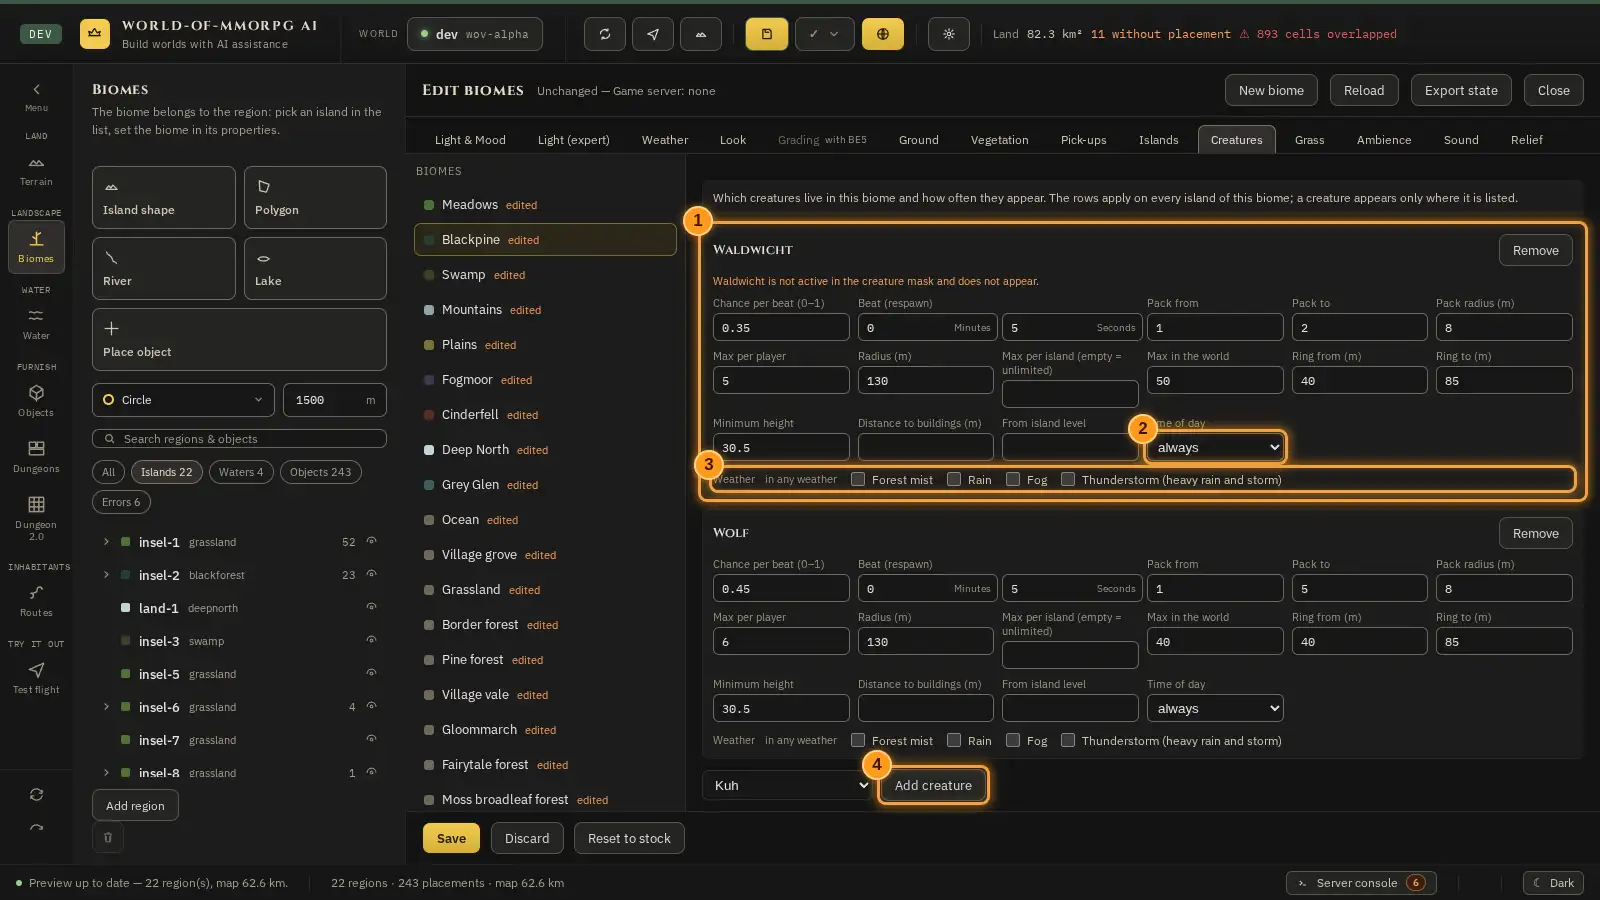
What for?
The “Creatures” tab decides per biome which creatures appear there — with frequency, respawn beat, pack size, maximum numbers and conditions. Where a biome has a block, it counts; the spawn numbers in the creature document are only the fallback for biomes without a creature block of their own.
How it works
- Open the biome form, choose a biome on the left and click the “Creatures” tab at the top.
- The table shows the creature list that applies to this biome. A hint above the table says where it comes from: if the biome has no creature block of its own, a yellow hint stands there — the numbers then do not come from a creature block of this biome. If it uses the list of a parent biome, a grey hint names it. The order of the sources is: the biome’s own block, otherwise this biome’s own rows in the creature document, otherwise the same on the parent biome. As long as you change no row it stays with that source — saving without a change does not create a block of its own. Only a changed row writes a list of its own for this biome. “Reset to stock” at the bottom of the mask leads back to inheritance: if the biome stands in the stock without a creature list of its own, the following save removes the block of its own.
- Every card (1) belongs to one creature. At the top stand its name and “Remove”, in the grid below chance per beat, the beat in minutes and seconds, pack from and to, the pack radius, the maximum number per player together with the counting radius in metres, the maximum numbers per island and in the world, the ring from and to, the minimum height, the distance to buildings and the island level.
- “Time of day” (2) and “Weather” (3) restrict when a creature appears. Without a tick at a weather state, “in any weather” applies. The water proximity of a creature (“Spawn only near water” in the creatures form, “Spawn” tab) applies in addition to the conditions of the row and to all biomes of the creature.
- At the bottom “Add creature” (4) appends another creature to the list. Only creatures that are active in the creatures form and still missing here are offered. “Remove” takes a row away again.
- The footer names errors in plain words and reminds you that the values apply to new spawns: creatures that already run keep their values. “Save” takes everything over.
Tip: A creature appears only where it is listed. Whether a creature exists at all and whether it spawns stands in the creatures form on the “Spawn” tab: there you see one read-only line per biome with the same numbers and the button “Edit in Biomes”, which jumps here — the numbers are changed only here in the biome. Spawn numbers apply per biome: if this biome has a list of its own it overrules the creature document; if it has none, the numbers of the creature apply. The creatures form shows such a difference in a block in the warning colour.
Advanced light and grading
In development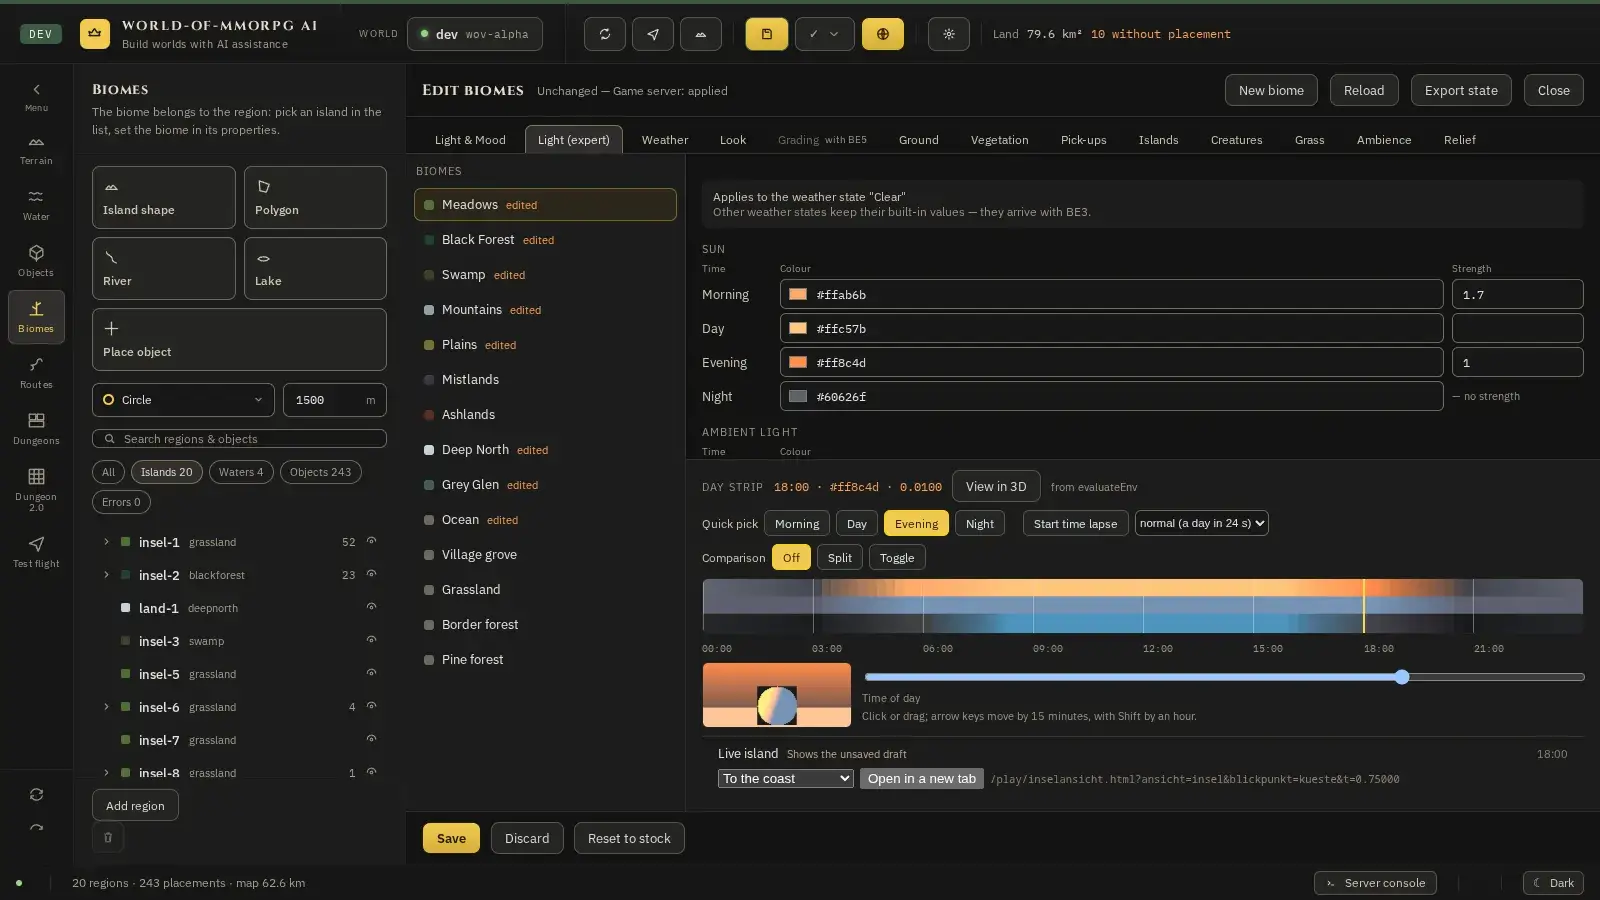
What for?
If you want full control, you set sun colour, sun strength and ambient light for each time of day yourself.
How it works
- Open the Light (expert) tab. At the top it says for which weather situation the values apply, for example clear.
- Under “Sun” you enter a colour and a strength for morning, day, evening and night. You write colours as a colour code, for example #ffab6b.
- Under “Ambient light” you set the light that remains even in the shade, and under “Fog” the fog colour and density for each time of day. The “Fog colour night” (the night sky) acts, as soon as you enter it, in all weather states of the biome with colour and brightness; unset, the weather state applies.
- The “Grading” tab for the colour mood of the whole picture already exists but is still locked.
The 3D preview
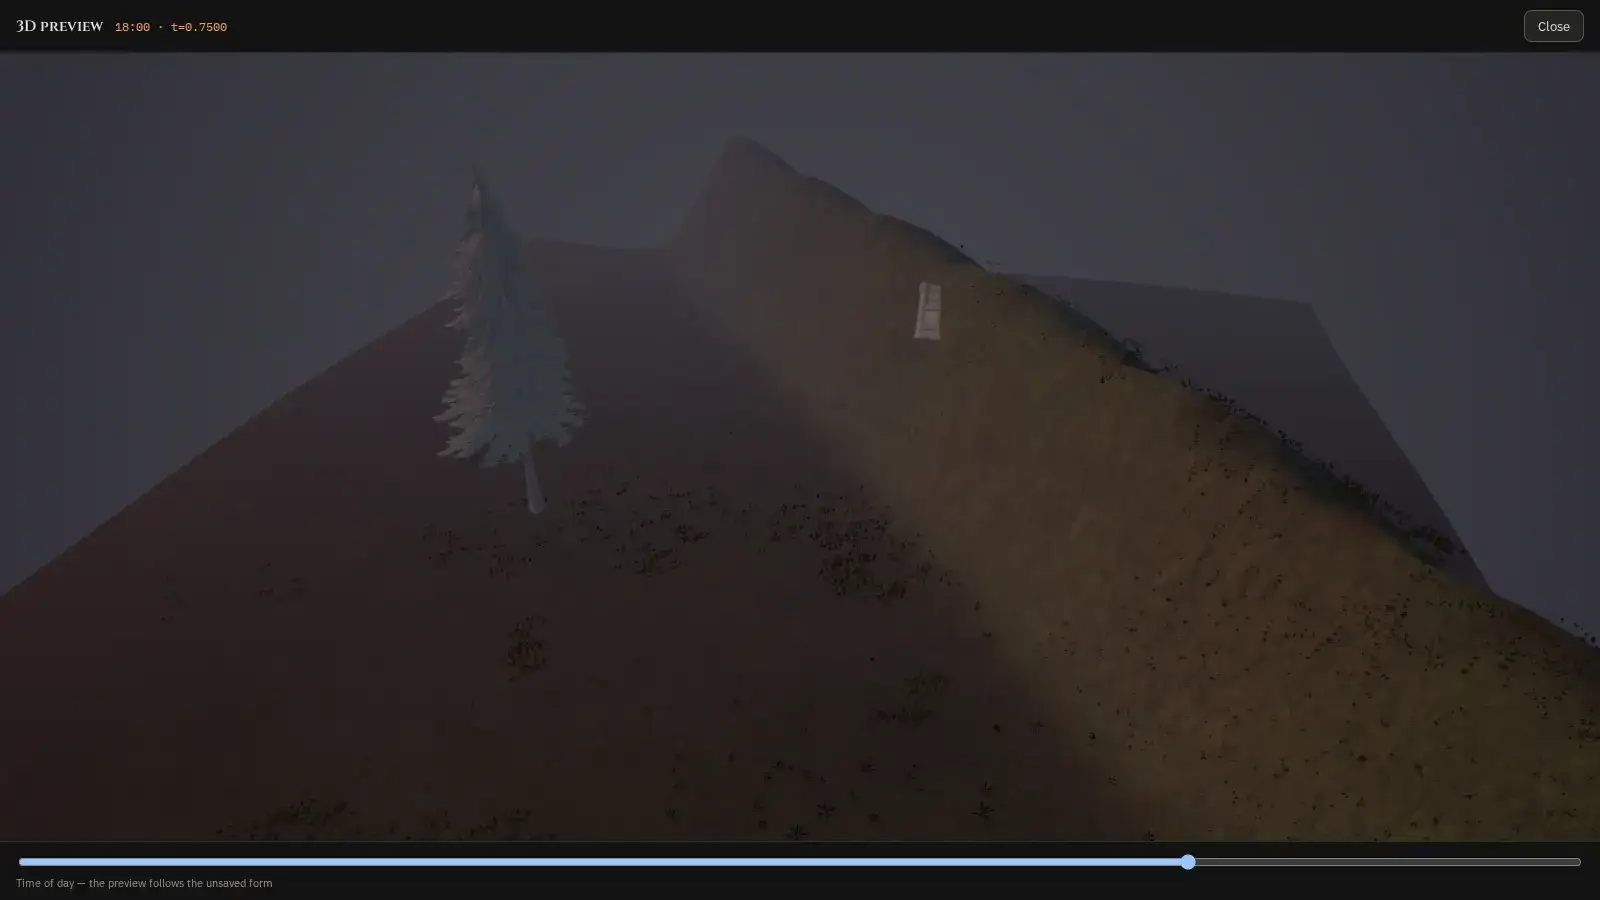
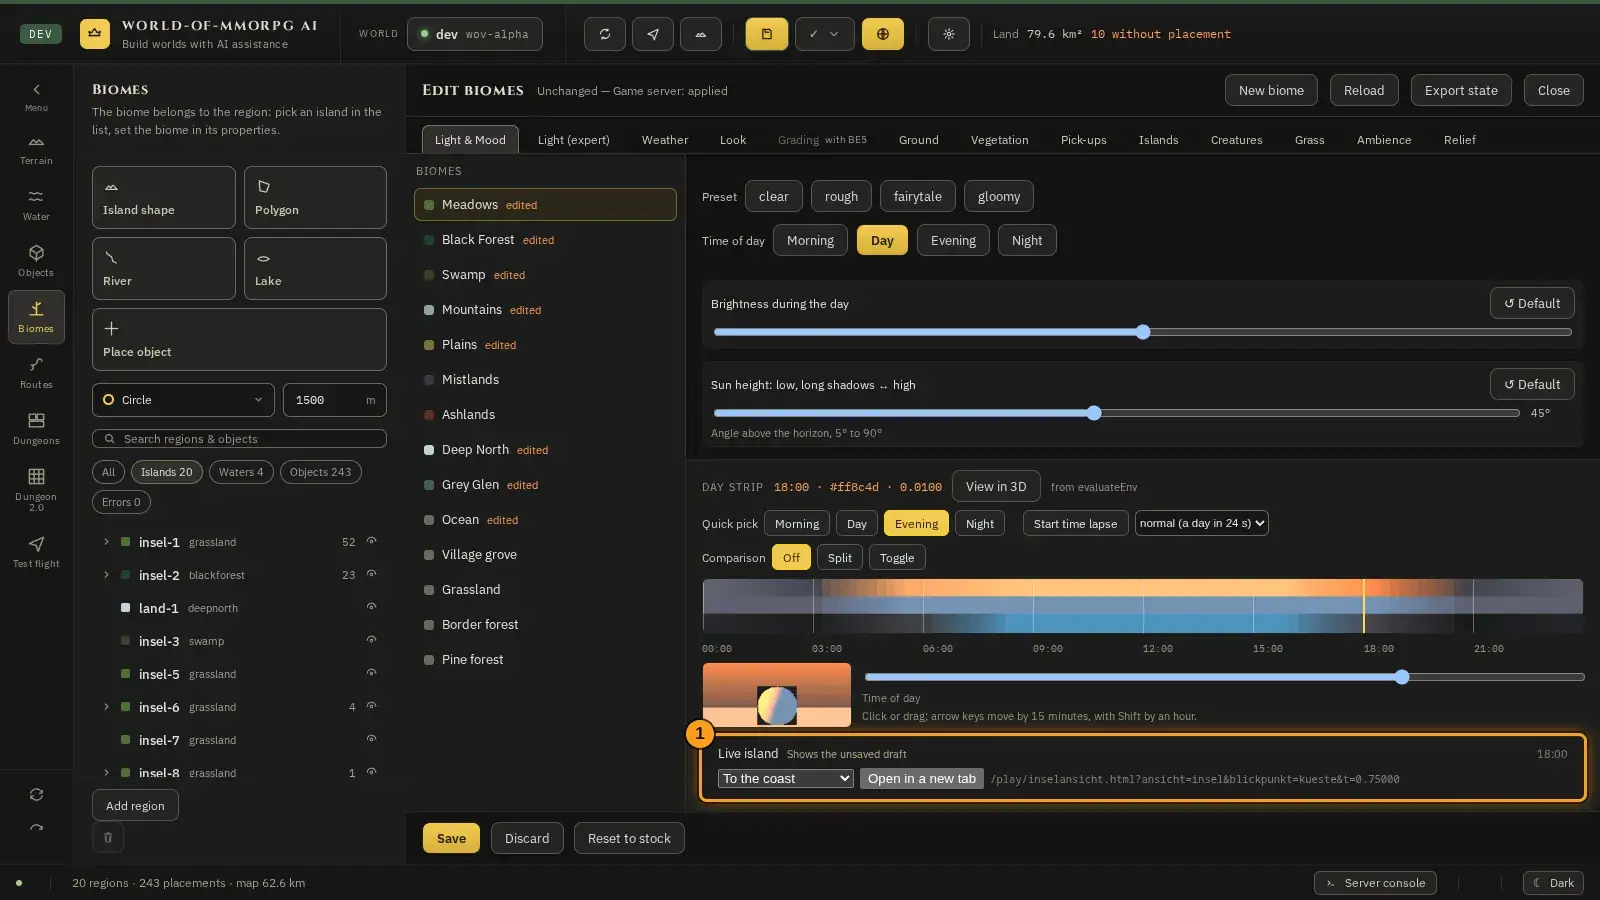
What for?
The 3D preview shows your biome as a small piece of terrain before you save. That way you immediately see how light and colours feel.
How it works
- In the tab “Light & Mood” (or “Light (expert)”, “Weather”), click “View in 3D” in the day strip at the bottom. The preview opens over the form.
- The slider at the bottom sets the time of day. The preview follows what you have set, even if it is not saved yet.
- “Close” takes you back to the form so you can keep refining.
- In the tabs “Light & Mood”, “Light (expert)”, “Weather”, “Ground” and “Islands” the frame “Live island” sits under the time band or at the foot of the form (it is absent in Vegetation, Pick-ups and Creatures, because nothing visible depends on your draft there). It shows no embedded picture: choose one of four view points in the dropdown — “To the coast”, “Towards the village”, “Into the forest” or “From the mountain” — and then click “Open in a new tab”. Only that click opens the view as a page of its own; choosing the view point beforehand only changes the address named in the frame. Every view point builds the same view at another spot, the clock follows the time band (in “Ground” and “Islands” there is no time band: the time last chosen in a light tab applies there), and the note “Shows the unsaved draft” reminds you that the view shows the draft, not the saved state.
Tip: The live island shows the unsaved draft; a reloaded view tab fetches the current state by itself. The weather only applies when the view is built — light and ground follow live. The view is offline: it shows no server state, and figure, HUD and camera movement are off there.
Creating a new biome
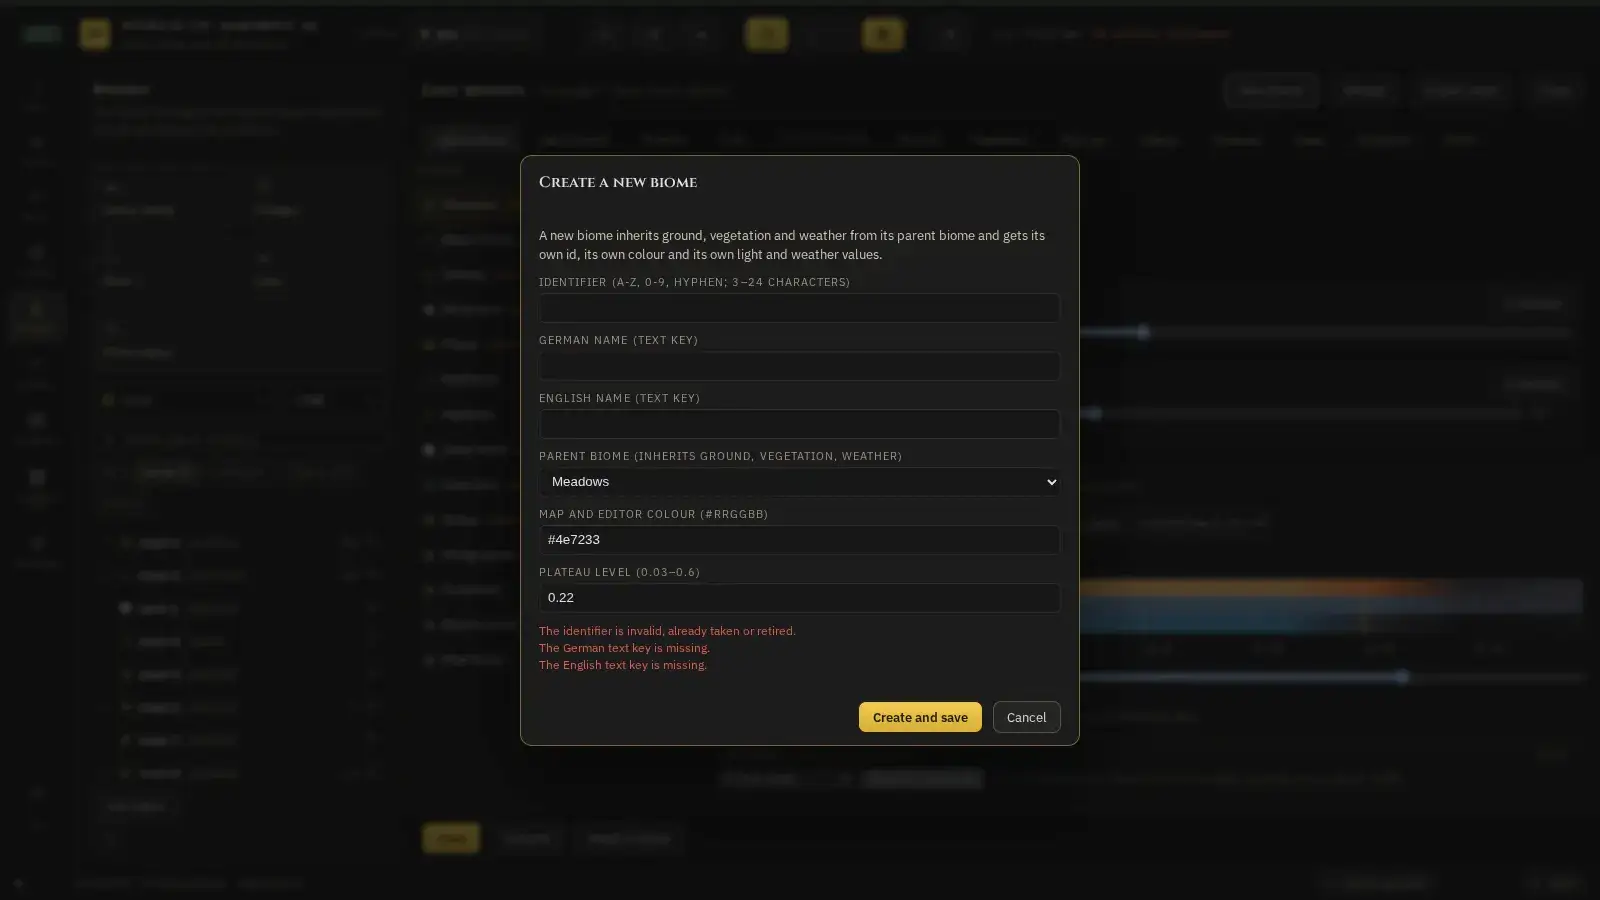
What for?
If no existing biome fits, you create a new one. It inherits ground, vegetation and weather from a parent biome, and you only change what should be different.
How it works
- Click “New biome” at the top right of the form.
- Enter an identifier: letters from A to Z, digits and hyphens are allowed, three to 24 characters.
- Enter the names in German and in English (“German name” and “English name”; they are text keys) and choose the parent biome.
- Choose a colour for the map and the editor and a base height (called “Plateau level” in English) between 0.03 and 0.6. The biome appears in this colour on the world map in the game (key M) and in the editor’s map image, and the outline of its regions uses it too.
- Click “Create and save”. Red hints appear below the form while something is missing or invalid.