
Test flight and building in the game
The test flight takes you through your draft in the real game, and you keep building there: place and align objects, shape terrain and save.
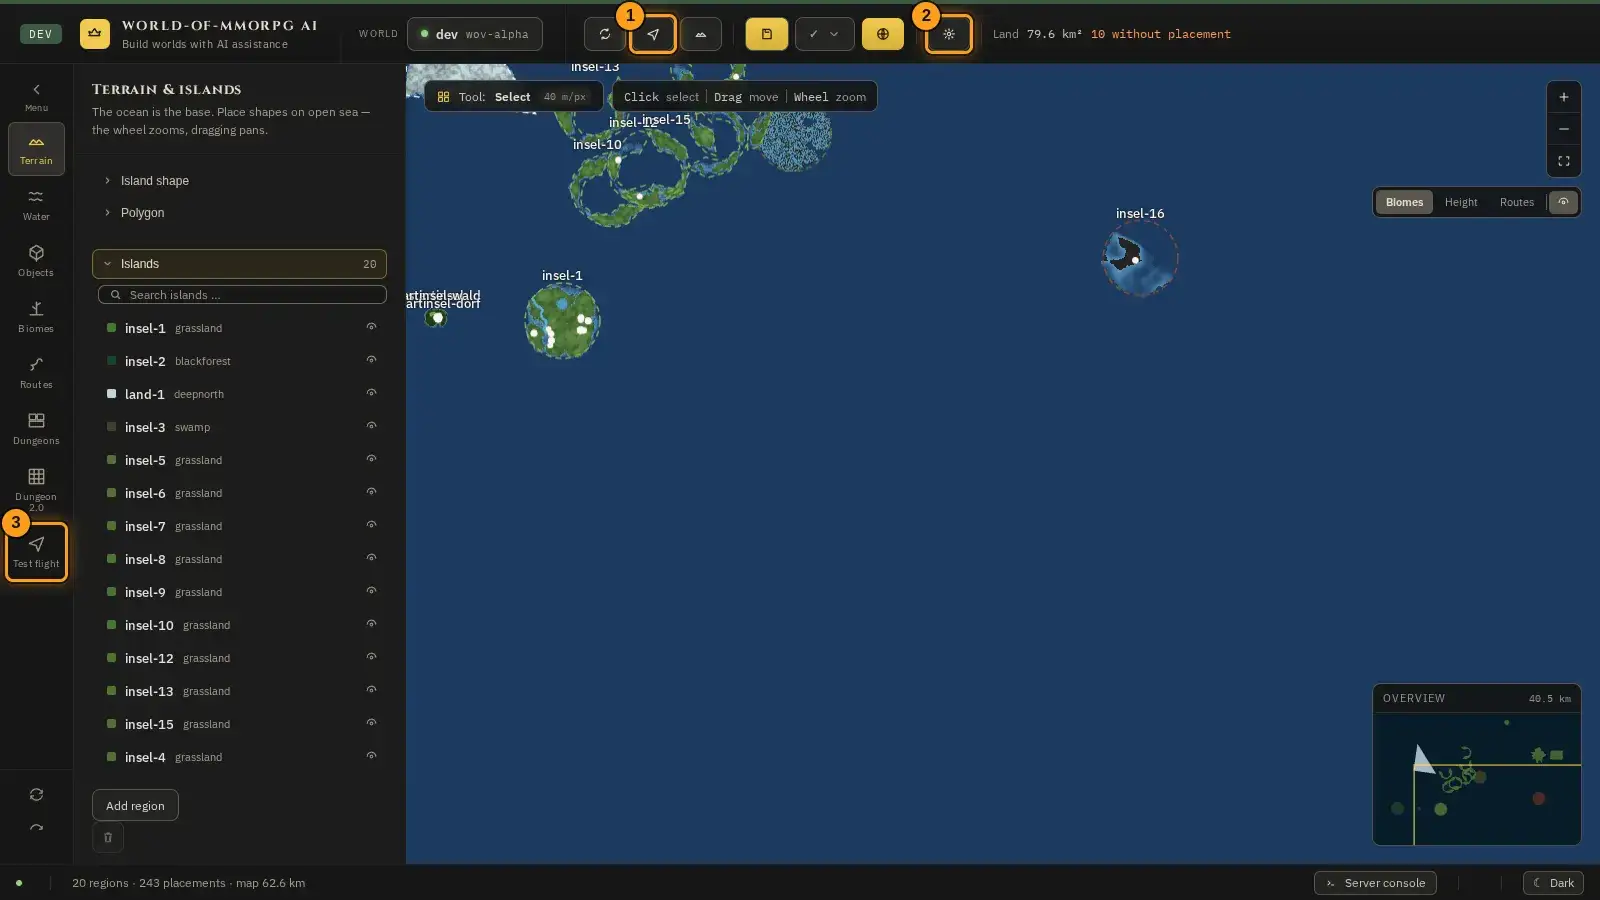
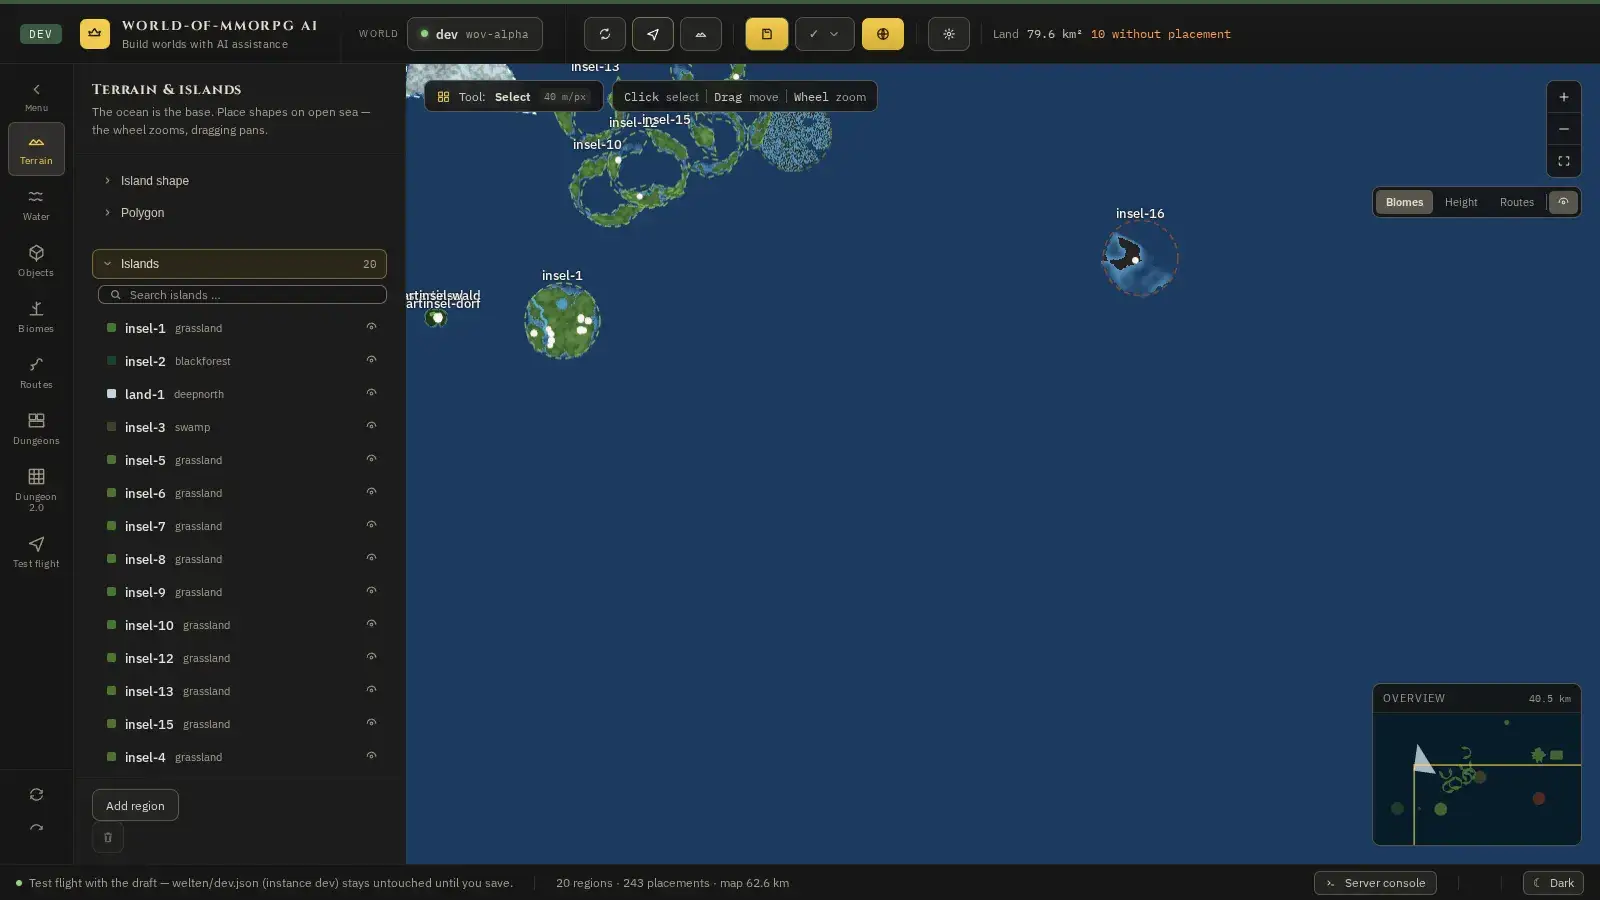
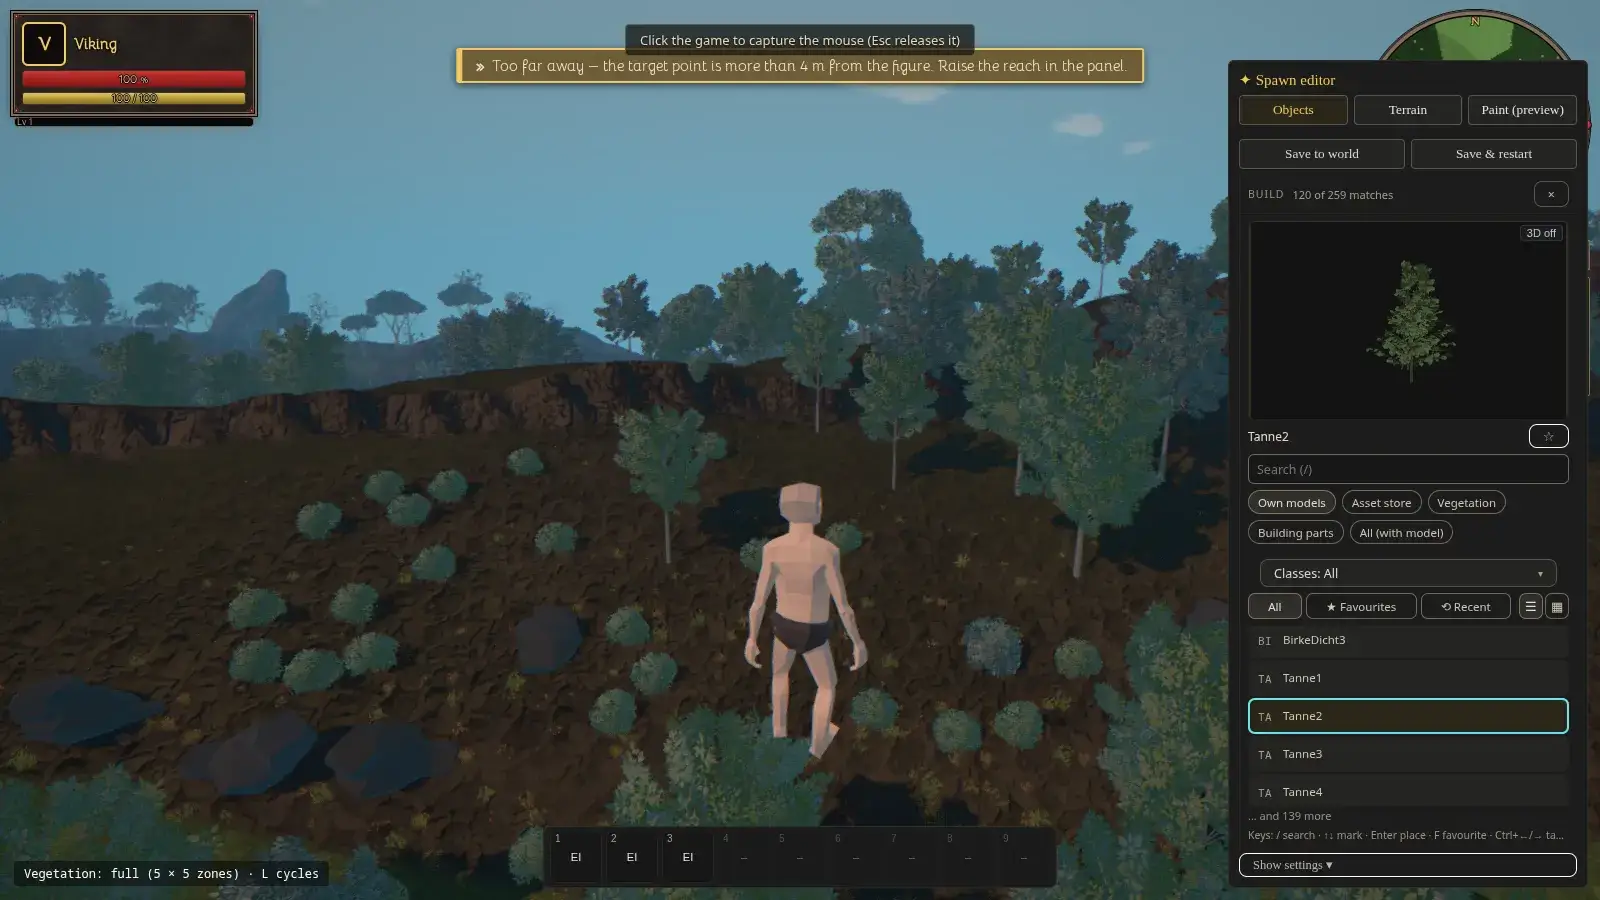
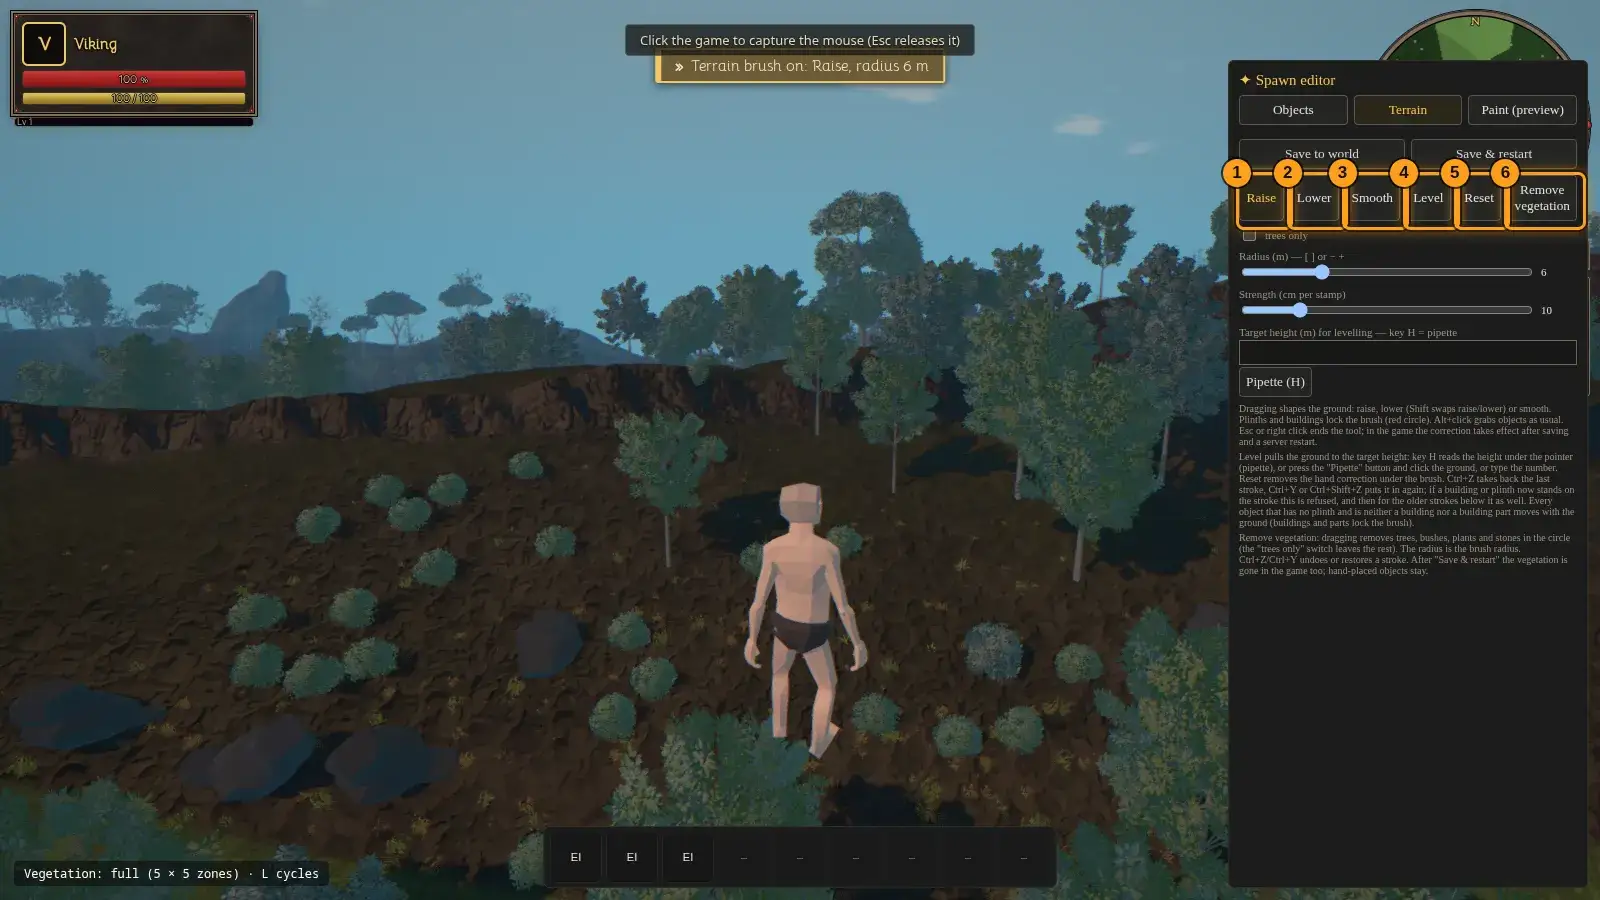
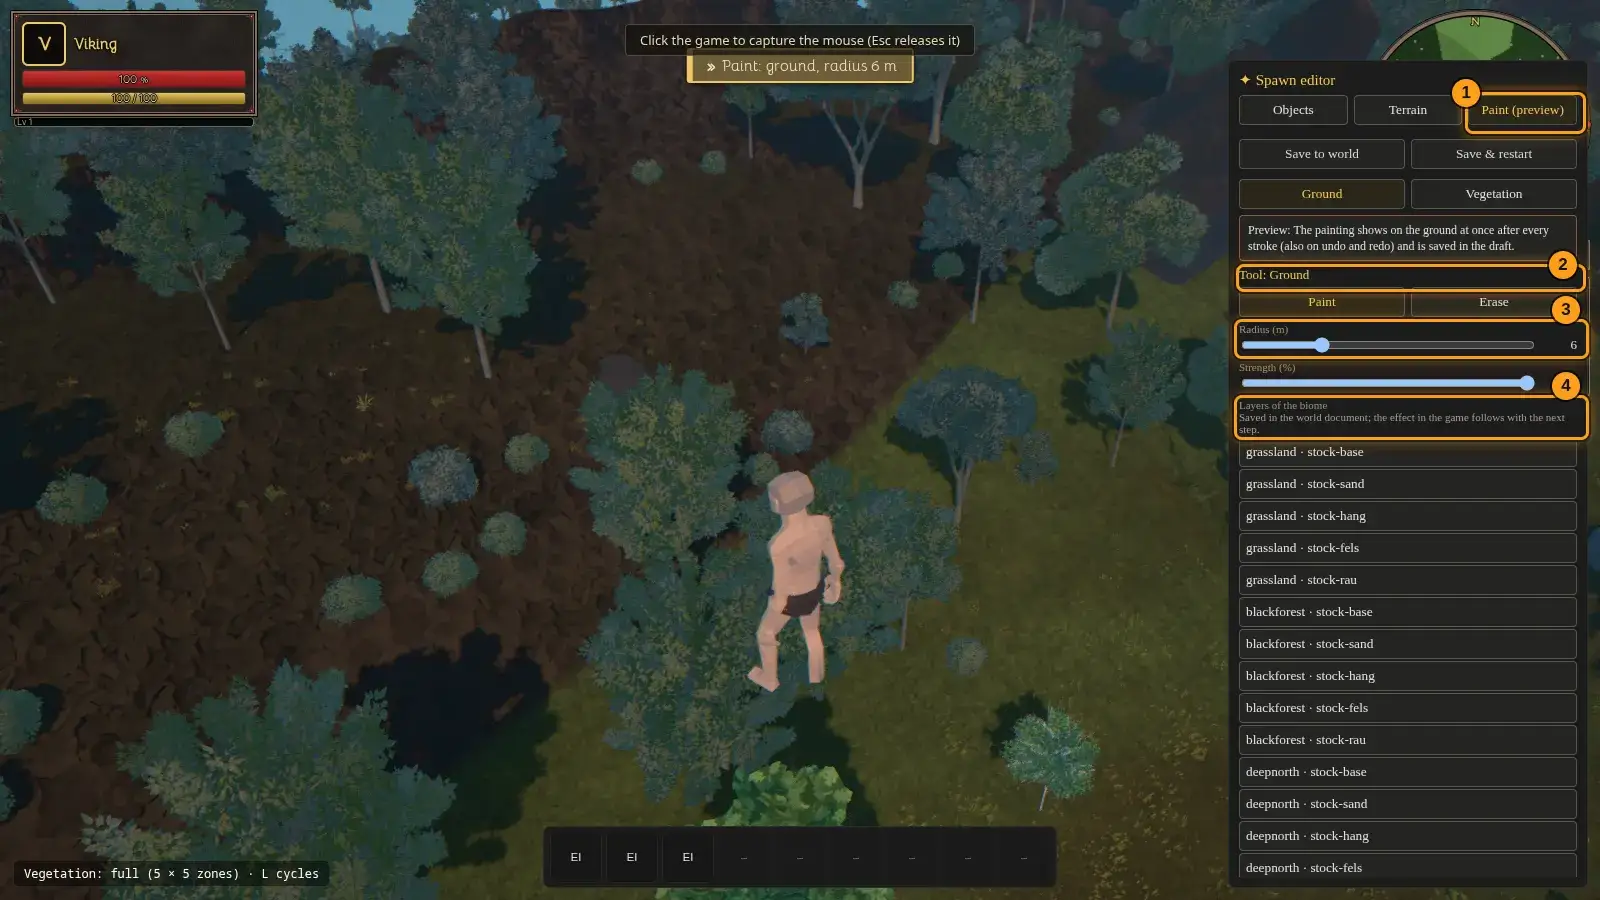
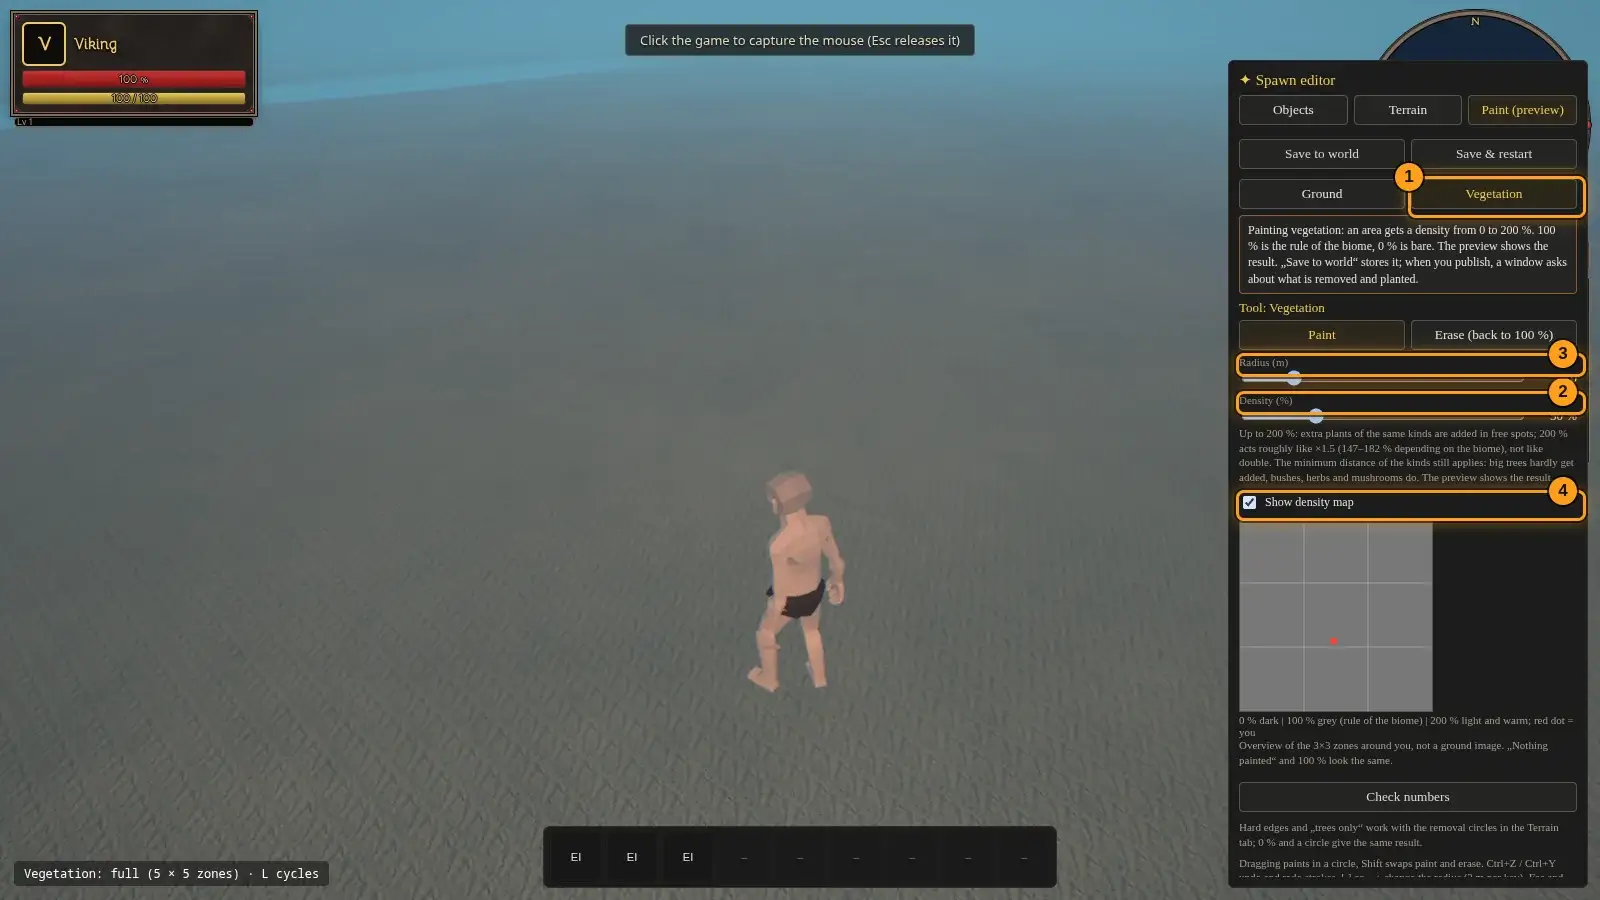
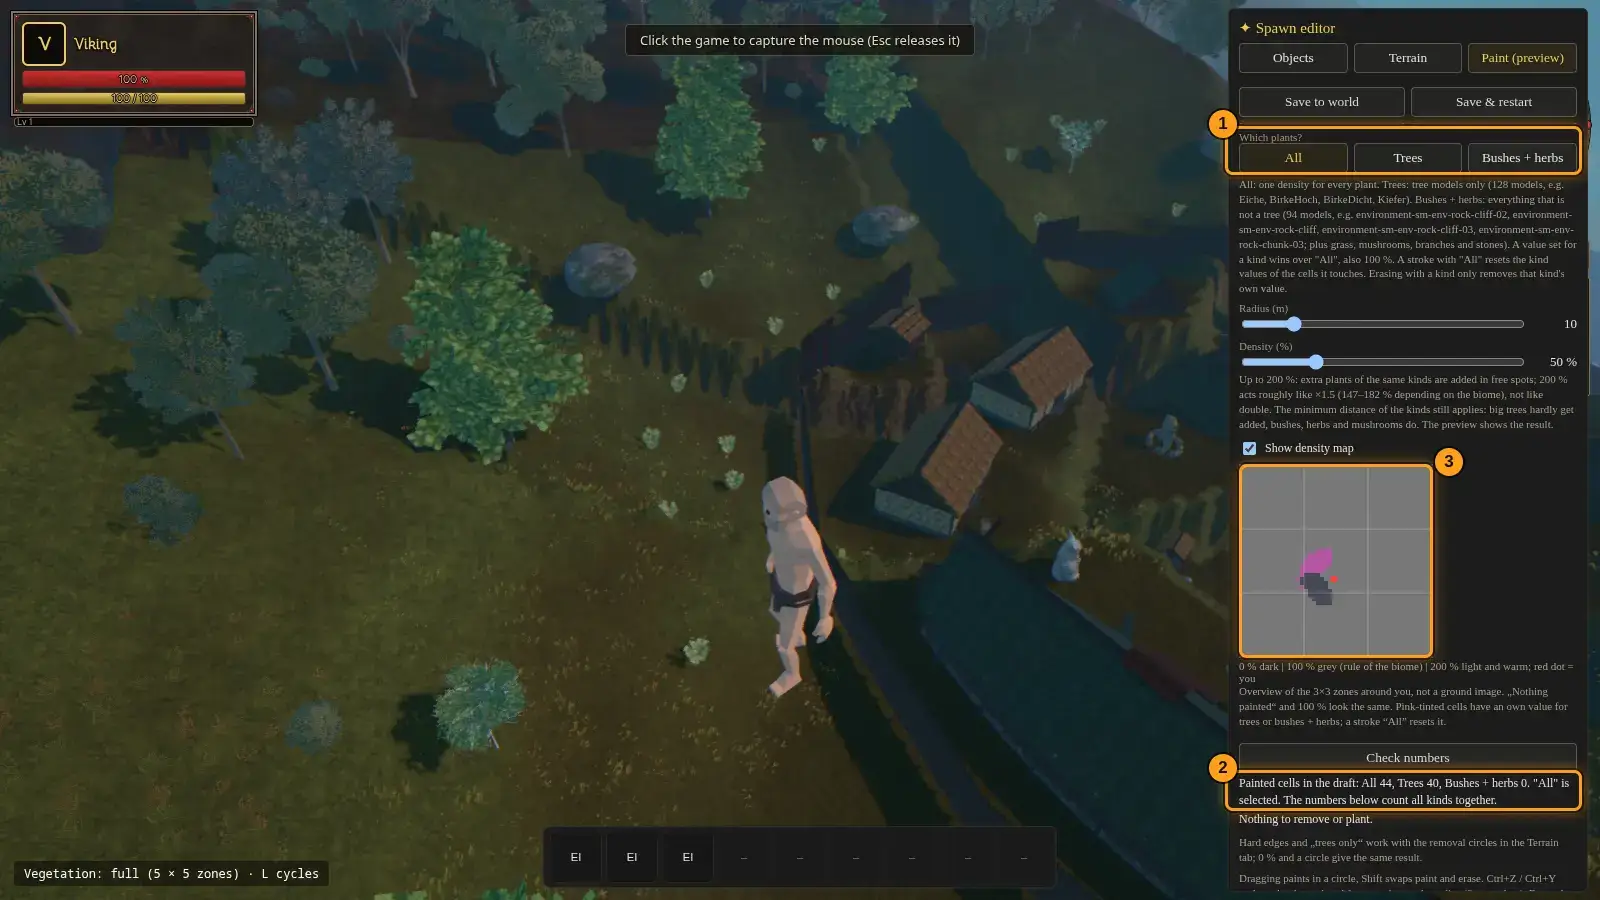
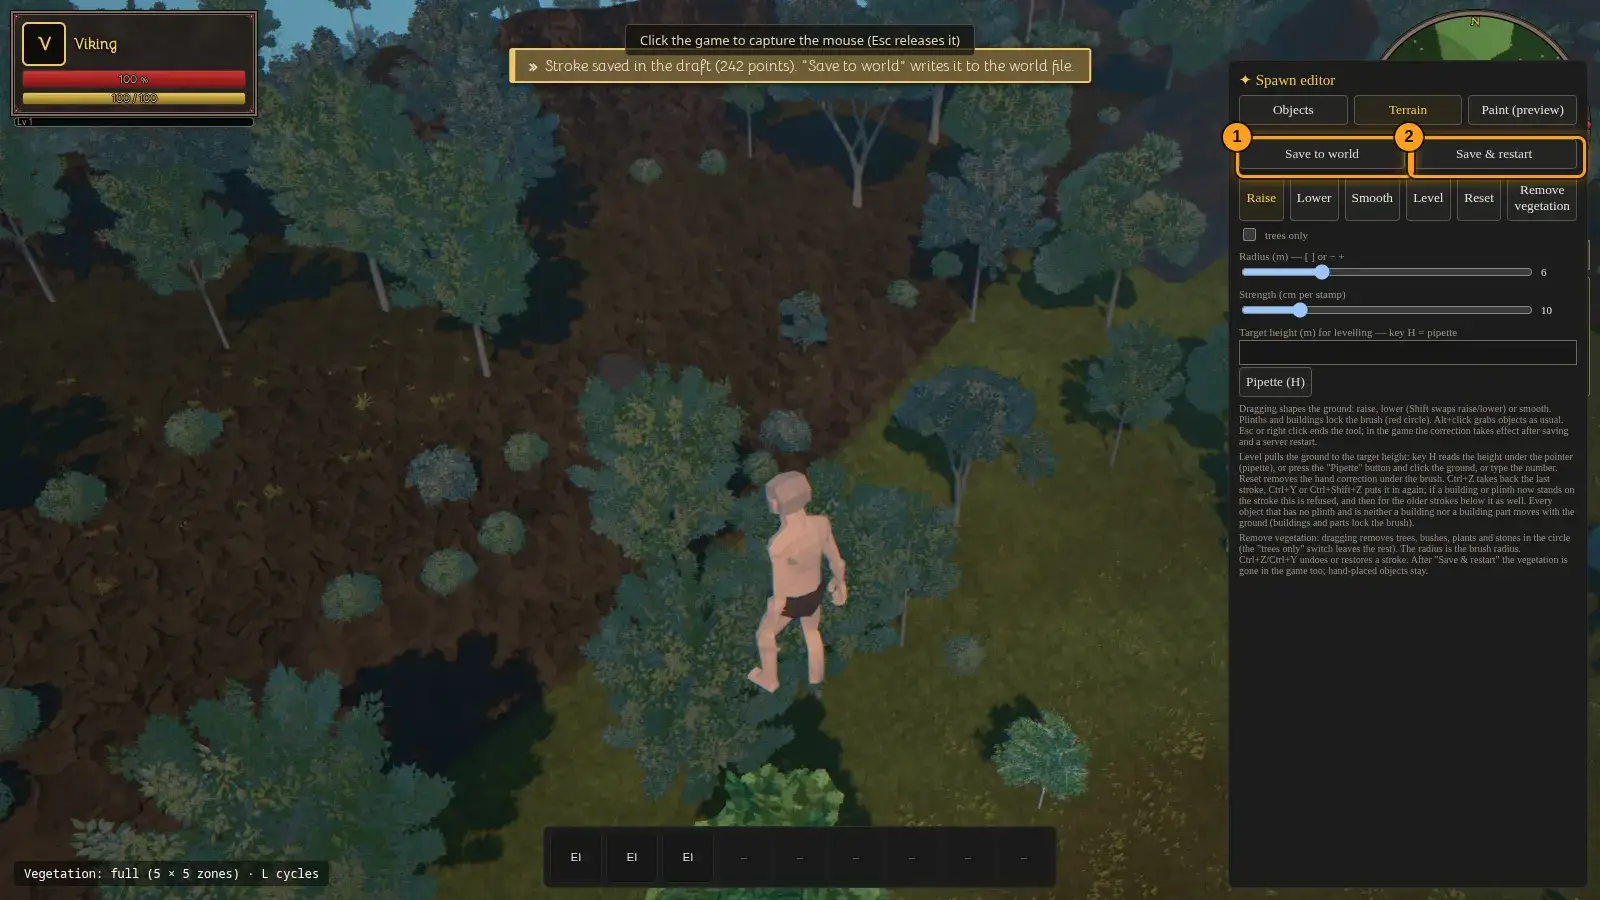
The pictures show the editor with sample data. The orange frames and numbers refer to the steps in the text.
Starting the test flight
What for?
The test flight opens the real game in a new browser tab, but with your draft. You see your world as players will see it, and the world on the server stays untouched until you save.
How it works
- Click the test flight button (1) in the header bar or “Testflug” (3) on the left. A new tab opens. For the fresh map on the game server, use “Operations ⋯” › “Test map live” at the top right instead (see “The Operations menu”).
- If you want to begin at a particular island, open the island list (2) next to it and click “Enter in 3D” at the island.
- Or hold the mouse pointer over a spot on the map and press the T key. The test flight then begins exactly there.
- “Close” leaves the island selection again.
- In the options window (tab “Grafik II”) the button “Combat particles” switches the combat hit effects off: hit flash, sparks, blood, water splashes and the slash arc. Off means no more particles are created. The address suffix ?partikel=off does the same and leaves the saved setting untouched.
- When harvesting soft targets (bushes, branches) the hit depends on the ground: dust rises on sand, blades fly in grass, drops splash in water. A tree throws sparks and splinters (wood), and so does a rock (stone). A hit on a creature shows blood, whatever the ground. The direction of the burst follows the blow and its size follows the damage – for every hit near you, not only your own. Attacks by creatures have no blow direction; there the particles fly all around.
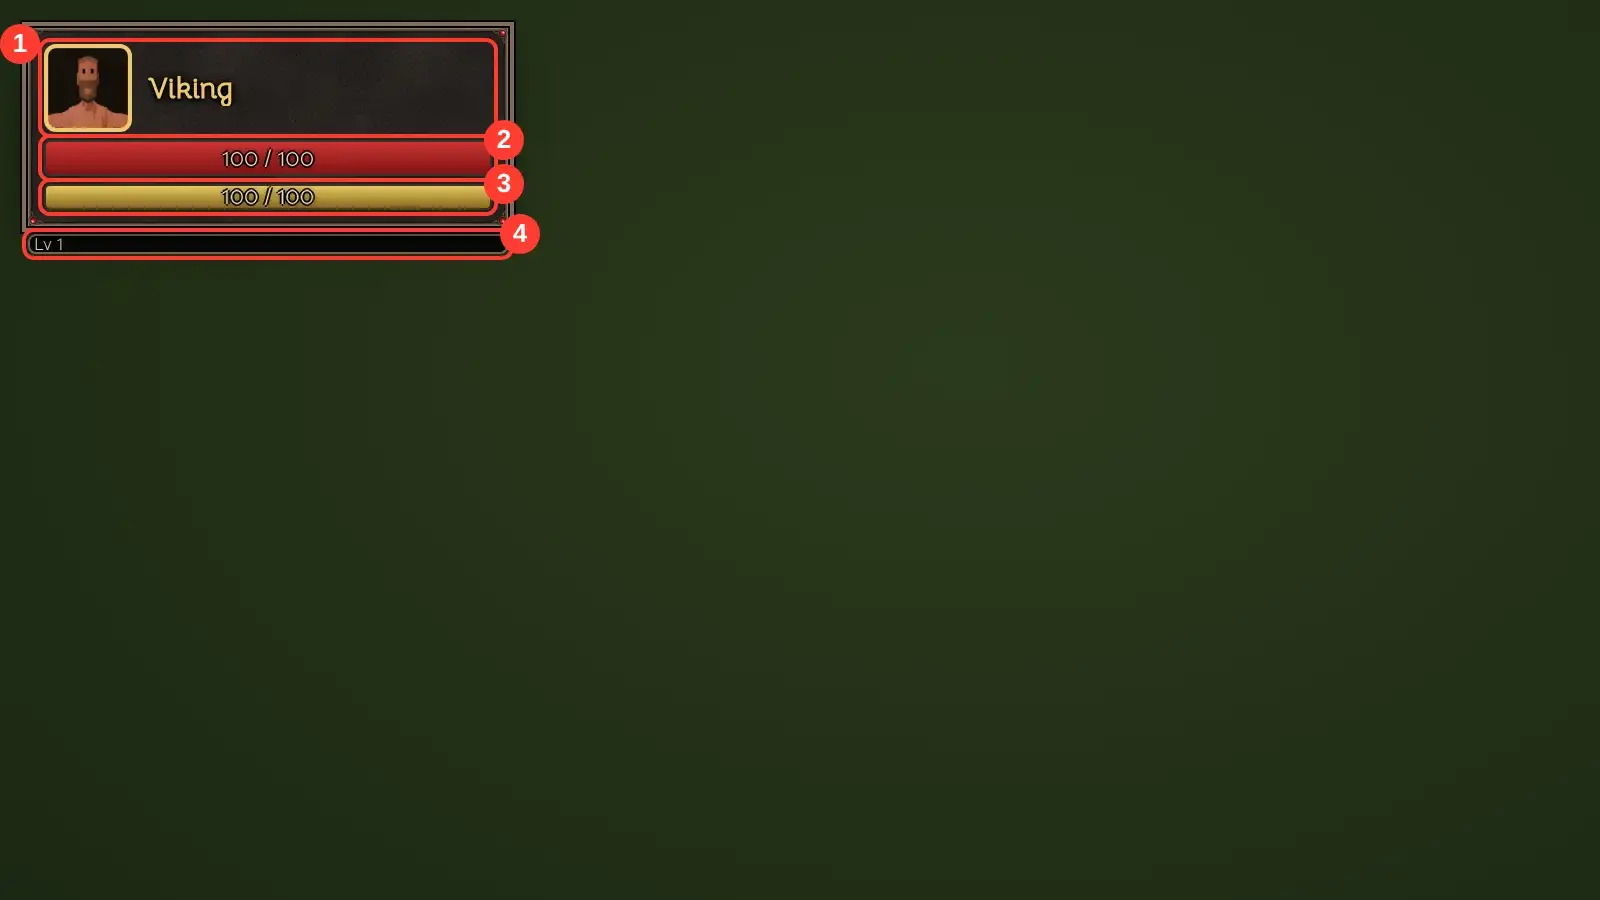
- In the test flight you see your HUD as in the game. All parts of the HUD – character field, target frame, experience frame, boss bar, minimap with time bar, message strips, name plates and object names – wear the same look as the windows: dark stone ground with a metal rim and red corner gems, the minimap with a round metal ring. Only the look is new, the bar colours keep their meaning (red life, gold energy, blue mana), and name plates sit on a dark ground so they stay readable on bright terrain. At the top left is the character field: on the left the picture of your figure – head and shoulders with face, beard and shoulder line (the arms stay outside the picture), always evenly lit and therefore equally bright at any time of day and in any weather; when your appearance changes (hair colour, clothes or armour), the game takes a new picture shortly after; while there is no picture yet or the capture does not succeed, the box shows the first letter of your name –, next to it your name – it shows no level yet, because there are no experience levels yet. Below lies the life bar with the life points as “current / maximum”, for example “72 / 100”; the maximum rises with armour and with a food bonus, and the number follows it. The bar below is the “Energy” (stamina, “64 / 100”), which drops while you run. Large numbers are compact (“1.2k”). A mana row is prepared but stays invisible as long as the server sends no mana (today never); a row for strengthening effects lies below it and shows what currently strengthens you – today that is food (see “Buffs and food”); without a server it stays empty. An older server sends no maximum, and the test flight without a server has none at all: the life bar then shows only the percentage – in the test flight it reads “100 %” with a full bar, and the box carries the name “Viking”. After your death the character field shows 0 life until you live again. Below the character field lies the experience frame. When a creature hits you, a red arrow in the middle of the screen points to the side the blow came from; after your death no more arrows appear. If the creature is a boss (kind “Boss” in the creature document), its bar with the name and the share of life appears at the top centre. Bosses are recognised by the kind in the creature package: without the package (switch off) there is no boss bar. The bar shows the nearest boss within 40 m; a boss that has hit you keeps it for 8 seconds, even if it stands farther away.
- At its start the test flight loads the creature state from the Creatures mask by itself. A creature whose “Size (factor)” is not 1 therefore appears in the test flight at that size and acts with the matching reach and speed. In the live game with a server, a change from the mask takes effect after the next package, also for animals that stand still: the figure grows or shrinks at once, and the server updates body, reach and speed of the living animals; they neither have to move nor respawn. A change you save in the mask while the test flight is running only counts in the test flight after its next start. After a roll-out, reload any open browser tabs.
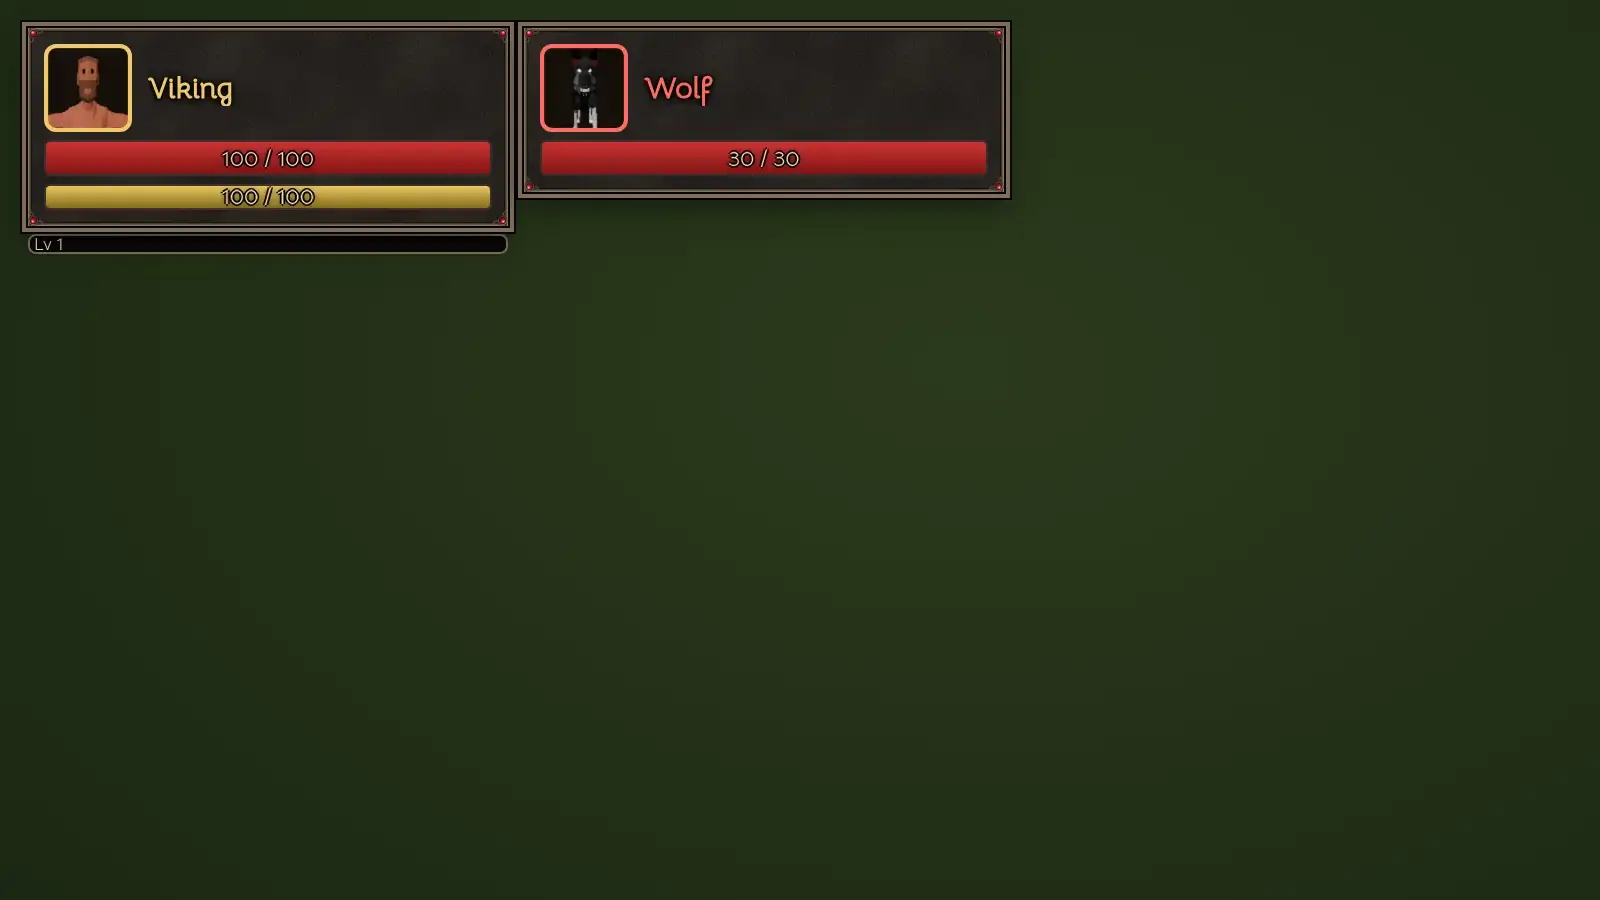
- You see the target as a frame at the top left, to the right of your character field. It appears as soon as you have selected a target (step 10). On the left is the picture of the target – head and shoulders for beings of human shape, for example other players, the front part of the body from the front and slightly above for animals and monsters (for the wolf the head with its ears, the chest and the light front legs down to the bottom edge of the picture; the picture is narrow); as with the character field the picture is evenly lit, whatever the time of day and weather; when you switch the target to a being of the same kind, the picture is back at once; while there is no picture yet, the box shows the first letter of the name –, next to it the name in the language of the game, and below it the level when it is known (“Level 9”) and the kind: for creatures “Animal”, “Monster” or “Boss”, for figures their role (“Villager”, “Quest giver”, “Merchant”). Below lies the life bar with the life points as “current / maximum”, for example “15 / 30”; large numbers are compact (“1.2k”). The name and the border of the box show the stance: red is hostile, gold neutral, green friendly. Another player has neither a known name nor life points: the frame then shows only “Player”, without a life bar. There is no mana row on a target; a row for strengthening and weakening effects is prepared and stays empty until such states exist. The frame disappears when the target dies, stands more than 40 m away, is no longer loaded, or you drop it with Escape. If the target is a boss, the frame replaces the boss bar at the top centre, so it does not appear twice. With any other target the boss bar stays but moves to the right so that it touches neither the frame nor the minimap; the messages at the top centre move with it. In a narrow window (under 998 pixels wide) the frame sits below the character field instead of beside it; in every window the boss bar keeps clear of the character field and the minimap. The yellow crosshair for aimed-at objects stays as it is.
- You acquire targets in the game itself: Tab selects the nearest hostile or neutral creature that is alive, at most 40 m away and at most 60° off your line of sight; every further Tab moves on to the next creature in range in order of distance, from the last one back to the first. Shift+Tab goes backwards, Escape drops the target (if a window or the build menu is open, Escape closes that first; with the mouse captured, releasing the mouse with Escape already drops it in case the browser does not report the key). A left click on a creature selects it, friendly figures and other players too; a click on nothing leaves the target as it is. The first click after Escape only captures the mouse again; only the second one selects. The target is dropped when it dies, stands more than 40 m away or is no longer loaded. With the hammer in your hand Tab stays the build menu – switch to another item with the digits 1–8 first to select targets. The target is yours alone and is not reported to the server; its display is the target frame from step 9.
- You talk to figures with the E key: walk up to a resident, quest giver or merchant, to within four metres, and press E. A window opens with the figure’s name at the top, its role below it and a text; conversations with replies come later; a merchant that has nothing to offer but trade opens the merchant window at once when you talk to it; if it has something else to offer as well, the “Trade” button opens the merchant window (chapter “Merchants: trading and price lists”). The greeting of a merchant that has nothing else to offer stands as one line under the title of its merchant window, because no conversation window opens for it; the default line does not appear there. You set the text in the editor: select the figure in the world during the test flight; the block “Character (selected placement)” holds the fields “Greeting (German)” and “Greeting (English)”, each at most 240 characters (a counter below the field shows “characters / 240”; visible characters are counted: a composed emoji such as a family, a flag, or a letter with an accent also counts as one character, and a text that is too long is never cut in the middle of a character). The window shows the greeting in the language of the game; if that language is empty, it shows the greeting of the other language. If you leave both empty, the default line (“… nods to you.”) is shown. A greeting is one line: in the field the browser removes pasted line breaks, and line breaks or control characters that come from a world file become spaces when saved. Invisible zero-width characters and characters that reverse the writing direction are removed; if the greeting consists only of such characters, the default line is used. The text always appears as plain text. It is only a text, not a dialogue tree. For the role “Monster” the fields are locked and a note explains why; a greeting that is already entered is kept and applies again when you set the role back. Monsters and figures that are hostile to you cannot be talked to; you only see a short message. If an object such as a door stands closer to you than the figure, E acts on the object. The window closes with Esc, with the “Close” button, as soon as you move more than five metres away, when you open another window (map M, inventory I, crafting C, character K, build menu Tab), when you die and when the world changes. Conversely, an open chest closes when the conversation window opens. At every attempt the server decides whether the figure can be talked to and whether you stand close enough.
- With a bow in your hand you shoot with the left mouse button: hold it down to draw the bow and release it to shoot. The server measures the draw by the time you held it: if you release at once, the shot has 50 % force; after the draw time of the bow (default 1 second, adjustable in the Items editor) it has 100 %, holding longer adds nothing. The force sets the speed of the arrow and the damage. The arrow flies from the bow to the point the crosshair points at (within a small angle of your look direction), drops along its path and ends at the ground, at a wall, a roof, a ceiling or the top of a low wall, at a ridge of the terrain in its way or at the range of the bow (default 80 metres); it flies over a low wall when its path lies above it. Only creatures are hit, no other players; the first hit on the path counts. At least 0.4 seconds pass between two shots. At most 16 of your own arrows are in the air at once, and at most 64 in the whole world; further shots do not fly; the 16 count for you as a player, even if you reconnect. When a shot is dropped (too fast, weapon changed, no bow in hand, no arrows, too many arrows in the air), the game shows you a line about it, at most one every 5 seconds. You cancel the draw with Escape, and also when you change weapon, roll, open a window, release the mouse pointer or die; then no arrow flies. While you draw, a ring in the middle of the screen fills over the draw time of the bow; when you release, the game sends the shot to the server. Your arrow flies off the bow the moment you release, exactly where it lay on the string; every player within 80 metres sees it as soon as the server has accepted the shot. The server calculates the path: it starts at the left hand that holds the bow (only if that point is at most 1 metre from the eye, otherwise at the eye) and runs to the point under the crosshair, with the random spread; your arrow joins it without a jump; it is thick and bright and draws a short trail behind it that starts at the bow and grows with the flight, so you can follow its path. If it hits or strikes something it stays stuck in the target for about five seconds, its tip slightly inside the surface, and fades out during the last half second; if it reaches its range in the air it fades out on the spot. At most 8 arrows are shown at once, the oldest go first. When a shot is dropped, no arrow flies for anyone else; your own arrow disappears again after one second at most, and the line above gives the reason. With the bow in your hand the figure stands in the ready pose: it holds the bow in the left fist at an angle in front of the body, while drawing it stands upright, and as long as you have arrows one lies on the string (nock at the right hand, tip towards the bow); with 0 arrows none lies there. The arm poses are real motion sequences (carry, draw, release): when you draw, the figure raises the bow arm forward and pulls the string back with the right hand, as far as the ring fills, and an arrow lies on the string and travels back with the hand; the figure turns sideways to the target (the left shoulder points at the target, bow arm and arrow point along your line of sight), and the whole upper body follows your look up and down (up to 60 degrees) without the hands moving apart. When you stand, the hips turn along completely; when you walk or run, mostly the waist turns, so that the feet stay in the direction of travel. On release the string hand snaps forward, the arrow leaves the string and flies off, and after an abort the figure goes back to the stance softly. Ammunition: every shot that leaves uses up one arrow from your backpack, namely the arrow that the bow has as its ammunition in the Items editor (field “Ammunition”, an entry with the tick “Is ammunition”). A shot that is refused, or one for which the world has no room, costs no arrow. While you carry a bow, the game shows “Arrows: N” at the lower right with the number of your arrows, red at 0. When you have no arrow left, you cannot even begin to draw the bow: the ring does not fill, the figure does not pull the string, and the game shows the line “No arrows left”. If you sell your last arrows while you are drawing, no shot flies when you release, and nothing is lost. Picking arrows up from the ground does not exist yet. Bows and arrows are in the item catalog; a world builder can offer them at a merchant or hand them out (the standard world does not bring any merchants yet). Their purchase value: Hunting Bow 45 coins, War Bow 80 coins, arrows 2 coins each; arrows are ammunition. While you draw, the arrow lies on the string with its nock at the fingers of the drawing hand; it is 0.90 m long and, at full draw, reaches out in front of the bow. The string runs from both limb tips to the nock and hangs straight without an arrow. The bow sits in the fist of the left hand (grip in the middle, back towards the target), and the arrow starts at the grip.
Tip: The spot has to be on land. If it lies in water or on open sea, the editor tells you so and does not start.
Buffs and food
What for?
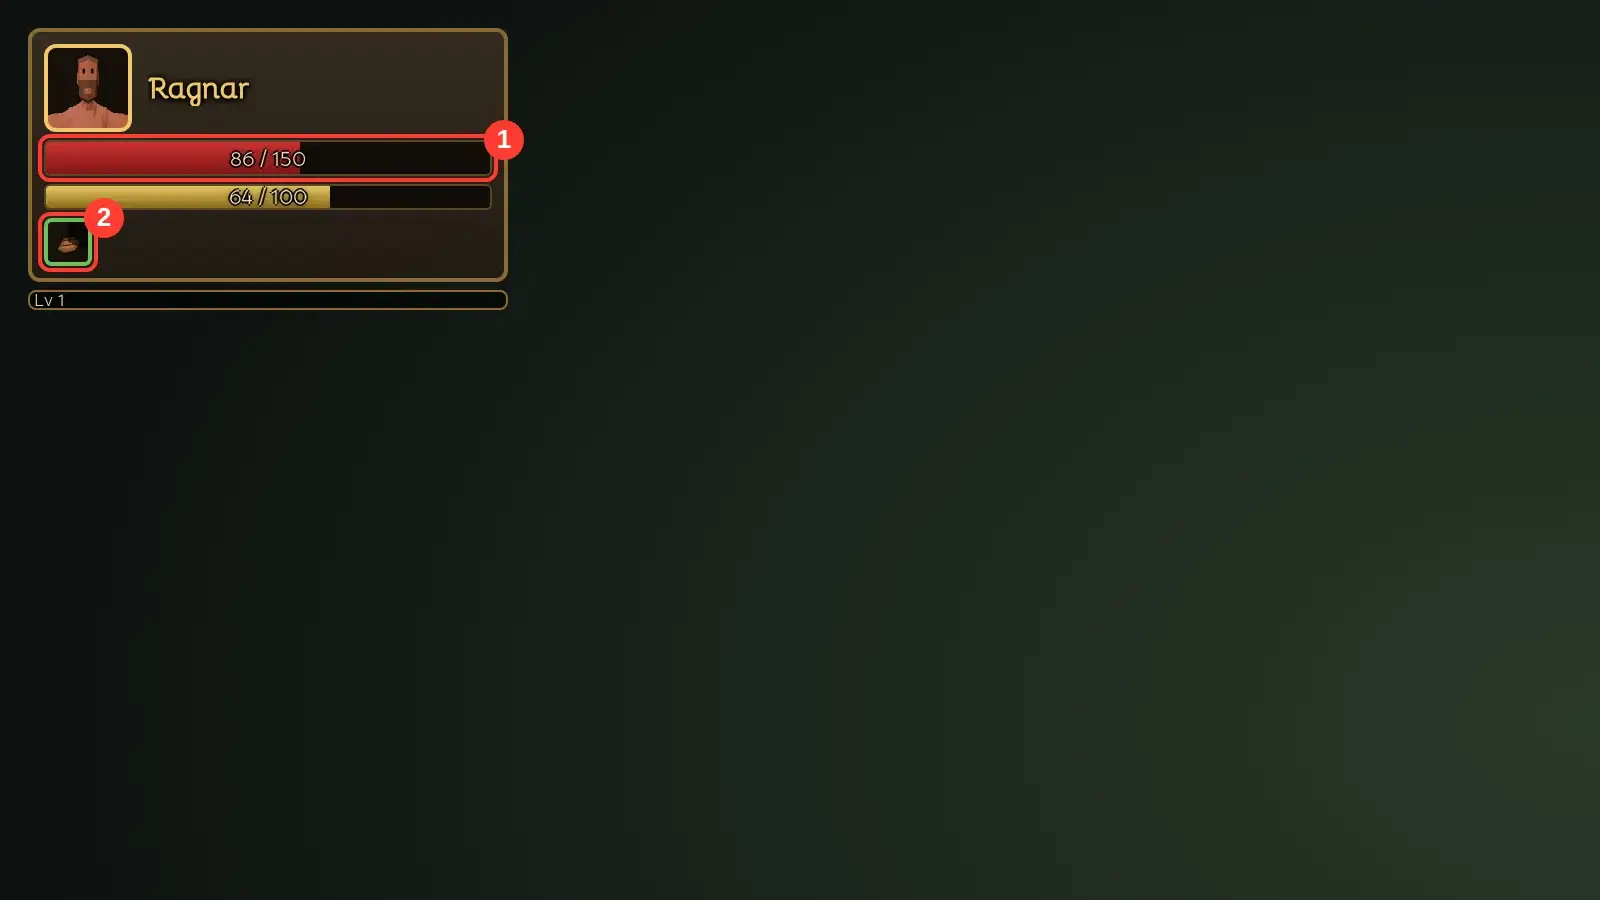
Food gives you more maximum life for a while. This time-limited effect is called a buff and appears as a small icon in the character field. Food exists only in the game on a server; in the test flight without a server the row stays empty.
How it works
- The F key eats the best food in your inventory, the one with the highest bonus. It leaves the inventory and you get 10 life at once (at most up to the maximum). If nothing edible is in the inventory, the game shows a short hint instead.
- While the buff runs, your maximum life rises by the bonus of the food (“+30 max. life”). The number in the life bar (“current / max”) follows the new maximum, for example “86 / 150”. During this time you also regain 2 life per second until the maximum is reached.
- The buff appears below the bars of the character field as the icon of the food, with a green border for a beneficial effect. A dark section that grows with time shows how much of the duration has passed. A number such as “3×” in the corner stands for several stacked layers; food does not stack and shows no number. If more than twelve buffs are active, the last slot reads “+n” for the rest.
- If you release the mouse and point at the icon, the hint names the food, “Buff”, the text (“+30 max. life”) and the time left (“7 min left”). The time left counts down every second.
- If you eat while the buff runs, the duration starts again; the bonus is not counted twice. When the buff runs out, the icon disappears, the maximum falls back to its old value and your life is capped to it. If you die, the buff ends at once: the maximum falls back to its old value at that moment, not only when you are revived, and the icon disappears. Logging out also ends the buff; after you log in again you have no buff and must eat again.
Tip: You set the bonus and duration of a food in the editor, in the form of the item (effect when eaten). A change applies from the next meal. The messages at the top centre of the screen start with a sign, so you can tell them apart without colour: ℹ note, ⚠ warning, ✖ error, » message from the game. Screen readers read the kind (“Notice”, “Warning”, “Error”, “Server message”) and then the text.
Equipment and the swap weapon
What for?
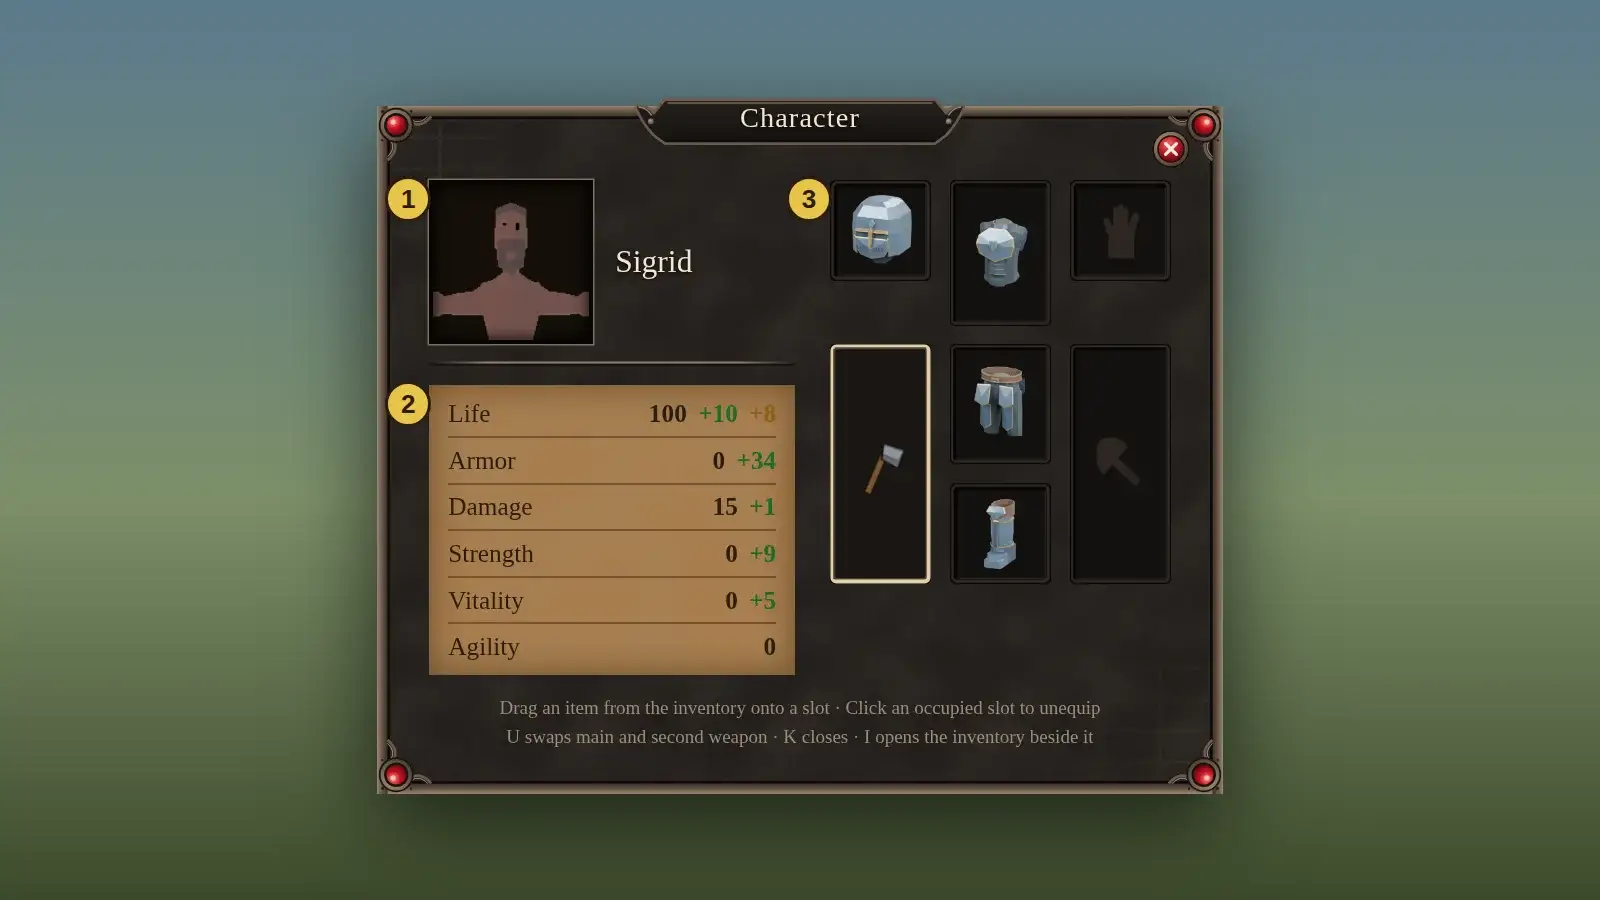
Your character wears its equipment on seven places. Here you see what goes where and how to switch quickly between two weapons.
How it works
- The K key opens the character window. On the left are your portrait with your name (1) and below it the value table (2), on the right the seven equipment places (3): Head, Chest and Hands in the top row, Legs and Boots below them in the middle, the Main weapon bottom left and the Second weapon bottom right. The portrait is a picture of your figure and follows your equipment. The I key opens the inventory beside it; close the window with K, Escape or the red knob. It is the same picture as in the character field at the top left; the window takes no picture of its own.
- Drag an item from the inventory onto a place. It fits only the place its mask names; a weapon may go onto the main weapon and onto the second weapon. A click on an occupied place takes the item off again. Nothing is ever lost this way: the item stays in the inventory. Empty places show a pale drawing of what belongs there. If you drop it on the wrong place, a message at the top of the screen tells you that it does not belong there.
- The main weapon is in the hand; only it counts for damage, harvesting and values. The second weapon is the swap weapon: it is not in the hand and has no effect. If you pick a weapon that lies in the second weapon with the number keys, the two change places. Every weapon change from the quick bar (another weapon, the second weapon or putting the weapon away) is under the same lock as the swap with U: in the middle of a swing, while blocking, during a roll and in the one second after the last change the weapon stays in the hand. Drawing a weapon from an empty hand is the exception: it works at once even within that second (but not while blocking, rolling or in the middle of a swing), and the second then starts anew. If you pick the weapon that is already in the hand, nothing happens.
- The U key swaps the main weapon and the second weapon. The server decides: in the middle of a swing, while blocking, during a roll and in the one second after the last swap it does not swap. The character window then shows both places anew.
- Shoulders and forearms are no longer places of their own. They belong to the chest and the hands item of their set and are shown together with them: whoever wears a whole set looks the way they did before.
- The value table shows Life, Armor, Damage, Strength, Vitality and Agility. The value without equipment comes first, followed in green with a plus by what your worn parts add. For life the base value, vitality and, while you are fed, the share food adds stand as their own plus (the sum is the maximum the life display at the top left names too); for damage the main weapon counts, and strength raises it. Level, experience and attack speed do not exist in the game yet, so they are not in the table. Numbers with a decimal place are written the way the language writes them (1,5 in German, 1.5 in English).
Tip: Put an axe for harvesting in the main weapon and a sword for fighting in the second weapon: one press of U switches.
Flying and build mode
What for?
In the test flight you walk as in the game. Build mode lets you float freely through the world and build from above without getting stuck on obstacles.
How it works
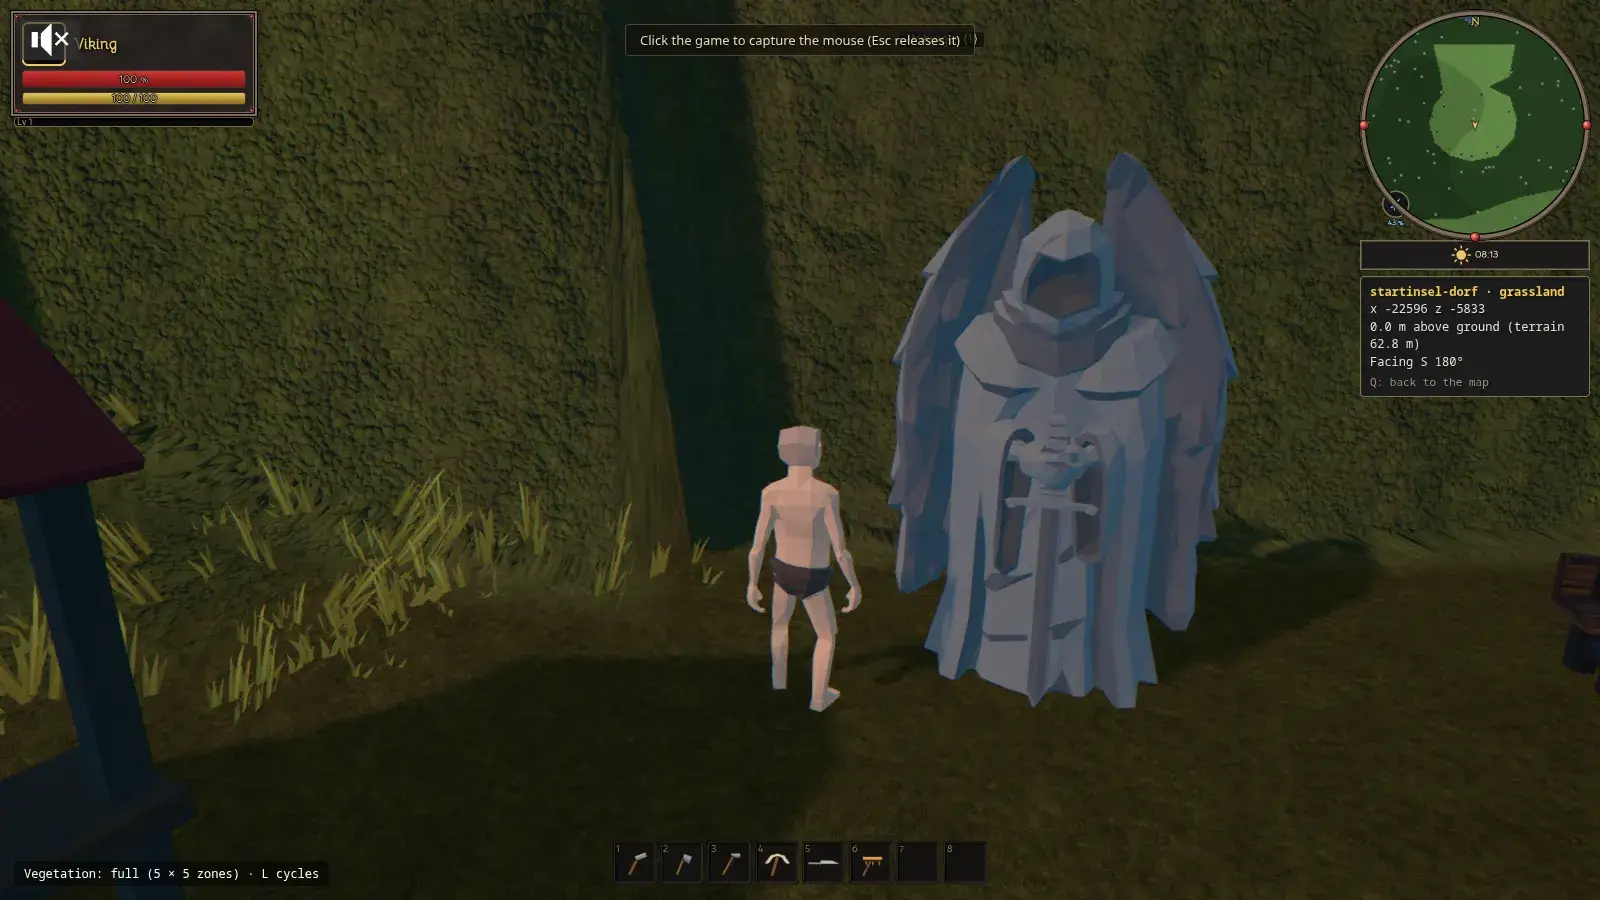
- Click once into the picture. The game then captures the mouse and you steer the camera. Esc releases the mouse again.
- Walk with W, A, S and D. In the top right corner, the small map and the readout below it show where you are: place, coordinates, height above ground and viewing direction.
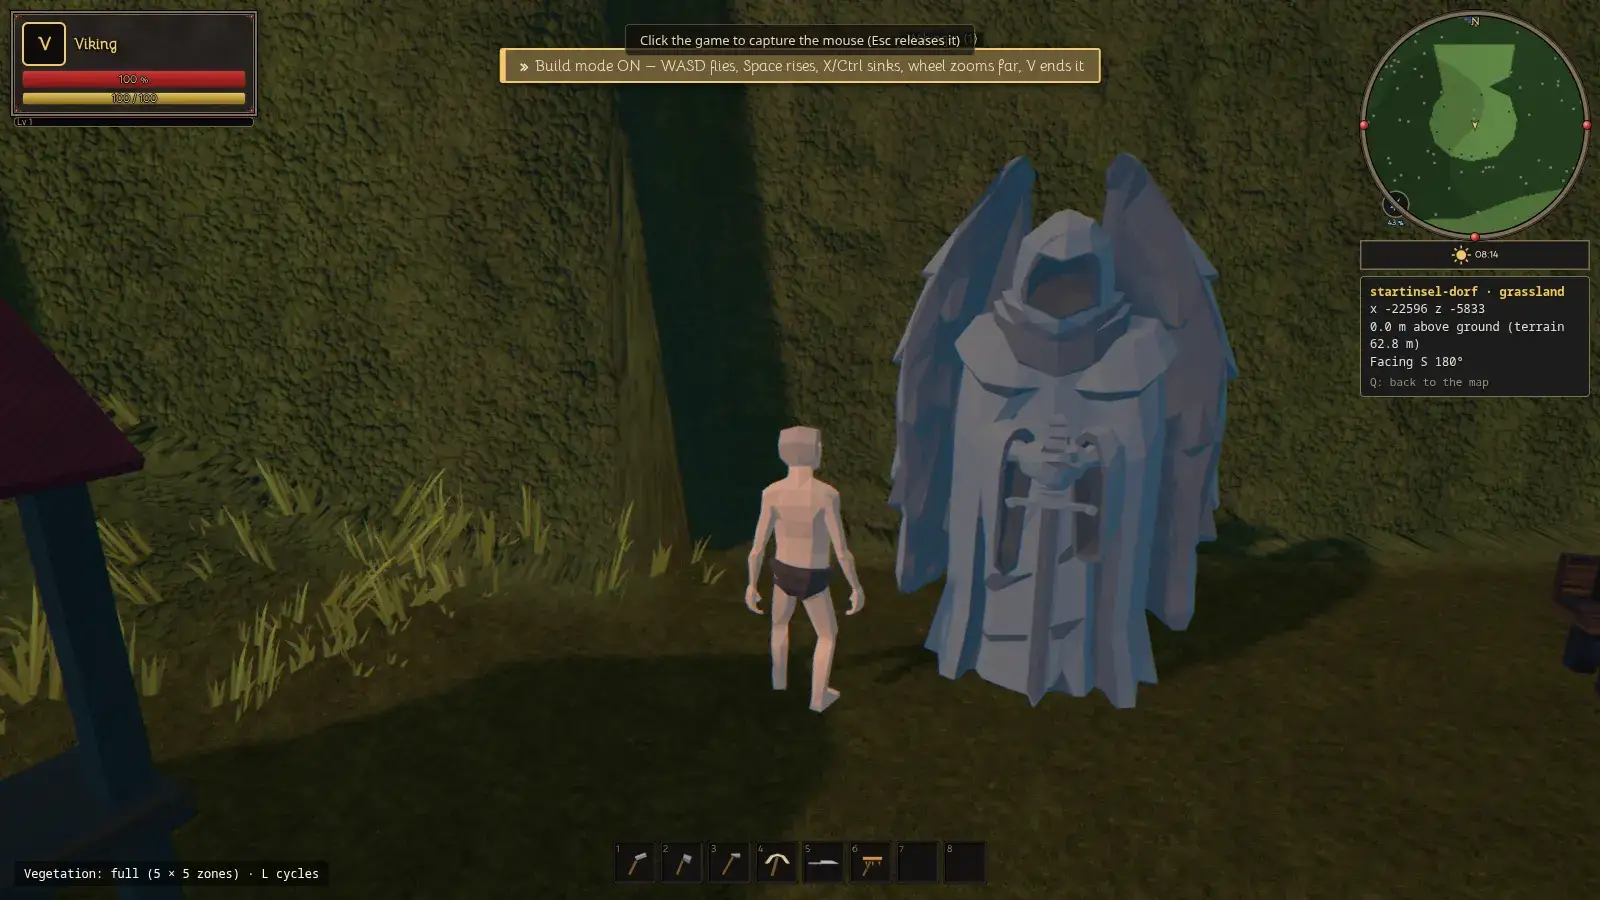
- Press V for build mode (1). Now you fly: W, A, S and D move you, Space rises, X or Ctrl sinks, the mouse wheel zooms far. V ends build mode again.
- The L key switches the vegetation preview between off, small and full. That helps if your computer gets slow with many plants.
- The Q key takes you back to the map.
- With the E key you pick things up and open chests and doors. Your figure plays a gesture of its own, provided the figure’s model carries the matching clip: opening the lid for a chest (about 2.4 seconds), the left or the right gesture for a door depending on the side (about 2.6 seconds), and for picking up a stoop with grasping and straightening up (about 2.8 seconds). Beds and fireplaces have no gesture. The gesture does not play while you lie on the ground or strike. Other players do not see it.
If something does not work
- The mouse does not move the camera.
- The game has not captured the mouse yet. Click once into the picture; at the top it says “Click the game to capture the mouse (Esc releases it)”. Esc releases it again.
Playing on a smartphone
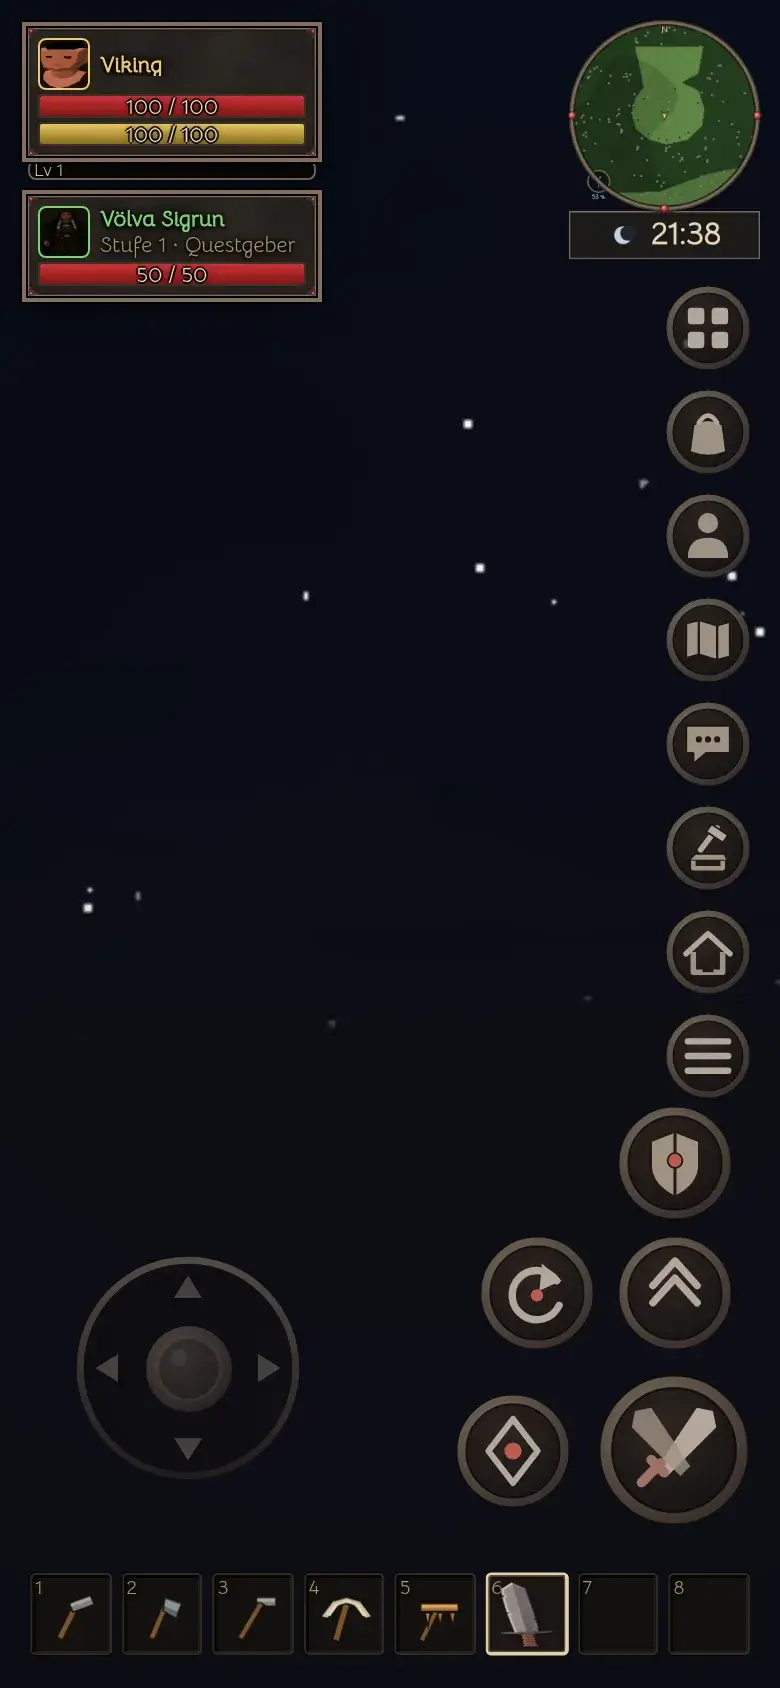
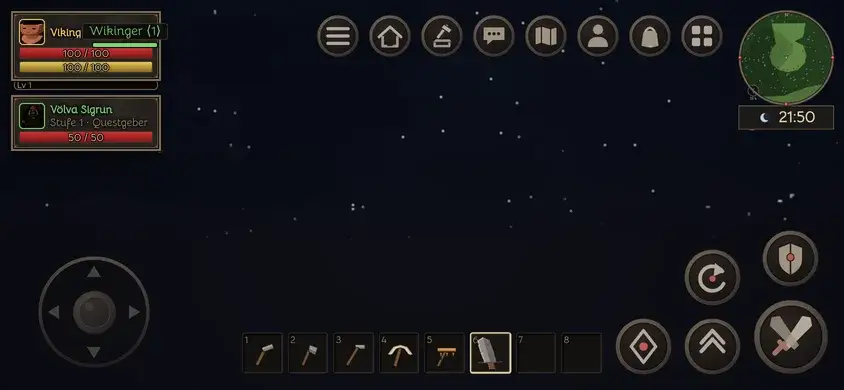
What for?
On a smartphone the game needs no keyboard and no mouse: a round stick sits at the bottom left, five action buttons at the bottom right (block, dodge roll, jump, interact, strike), and you turn the camera with your thumb. A short tap on a creature selects it as the target. On a computer with a mouse none of this appears; the controls stay as they were.
How it works
- The touch controls switch on by themselves when the device has a finger as its main pointer, has a touch screen and no mouse is connected, and the operating system is a mobile one (Android, iOS, iPadOS). That fits smartphones, tablets and unfolded foldables (such as the Galaxy Z Fold), in portrait and landscape. If the game cannot tell the operating system, the fallback is: the shorter side of the screen is at most 600 pixels. Computers and laptops with a touch screen keep keyboard and mouse. If you turn the device, unfold it or plug in a mouse, the game decides again.
- Walking: put your thumb anywhere in the left half of the screen. The round stick appears there, and the character walks in the direction you push your thumb away from the centre, smoothly in every direction, diagonals included. A small area in the middle does nothing, so a resting thumb triggers nothing. Push to the outer rim and the character runs (this costs stamina, like Shift on a computer). Let go and it stops at once.
- Looking around: swipe with a second finger in the right half of the screen; the camera turns like it does with the mouse. Walking and looking work at the same time, each finger does only its own job. Selecting a target: a short tap (the finger stays within 10 pixels of where it landed and is up again within 0.3 seconds) on a creature in the world, be it an enemy, an animal or a friendly NPC, selects it as the target, exactly like a click of the left mouse button; its target frame appears below the player frame. A tap into empty space changes nothing, the old target stays, as on the computer; a tap on the minimap, a frame or a message picks nothing that stands behind it. A swipe, a longer hold or a finger that slides away and comes back is not a tap and only turns the camera. The tap counts in both halves of the screen; it does not count while a window is open.
- The buttons at the bottom right: the big button with the crossed swords strikes (like a click of the left mouse button, one strike per tap), the button with the arrows jumps (Space), the button with the diamond interacts (key E: doors, chests, pick-ups, dungeon entrance). New: the button with the shield blocks for as long as you hold it down, exactly like the right mouse button on the computer; it ends when you let go, when the device cancels the touch or when a window opens. With nothing in the hand, with a building tool, in the water or with too little stamina the figure does not block (the start costs 5 stamina, as on the computer). The button with the curved arrow is the dodge roll, the key Q: the figure rolls in the direction the stick points, otherwise the way the figure faces; it costs 10 stamina, lasts a little under a second and is followed by a half-second lock. Where there is no room, in the water, in the air or with too little stamina the game tells you, and it costs nothing. Both buttons use the same game rules and the same way to the server as the keys; stamina locks and cooldowns apply unchanged. With three fingers you can walk (left), hold the block (shield button) and look around (right) at the same time; every finger has its own touch, and a cancelled finger ends only its own button. All new buttons carry a label for screen readers (“Block (hold)”, “Dodge roll”) and work with Tab, Enter and the Space bar.
- Windows: at the top right below the minimap stands a single round button with four small squares. Tap it and the seven menu buttons unfold: Inventory (I), Character (K), Map (M), Chat (Enter), Crafting (C), Build menu (Tab) and the menu with the settings (Esc). Crafting opens the crafting window. Build menu is the Tab key: with a hammer in the hand it opens the build menu, without a hammer it selects the next target as on the computer, always forwards, also while you are running (without a hammer no build menu appears). In portrait they line up as a column below the button, on a low window as a row to the left, on a narrow one as a grid (three beside the button, the other four below it or, when an action button stands below the button, in the row above it), on a narrow and low window in two rows above the button (four and three); the game works out where there is room and, where possible, places the unfolded menu so that it covers no action button. On a very small window it may for a moment cover the minimap (or the sound button) instead; that is the lighter choice, and a tap folds the menu again. On a very small window the unfolded menu can cross the faintly drawn resting ring of the stick; while the menu is out the game then hides that ring (it is only a hint and takes no touch). The menu folds in again when you tap the button once more, tap one of the seven buttons, tap into the world or a window opens. Folded, the menu takes only the one button. While a window is open, the stick, the camera area and the action buttons are hidden. Large windows (inventory, character, map) cover the menu button; every window therefore has its own close button, the red cross at the top right (the settings close with “Back”, the chat is sent with the Enter key of the on-screen keyboard; to close it without sending, tap the chat button again or the menu button, or tap into the world). The quick bar with slots 1 to 8 you tap directly. For screen readers the menu button is labelled “Unfold menu buttons” or “Fold menu buttons” and reports its state. All touch buttons are real buttons: for screen readers and assistive technology they are marked as buttons and can be triggered there with Enter or the Space bar: a focus ring shows which one is selected, and the Tab key jumps from one button to the next as soon as one of them has the focus. Tapping with a finger does not set the focus. After you trigger an action button (jump, attack, interact, block, roll) with Enter or the Space bar, the game gives the focus back to the game area at once, so that Enter, the Space bar and the other keys steer the game again (a focused button would otherwise keep them for itself). The menu button and the menu entries keep the focus: after Enter on the menu button, Tab moves into the unfolded menu, from entry to entry. When the focus is not on one of these buttons, the Tab key stays the build menu in the game.
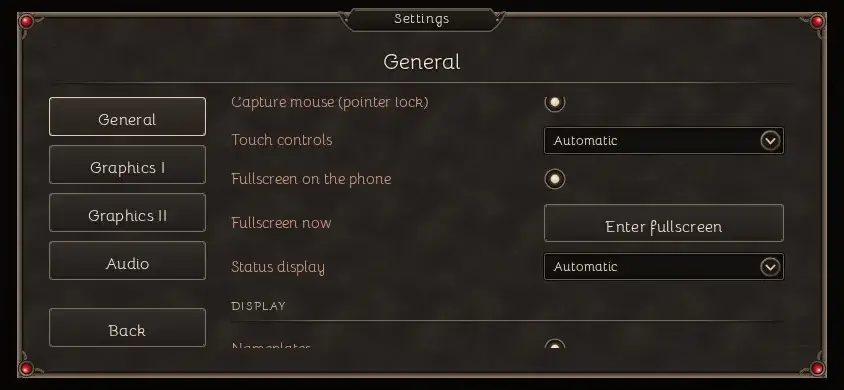
- Settings → General → “Touch controls”: “Automatic” (default), “On” (for a tablet, for example, or to try it on a computer, the game then ignores the mouse) and “Off”. The choice takes effect at once and is saved.
- Compact picture: in the phone mode the player frame, the target frame (NPC, creature) and the minimap are small: the frames at about 60 percent of their size, the minimap at about a quarter (at most 24.5 percent) of the shorter screen side. The text of the frames stays at least 11 pixels and the bars at least 12 pixels high; where these limits apply, only the area shrinks. The clock below the map, by contrast, gets bigger (about 16 pixels high on the screen, at least 14), with the sun and moon symbol, so you can read it on a phone; its bar is a little taller for that. So frames, map, menu button and action buttons do not overlap, even on a low window (a phone in landscape with browser bars, for example): the game works out the arrangement for the window size, folded and unfolded. Frames and map move away from a notch or rounded corners. The arrangement counts on the largest possible frame (life, energy and mana bars plus two rows of buffs), so that even a target frame with mana and buffs covers nothing; the number on a stacked buff is at least 11 pixels high. The boss bar and the messages at the top stand between the player frame and the minimap; where that is too narrow (a narrow phone in portrait), they stand under the frames across the whole window width, so they do not cover frames or map. The game measures how tall the message stack is on the screen (boss bar, standing message, server message and error lines; a long error text wraps to several lines) and sets it again at every change; a two-line server message pushes the error lines below it down instead of covering them. If the whole stack does not fit under the frames either because the window is very low, it stays at the top in the gap between frames and map, provided it fits there completely and touches no button; otherwise it lies as high as the window allows and covers a frame for a moment instead of sticking out of the picture. The mute symbol of the sound stands to the right of the player frame (in a very small window below it or below the target frame) and is never covered by the message stack: the stack then moves beside the symbol. On a nearly square window such as 480 × 320 the symbol stands below the target frame and the stack at the top beside the frames, so it covers nothing. The text with the technical values (status display) at the bottom right is hidden in the phone mode; set to “On” it wraps inside the window width instead of being cut off at the left. Settings → General → “Status display”: “Automatic” (default: off on a phone, on on a computer), “On” and “Off”. The choice takes effect at once and is saved; on a computer everything keeps its usual size as long as the touch controls are not set to “On”.
- Sound and full screen: on a phone the sound starts at your first touch, because the browser allows sound only after a touch by the player; the game waits for the end of a touch (a tap), not its start, and tries again at every further touch until the sound runs. When you come back from another app, the game switches the sound on again at the next tap. If the sound stops after a call or a voice assistant (on an iPhone the system interrupts the sound without you leaving the app), the game switches it on again at the next tap. With the same first touch the game goes to full screen (the address bar and toolbars disappear); only a finger or pen triggers this, not a mouse click on a computer, and an installed app (home screen) is full screen already. The game keeps the screen awake while it is visible. If the browser refuses (iPhone Safari, for example, has no full screen for pages), it stays silent and is not repeated at every touch. If you leave full screen (with the back gesture, for example), the game works out the arrangement for the new window size again and does not ask a second time. If you switch off the touch controls or “Fullscreen on the phone” and the game had turned full screen on itself, it leaves full screen again; a full screen you chose yourself (F11, for example) stays. Below it, in a row of its own, is the button “Leave fullscreen” / “Enter fullscreen”, which toggles full screen; it exists only when the browser has full screen for pages (not on iPhone Safari). Settings → General → “Fullscreen on the phone”: On (default) or Off; the choice takes effect at once, is saved and applies to the automatic full screen in the phone mode only: on a computer the game does not go to full screen by itself, but the button in the settings toggles it there as well. The game does not lock the screen orientation: portrait and landscape both stay possible.
Tip: The stick appears where your thumb lands; a faint ring at the bottom left shows where you can start. A notch or rounded corners do not cover the buttons, the game keeps its distance.
If something does not work
- I do not see the touch controls.
- First check whether a mouse or touchpad is connected: then “Automatic” keeps keyboard and mouse. If the device does not identify itself as mobile (for example a browser in desktop mode), there are two ways out. First: when the main pointer is a finger but the touch controls are off, a small round menu button appears at the right below the minimap (left beside the minimap when the window is too low), so that it covers neither the map nor the clock; the same holds for Android in the desktop mode of the browser with a pen digitizer that reports itself as a “fine pointer” while no mouse is connected. The button opens the settings like the Esc key, and there you set the touch controls to “On” under “General”. Second: add “?touch=1” (On), “?touch=0” (Off) or “?touch=auto” (Automatic) to the game’s address; if the address already contains a “?” (for example “…?offline=1”), write “&touch=1” instead of “?touch=1”, and the name “touch” is lower case (“TOUCH=1” is ignored); the game stores the choice and removes the addition from the address again. Any other value is ignored.
The build menu
What for?
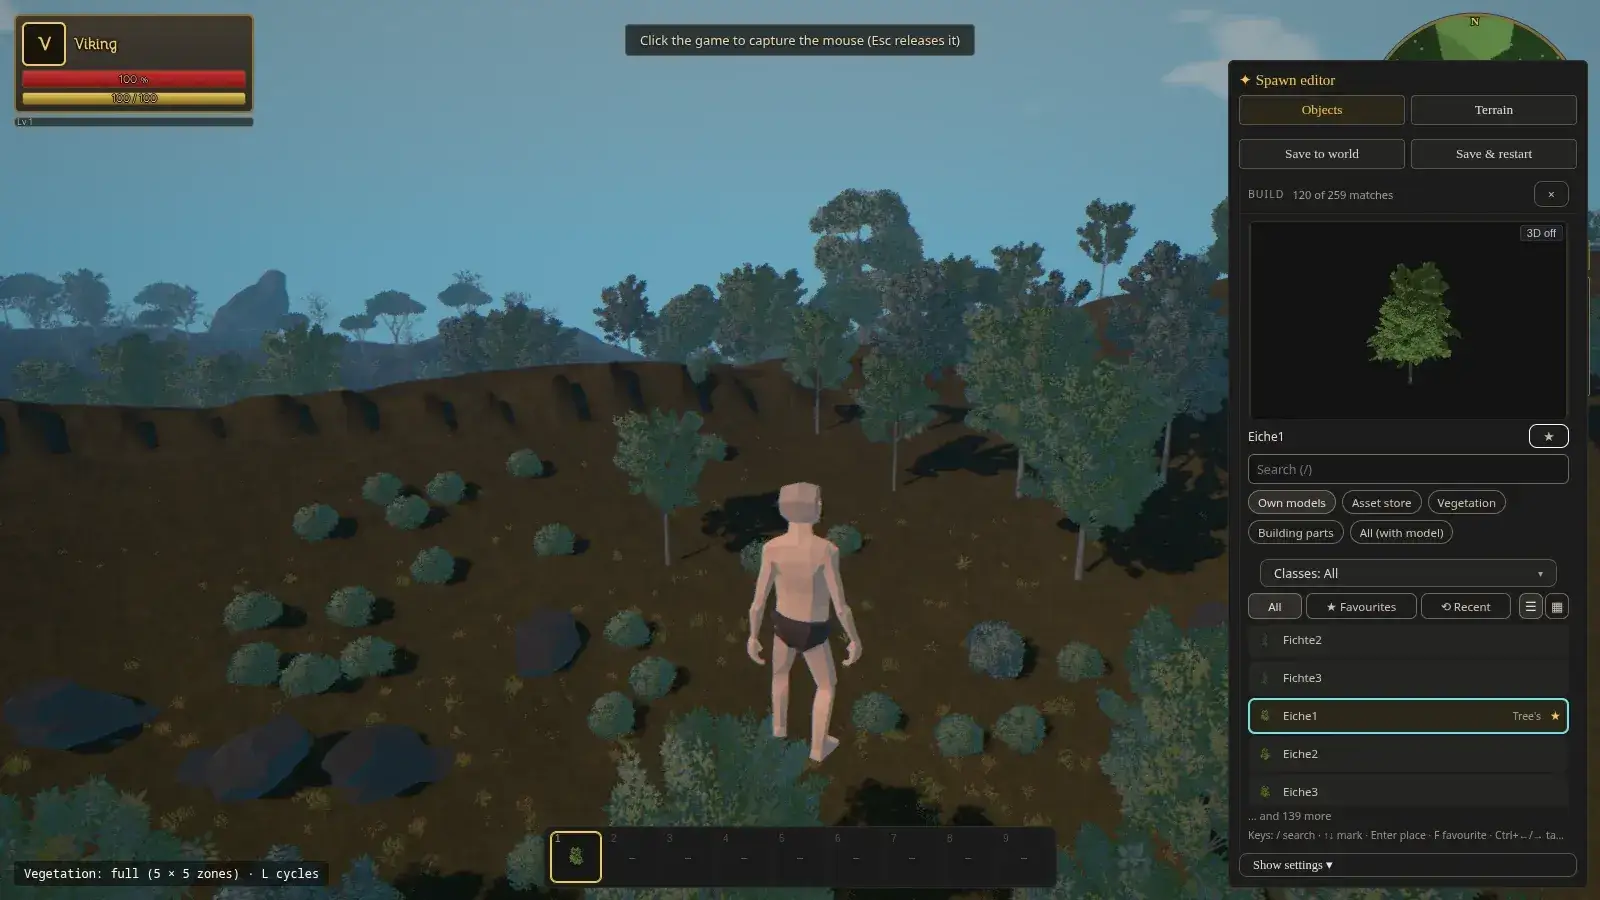
The build menu (the “Spawn-Editor”) is your toolbox in the game. It shows you all objects with a preview and lets you place them with one click.
How it works
- Press the B key in the test flight. The build menu opens on the right. B closes it again.
- At the top you switch between the “Objects” and “Terrain” tabs. Next to them are “Save to world” and “Save & restart”.
- Below it you see the chosen object as a 3D preview with its name and a star for favourites. The search field (key /) and the buttons “Own models”, “Asset store”, “Vegetation”, “Building parts” and “All (with model)” help you find what you need fast.
- In the list below, you click an object. The ↑ and ↓ arrow keys mark, Enter places, F saves an object as a favourite. The tabs “All”, “★ Favourites” and “⟲ Recent” filter the list.
- To the right of the tabs, the two small buttons switch between “List” and “Tiles”. The list is the default: each row shows the object’s icon, its name (long names wrap onto two lines, the tooltip gives the full name), its classes, each in a small field of its own, for example “Houses” (a comma inside a class name belongs to the name; the tooltip lists all classes one below the other), and the star for favourites on the right. In the “Tiles” view each object is a tile in a grid of five columns. Switching keeps the mark and the search text, and the editor remembers your choice in this browser.
- At the very bottom, “Show settings” opens the options for placing; more about that in the next chapters.
Tip: Grey entries do not have a model of their own yet and cannot be placed. In the list they have neither click nor star, and the same holds for tiles. The ← and → keys do nothing in the list, which has only one column; in tiles they move the mark. The arrow keys and F belong to the menu even while a button (a tab, “List” or “Tiles”) has the focus; only Enter and the space bar click the button.
The inventory
What for?
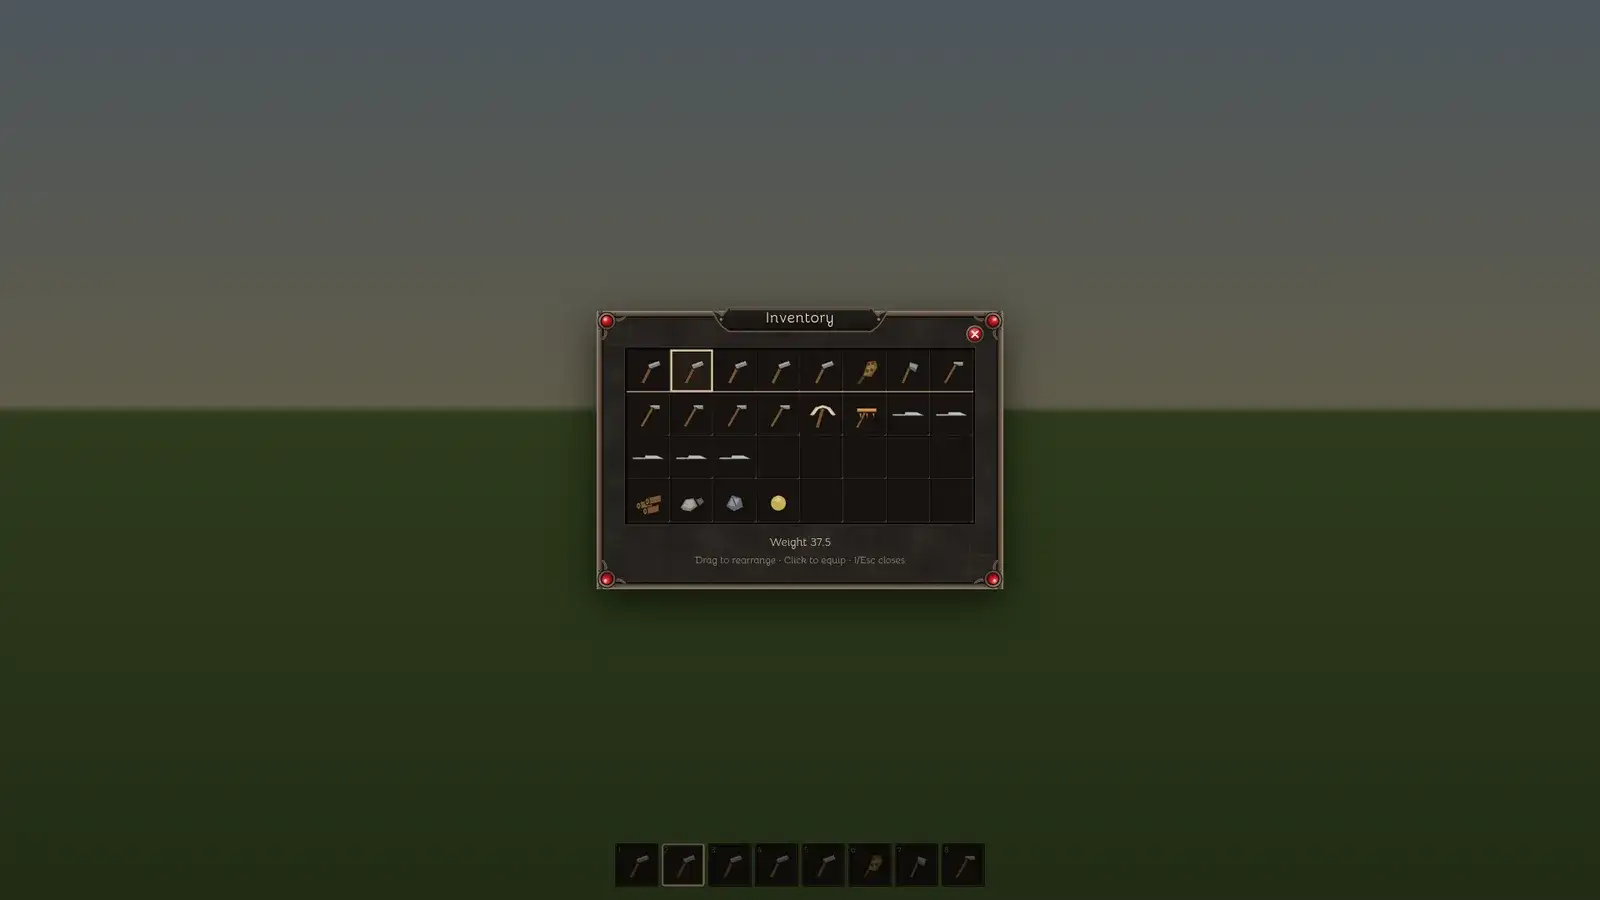
The inventory holds everything the character carries: a grid of 8 by 4 cells. The window shows the item in each cell, the total weight and the quick bar.
How it works
- The I key opens and closes the inventory. It sits in the middle of the screen; when the character window is open it moves to the right.
- The window has a metal frame with a red gem in every corner and the title plaque "Inventory" on top. The round red button with the X at the top right closes it, and so do Esc and the I key. A click beside the window closes it only when no other window is open. The chest and the “Crafting” window have the same knob.
- The grid has 8 columns and 4 rows with no gap between them. Each cell holds one item or one stack; the number at the bottom right of a cell is the stack size. Moving the mouse over a cell lights up its edge and the tooltip names the item, its values and its weight (step 7).
- Dragging: hold the mouse button on an item, move it onto another cell and let go. If the item fits the one lying there, the stacks are merged, otherwise the two swap places. Letting go on an equipment slot puts the item on.
- A double click on an item puts it on or takes it off. The worn item has a light edge.
- The top row of the grid is the quick bar, recognisable by the warm line under its cells: its eight cells also appear at the bottom of the screen and are used with the keys 1 to 8. The total weight is shown below the grid.
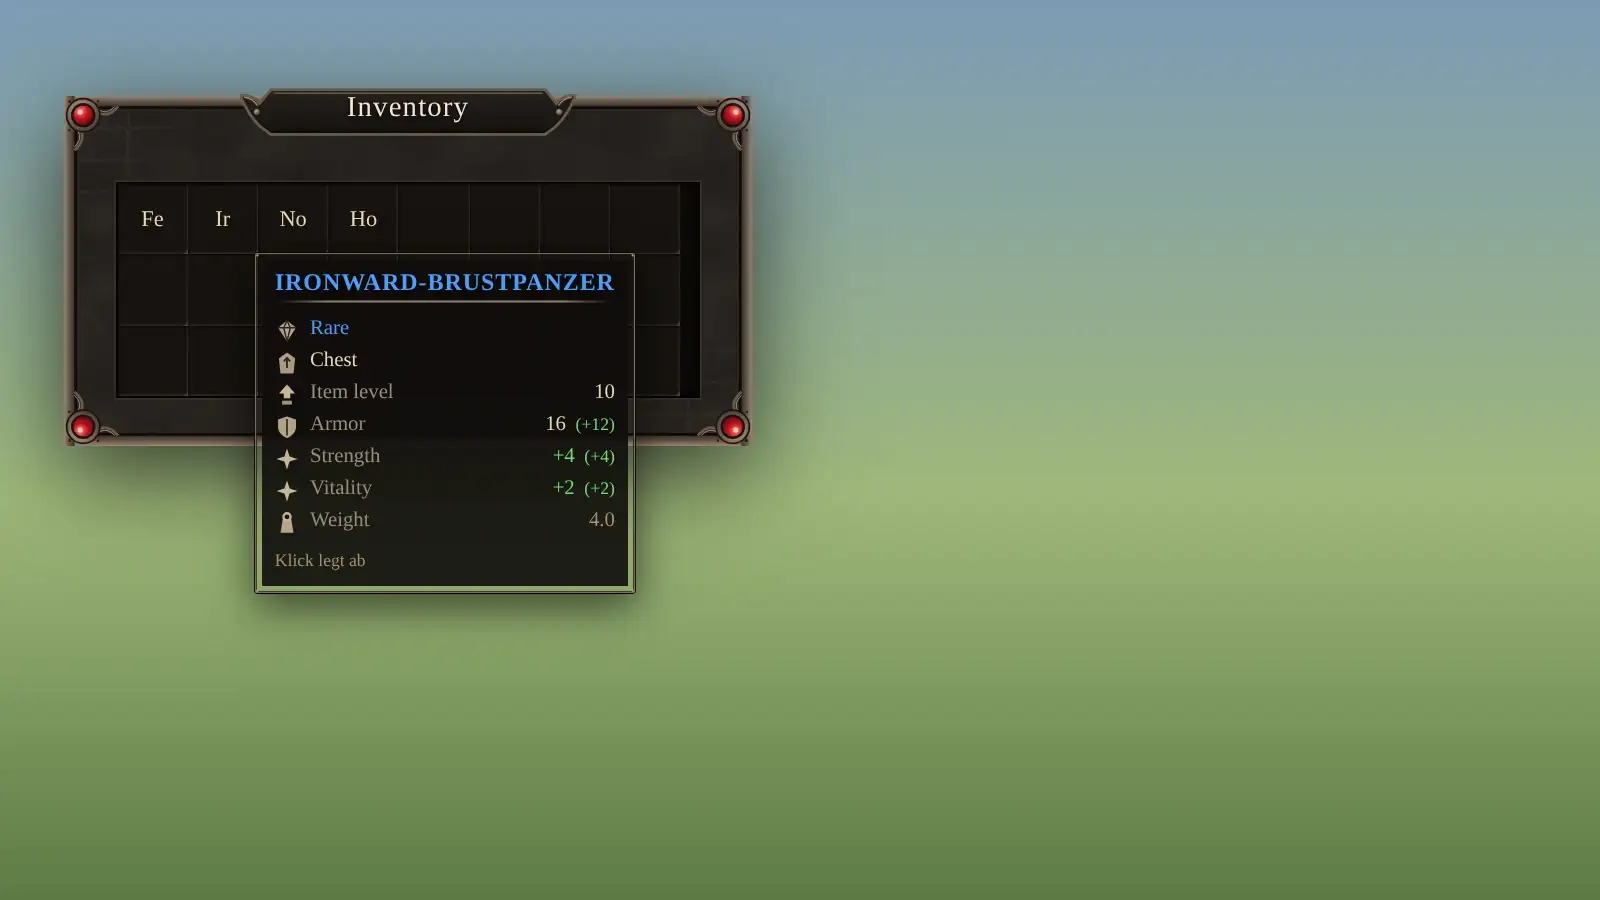
- The tooltip: when you move the mouse over an item, a dark panel with a thin metal edge appears next to the pointer. At the top is the name in capital letters, in the colour of its rarity, with a fine line under it. Below come rows with a small symbol, the label and the value at the right edge: rarity, type (for a weapon its weapon type, such as “Sword” or “Axe”, in the language of the game; if the weapon has no weapon type or the game does not know it, “Weapon” is shown; for a piece of armour the slot), item level, the values such as damage, armour or strength, and the weight. If the item carries a required level above 1, “Requires level N” is shown before the weight; if it carries a buy or sell price above 0, “Buy price N gold” and “Sell price N gold” follow after the weight (large numbers with the thousands separator of the language). If you already wear something in that place, the difference follows the value: green (+3) is better, red (−3) is worse. The grey line at the bottom says what a click does. The panel always stays on the screen; while you hold a mouse button down (for example when dragging) or press a key, it is hidden. A screen reader reads each row as one sentence (for example “Armor 10 (+3)”); the width of the box grows with the screen height.
- If an item has no picture of its own, the game draws a replacement symbol of its kind in its cell, such as weapon, tool, material, food or trophy; the colour shows the rarity. While a picture is still loading the replacement symbol is shown as well, so the cell is never empty. You can upload your own picture in the item editor, and it then replaces the replacement symbol.
- Sounds: when you grab an item and drag it, a short pick-up sound plays; when you let go on a cell or an equipment place, a short put-down sound plays. The sound depends on the item: small parts and raw materials, cloth, leather and food, weapons and tools, bottles and heavy armour all sound different. Which group applies is set by the field “Material (sound)” of the item in the editor; when it is “automatic”, the group is derived from type, place, values and name (every weapon then sounds like metal). An item you drop on the equipment place it is already in stays silent. If the drop is refused (wrong equipment place or a blocked cell), you hear only a dull sound and no put-down. If you cancel the drag (Esc, or release beside the grid), there is no put-down sound. A double click to put on or take off sounds like a put-down. Opening and closing the inventory, the character window, the settings, crafting and a chest also has a short sound each. All sounds use the “Interface” channel and are silent when “Muted” is on.
Tip: The size of the window follows the screen height: smaller at 720 pixels, larger at 1440 pixels; the number of cells stays the same.
The settings

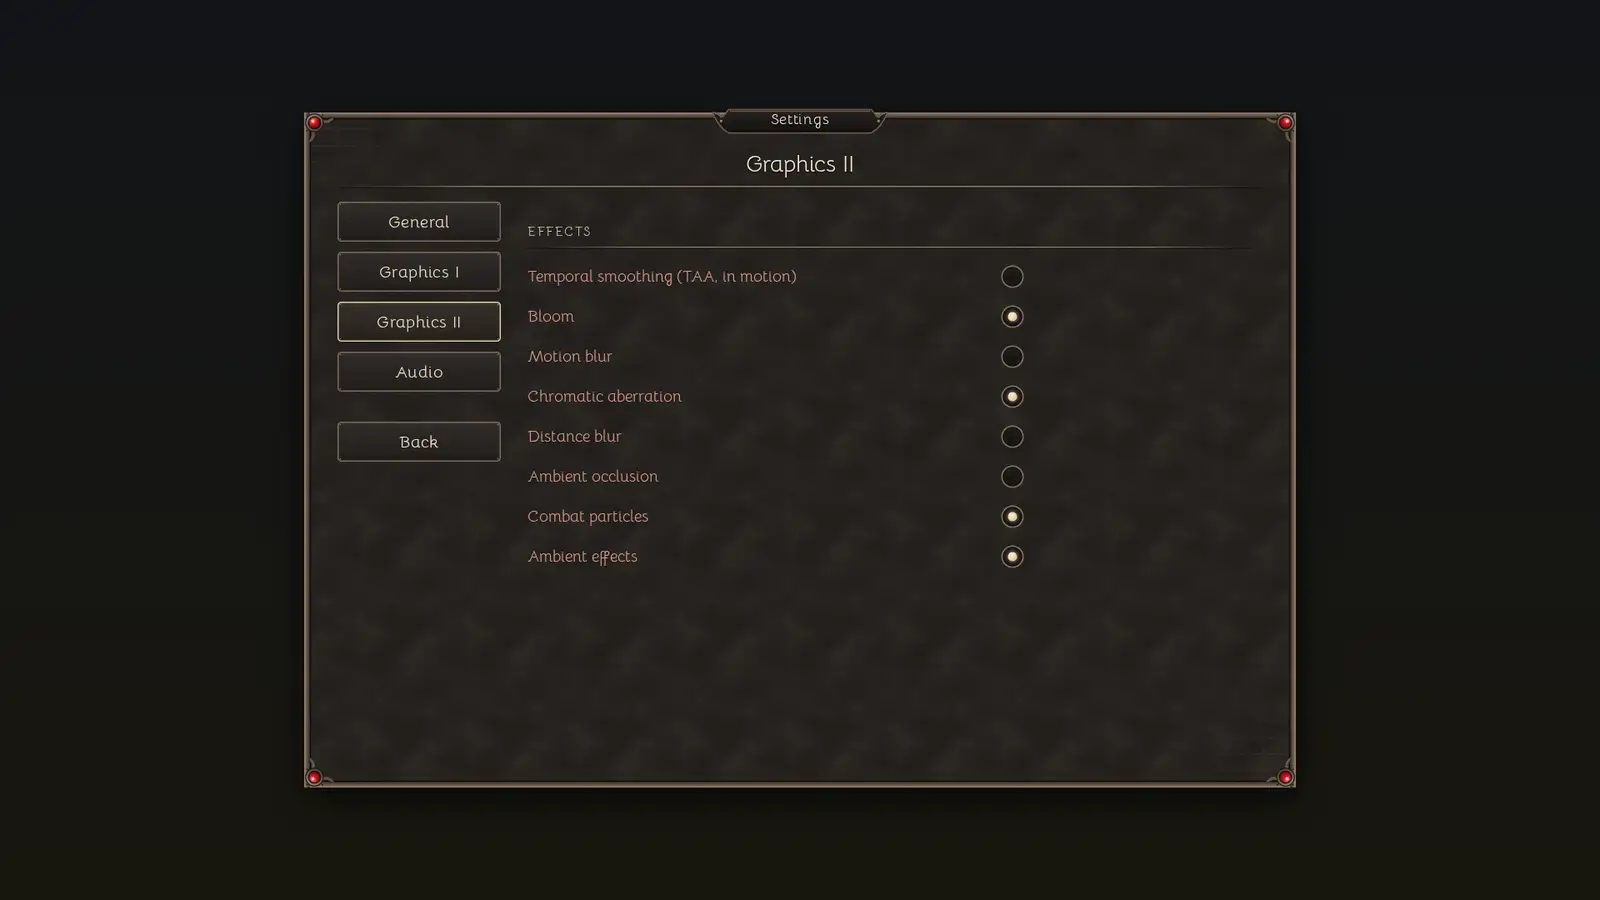
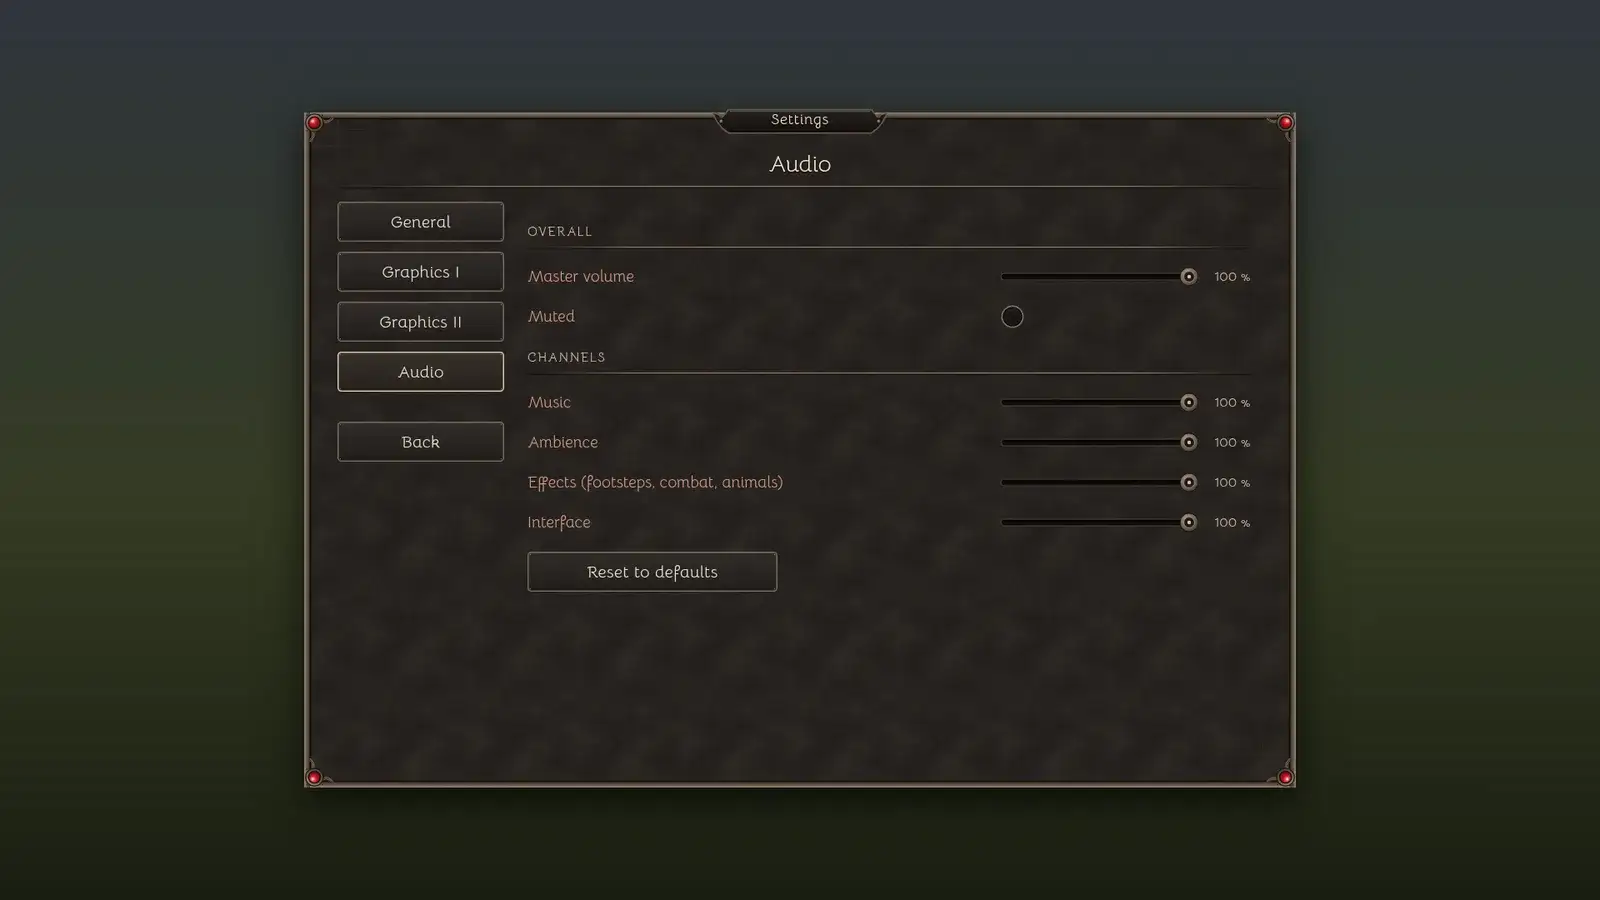
What for?
In the settings window you set language, display, graphics and sound. Every change applies at once and is saved in the browser; the values are back at the next start.
How it works
- Esc opens and closes the window. The “Back” button at the bottom left and a click next to the window close it too.
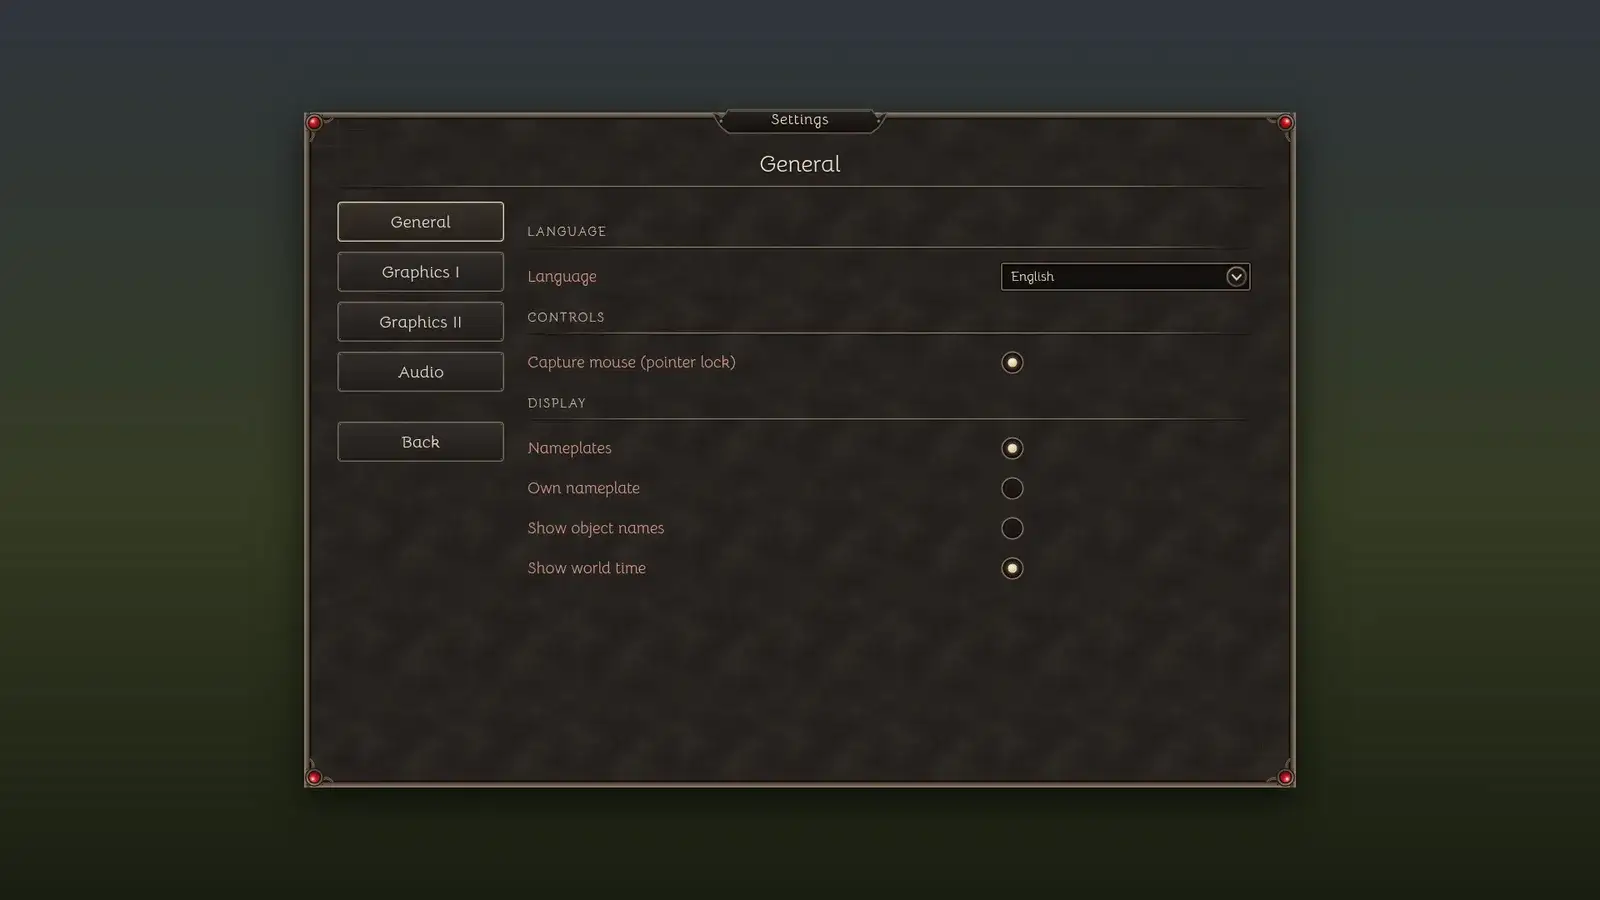
- The window has a metal rim with a red gem in every corner and the title plaque “Settings” on top. Below it the name of the open tab is shown in large letters. On the left is a column of four buttons — General, Graphics I, Graphics II and Audio — with “Back” under them; the open tab has a light edge. On the right the controls are rows: the label on the left, the control on the right.
- There are four kinds of controls. The round switch shows a bright dot when the setting is on and an empty dimple when it is off; a click toggles it. The dark select field with the round arrow knob opens a list when clicked; the chosen step applies at once. The slider is dragged with the mouse, its value stands next to it. The stone buttons light up under the pointer and sink when pressed. With the keyboard: Tab moves to the next control, Shift+Tab back; a rose-coloured ring shows where the focus is. Space and Enter operate switches and buttons, the arrow keys change select fields and sliders. The focus stays in the window: after the last control Tab jumps back to the first, and Shift+Tab goes from the first to the last. While the window is open, Tab, Space and Enter do nothing in the game (no jump, no chat); if you hide the interface with F1, these keys belong to the game again.
- General: Language (Deutsch or English, changes at once), Capture mouse (pointer lock), Nameplates, Own nameplate, Show object names and Show world time. Distant name plates (from about 36 metres) show only the text without a dark box; when several plates hang at the same spot, the rear one moves up a little (at the very top edge of the screen it moves down instead) so that no name is covered. Distant text no longer fades away completely. With the interface hidden (F1) menu keys (inventory, map, chat with Enter and so on) open nothing invisible; only F1 (show again), Esc (close) and the number keys 1 to 9 of the quick bar act. The red cross of the crafting, chest and map windows hands the mouse back to the game, like closing with the key.
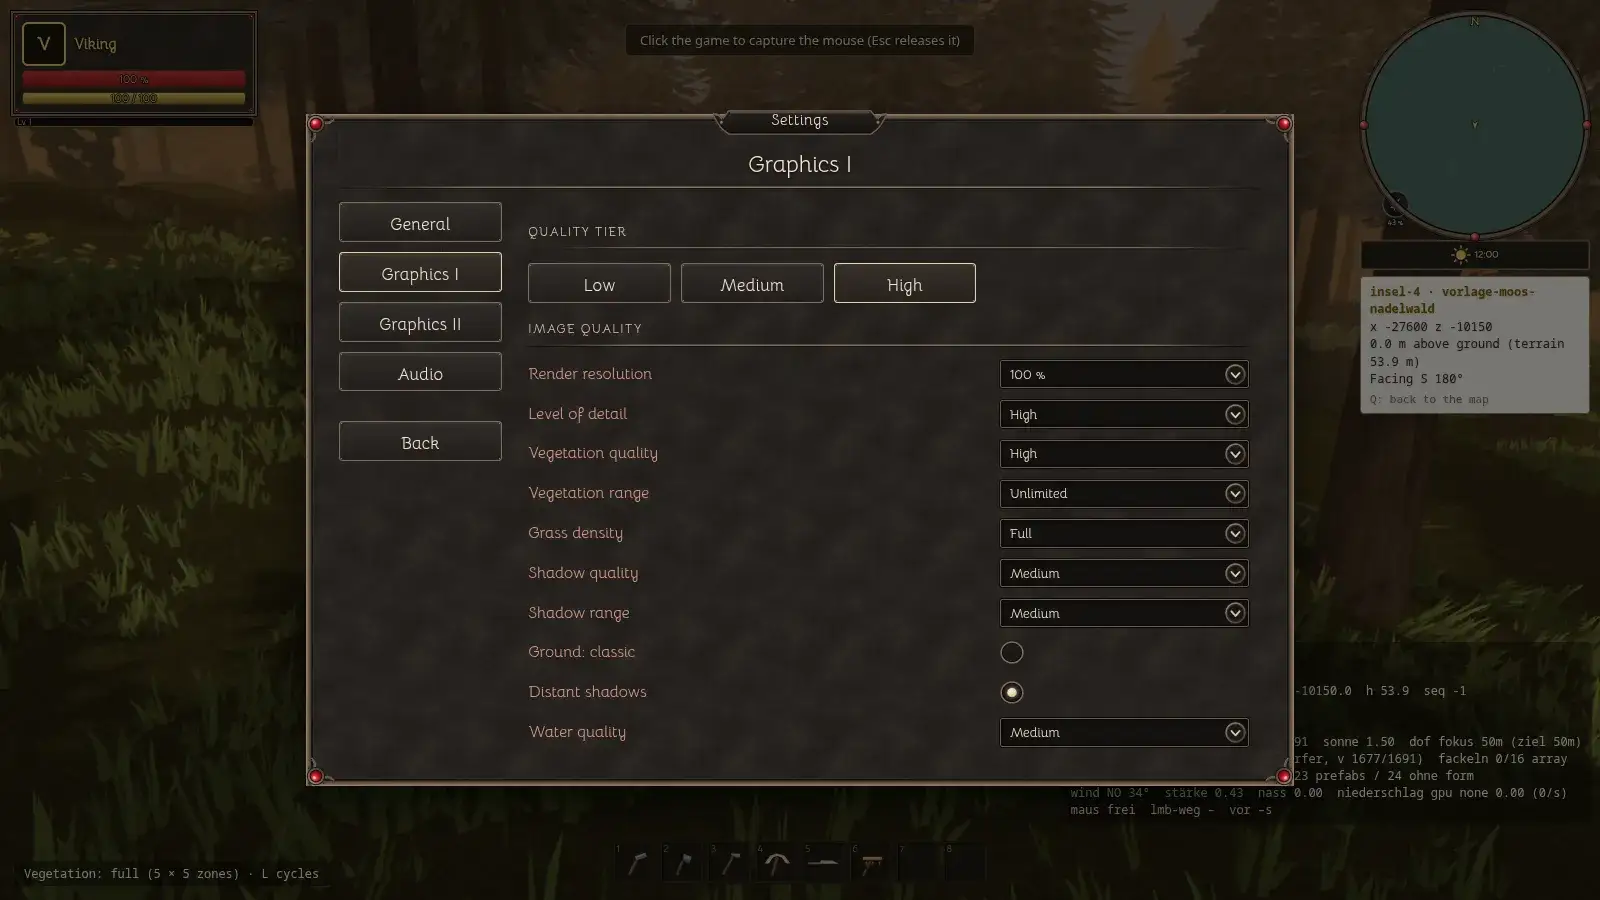
- Graphics I: the three quality buttons (Low, Medium, High) set several graphics controls at once; the step that matches the values is lit. Below are the single controls: Render resolution, Level of detail, Vegetation quality, Vegetation range, Grass density, Shadow quality, Shadow range (Near, Medium or Far: how far shadows reach; Near keeps the previous reach, Medium and Far draw them further; at all three steps the shadow fades out softly at the edge, and Far costs more frame time), “Ground: classic”, Distant shadows, Water quality (five steps: Off, Low, Medium, High and High (economical); High (economical) draws the refraction only every second frame, and at once on a teleport or a fast turn; the default stays Medium), Texture quality (after reload; Low or Normal, default Normal: Low drops the largest resolution level of model textures with an edge of 1024 pixels or more, 2048 pixels become 1024; this saves graphics memory and the upload to the graphics card, download and unpacking stay the same; the ground is not affected; textures look softer up close, and the setting only applies after you reload the page, which the row label also says; the quality button “Low” sets it to Low too, “Medium” and “High” set it to Normal; the editor and previews always load Normal; without a web worker (fallback) Low has no effect), Dungeon graphics, Anti-aliasing and 100 FPS profile; the last rows, from the 100 FPS profile on, lie below the edge of the picture and appear when you scroll the area with the scroll bar or the mouse wheel. If you then change a single control, no step is lit any more. “Ground: classic” switches the new ground off and draws the old one; switching back to the new ground applies without a restart; after a start with classic it can take a moment until the new ground is ready, and the old one keeps drawing until then. When starting with the new ground, the loading screen waits up to eight seconds longer so the ground of the near zones appears finished at once; after that the game starts in any case. If the ground description file (the small file with the layer details) does not answer at all, for example because the network hangs (after four seconds), the loading screen does not wait for it: the game starts at once with the old ground, the ground data keeps loading in the background, and the new ground switches on as soon as it has arrived. The four seconds apply only to this description file, not to the two large picture files of the ground: if those hang, no time limit of their own applies, the loading screen waits at most the eight seconds named above, after that the game starts with the old ground, and the new ground switches on as soon as the pictures do arrive. If the server answers with an error (for example “not found”), there is no second attempt on its own: the old ground stays until you switch “Ground: classic” on and off again; then the game loads the new ground exactly once more (without a restart; if that fails too, the old ground stays until you switch again). After a teleport that jumps farther than the near range reaches, the loading screen briefly returns and disappears once the terrain and ground of the near zones stand (at most 15 seconds), so the ground does not pop in piece by piece. If the new ground does not run on the device (shader cannot be compiled), the game draws classic automatically for that session without changing the setting. At the lowest level of detail the new ground draws only the first four layers of a zone.
- Graphics II: eight switches for the image effects — temporal smoothing (TAA), bloom, motion blur, chromatic aberration, distance blur, ambient occlusion, combat particles and ambient effects (butterflies and other effects of the biome). Distance blur is off by default; you can switch it on, it costs some performance, and a value you saved earlier stays.
- Audio: the overall volume and the “Muted” switch, below them the five channels Music, Ambience, World, Effects and Interface, each from 0 to 100 percent. “World” controls footsteps, combat sounds and animals; “Effects” controls the random sounds of a biome (bird calls, cracking and the like); “Music” also controls the combat music of a biome. If you saved your settings before the “Effects” slider existed, it starts at the same value as “World”. “Reset to defaults” sets all volumes back to their starting values.
- The sounds of the windows (pick up, put down, refused, window open and close) are tied to the “Interface” slider. If it is at 0, “Muted” is on or the overall volume is at 0, they stay completely silent. Until you click or press a key in the game for the first time, the browser plays no sound; earlier sounds are not made up for.
Tip: The window follows the screen height: it is smaller at 720 pixels and larger at 1440. If the height is not enough for the rows of a tab, the right area scrolls with a scroll bar in the style of the window; the button column on the left stays in place.
Favourites and the quick pick 1 to 9
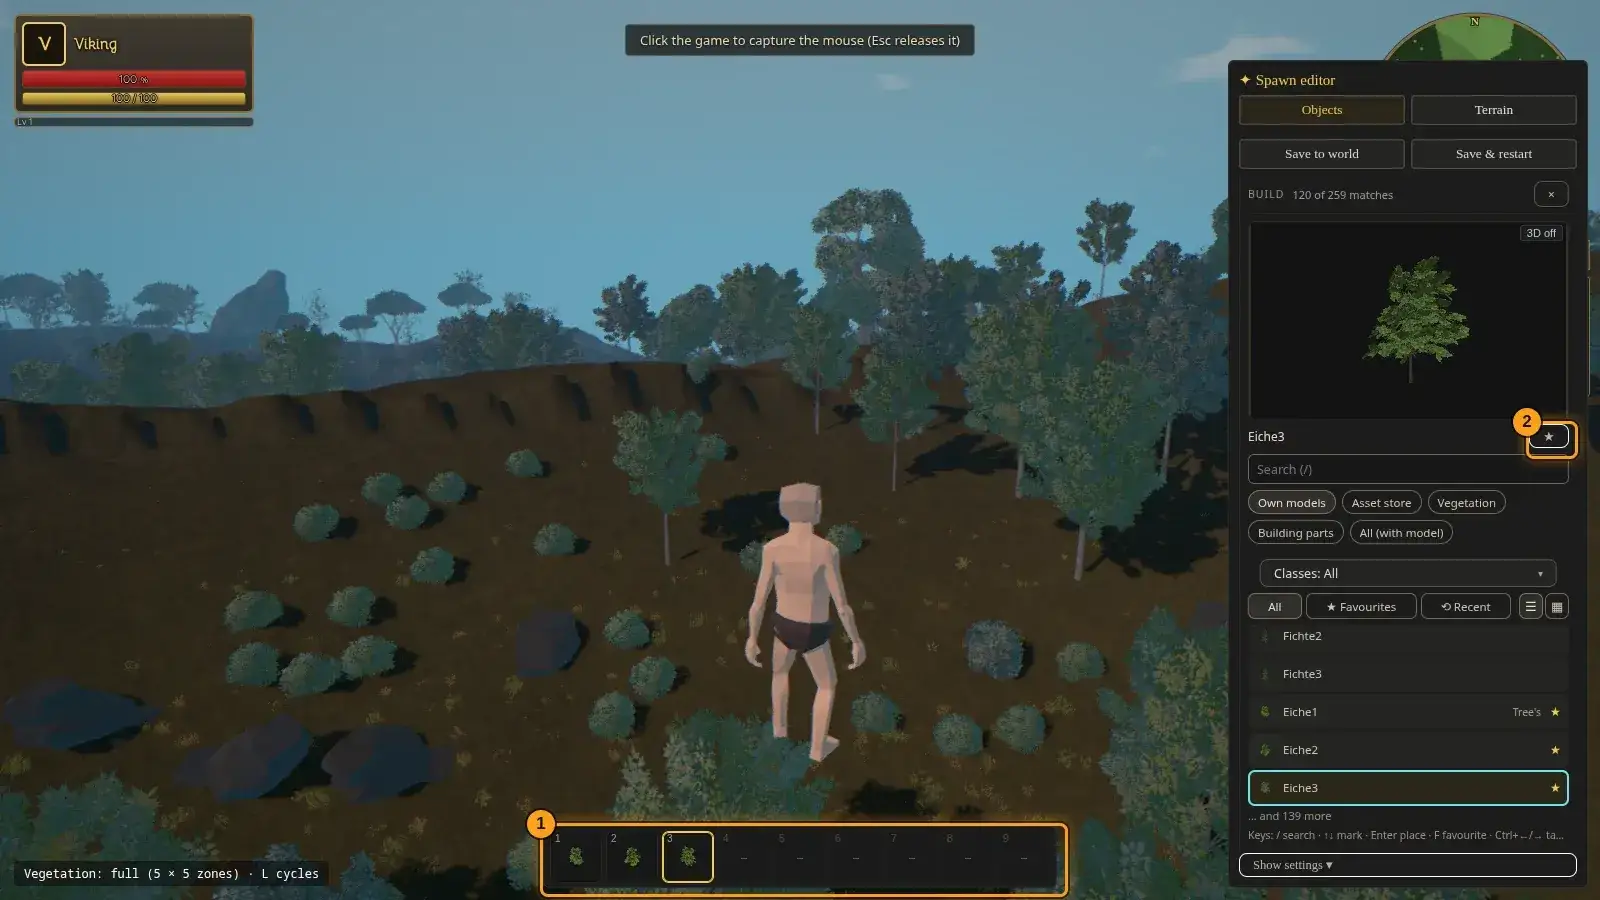
What for?
The objects you need all the time you mark as favourites. The first nine then lie at the bottom of the screen and are chosen instantly with the number keys.
How it works
- Choose an object in the build menu and click the star (2) to the right of its name in the preview area. The same star sits at the right end of the object’s row in the list and in the corner of its tile in the tiles view; there it is visible as soon as the object is a favourite, otherwise only while the mouse is over it. The star fills in, the object is a favourite.
- The first nine favourites appear at the bottom centre in the quick bar (1), numbered 1 to 9. The chosen slot has a frame.
- As long as the build menu is open, the number keys 1 to 9 choose the slot directly. A click on a slot does the same.
- A click on the filled star removes the object from the favourites again.
Placing and aligning objects
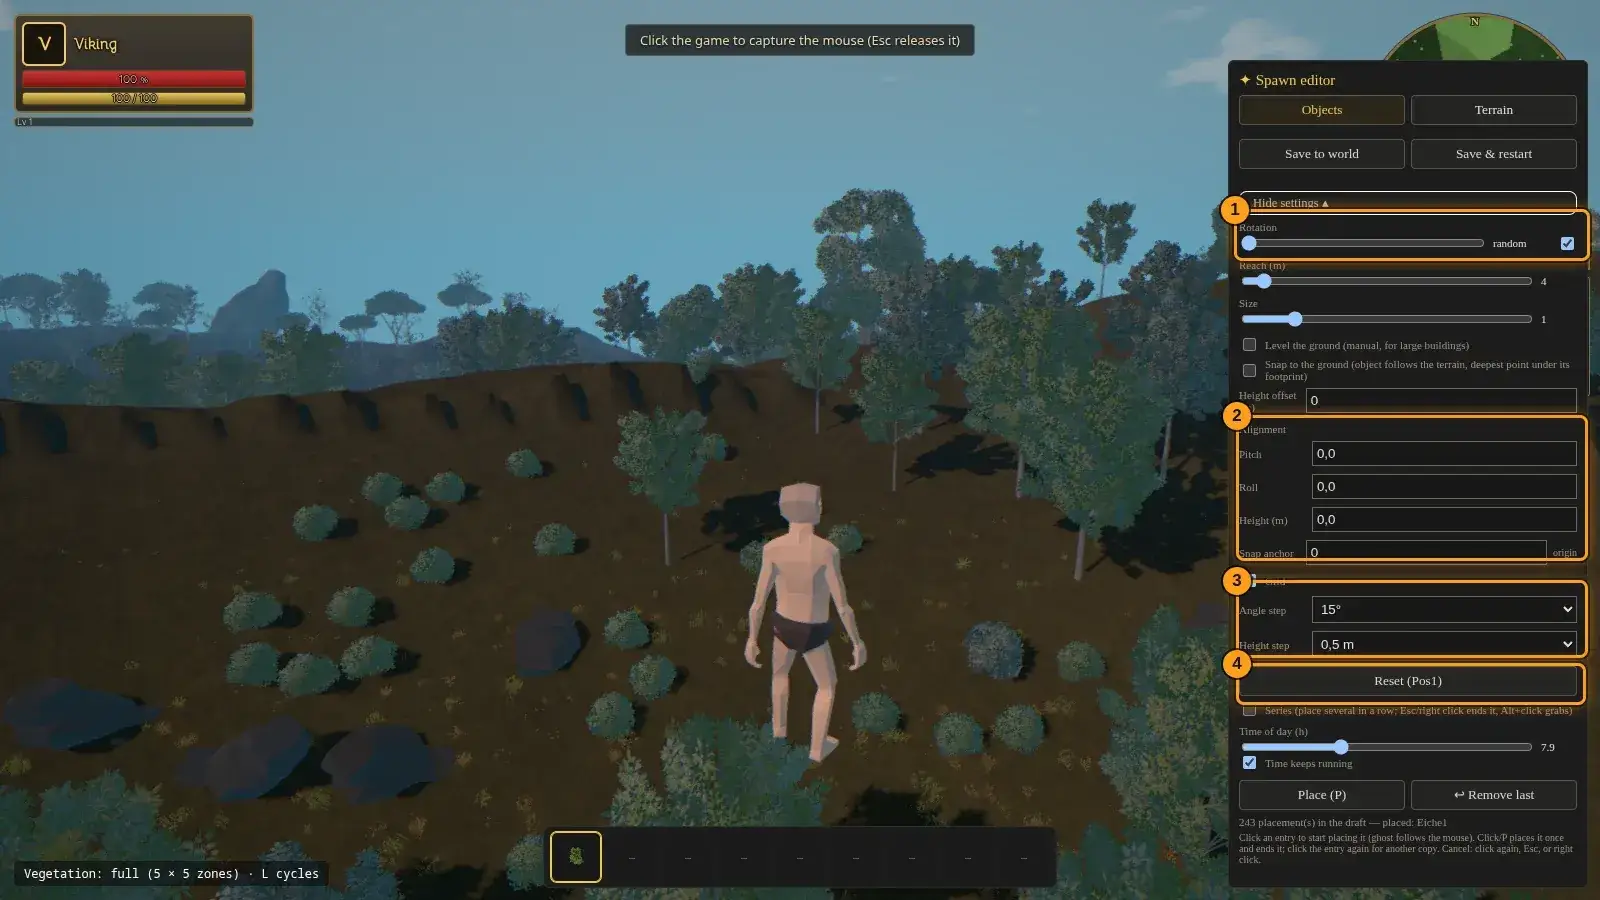
What for?
In the test flight you place objects exactly where you want to see them and align them: turn, tilt, raise or lower.
How it works
- Click an object in the build menu. A ghost of the object appears at the mouse pointer and shows where it will stand.
- A click or the P key places the object once and ends placing. For another one, click the entry again. Esc or right-click cancels.
- “Series” in the settings places several objects in a row. “↩ Remove last” removes the object you placed last.
- Turn with the comma and full-stop keys or with the mouse wheel. Shift and mouse wheel tilts forwards and backwards (pitch), Alt and mouse wheel sideways (roll). Page up and Page down change the height, Home resets tilt and height.
- With Alt and click you grab an object that is already placed. Dragging then moves it, the arrow keys nudge it sideways and Del deletes it.
Tip: In the settings you find “Angle step” and “Height step” (for example 15 degrees and 0.5 metres), “Snap to the ground” and “Level the ground” for big buildings. Try them out on a single object.
If something does not work
- Clicking shows “Too far away”.
- The target point is further from your character than the set reach (four metres at first). Fly closer or raise the “Reach (m)” slider in the settings of the build menu.
Shaping terrain and removing vegetation
What for?
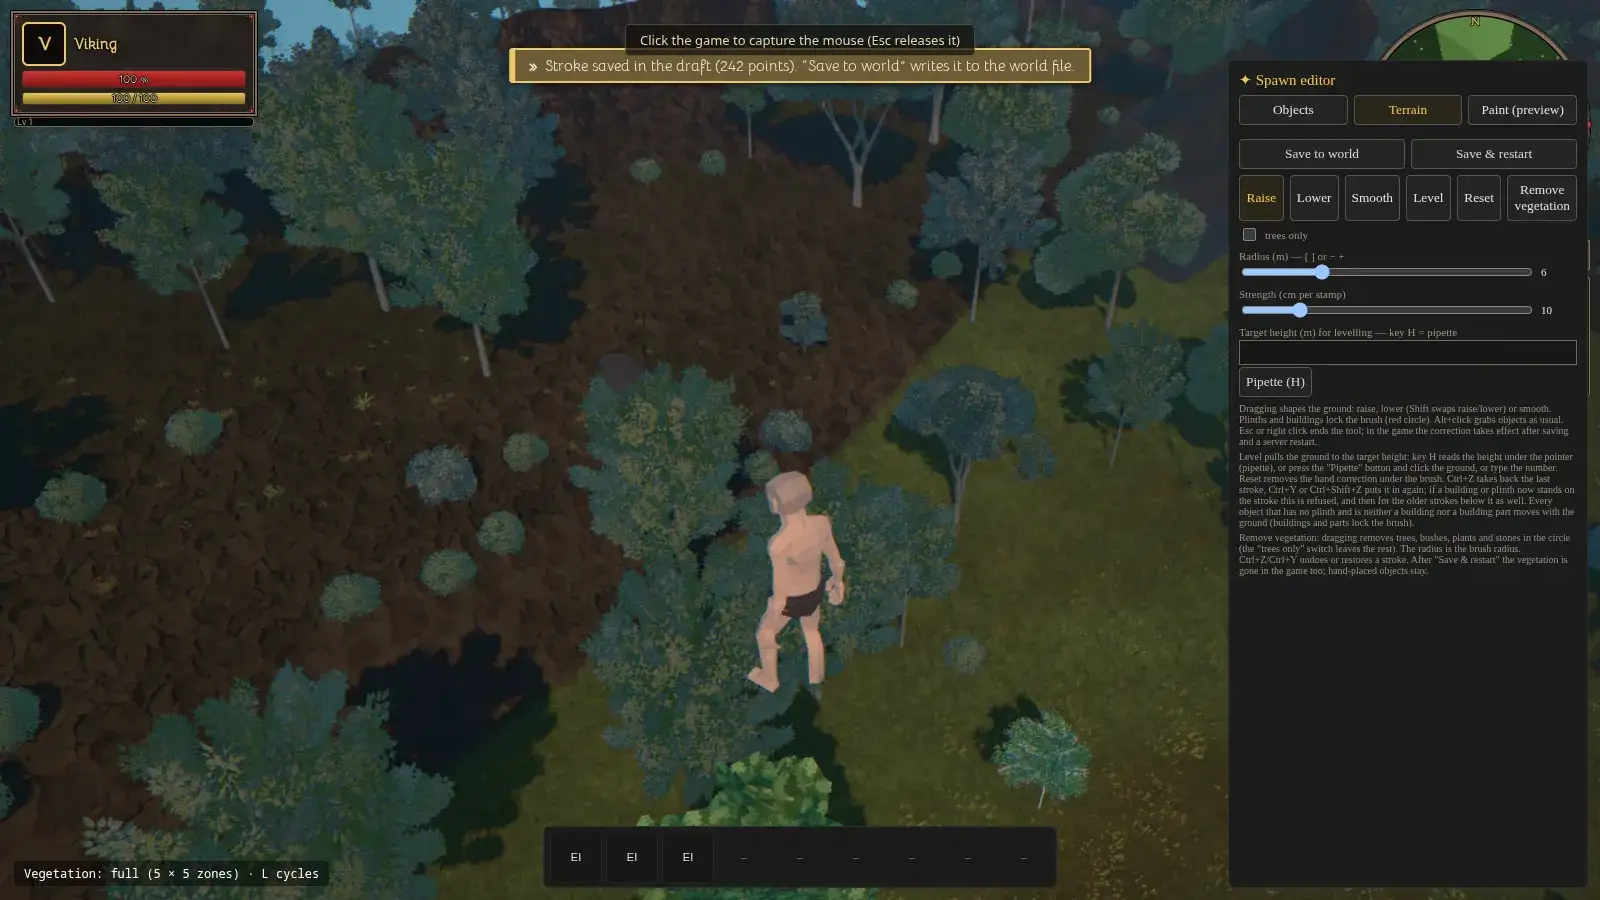
With the terrain brush you raise and lower the ground, smooth it or level it. You can also remove plants with a brush.
How it works
- Open the build menu with B and switch to the “Terrain” tab at the top.
- Choose a tool (1 to 4): “Raise”, “Lower”, “Smooth” or “Level”. “Reset” (5) removes your hand correction under the brush.
- Set the radius and the strength. The radius can also be changed with the [ and ] keys or − and +.
- Drag the mouse over the ground. Shift reverses raise and lower. “Level” pulls the ground to a target height: the H key reads the height under the pointer (pipette, or the “Pipette (H)” button), or you enter the number.
- “Remove vegetation” (6) works the same way: dragging removes trees, bushes, plants and stones inside the circle; grass, ferns and ground cover disappear with them at once while you paint (in the game only after you publish). With the “trees only” switch the rest stays, grass included. You paint soft areas with more or fewer plants in the chapter “Painting vegetation”.
- Ctrl+Z takes back a stroke, Ctrl+Y restores it. Esc or right-click ends the tool.
Tip: Houses and bases block the brush: the circle turns red there and nothing changes. Alt and click grab objects as usual. Which layer lies where is painted in the “Paint (preview)” tab (chapter “Painting the ground”).
If something does not work
- I do not see the terrain change in the game.
- At first the change exists only in your draft. In the game it applies after “Save to world” and a restart of the server, for example with “Save & restart”.
Painting the ground
What for?
Status: preview. The painting is saved in the draft and in the world; in the test flight it shows on the ground at once after every stroke, also on undo and redo. The “Paint (preview)” tab decides which ground layer lies where on the island – or that there is a path, a field or paving. You paint with a round brush; the paint is stored in cells of one metre.
How it works
- Open the build menu with B and switch to the “Paint (preview)” tab at the top. At the top of the tab there is a notice about the preview status. The “Ground” tool is already chosen.
- Pick a layer from the list “Layers of the biome” (the layers of the biomes of your island) or one of the three fixed entries “Path”, “Field” and “Paving”. The paint is saved in the world document; its effect in the game follows with the next step. Planned: layers affect looks and footsteps; path, field and paving act like hoed, ploughed and paved ground (grass does not grow there, footsteps sound accordingly). Until then the game shows and sounds no difference yet. There is no farming in the game yet; “Field” only prepares the ground for it. Trees, bushes and stones do not grow there either (see “Painting vegetation”).
- Set the radius (1 to 20 metres) and the strength (1 to 100 percent). The radius can also be changed with the keys [ and ] or − and +. Towards the rim of the circle the strength fades.
- Drag the mouse over the ground. A cell (one metre) carries only one layer: if you paint the same layer again, the higher strength counts; if you paint another layer or kind over it, it replaces the old one.
- “Erase” takes strength away. When it drops to zero in a cell, the cell is removed and the rule of the biome applies there again. The Shift key swaps painting and erasing while you drag.
- Pipette: Ctrl+click on a painted spot picks its layer or kind. If nothing is painted there, the choice stays and the game says so.
- Ctrl+Z takes back the last stroke, Ctrl+Y or Ctrl+Shift+Z puts it back. A stroke is one step, and the order is shared with the strokes of the “Terrain” tab. Esc or right click ends the tool.
- The paint first lives in the draft. “Save to world” publishes it, and “Save & restart” loads it into the running world. If the world has changed in the meantime the server says so; nothing is merged, and your draft stays as it is.
- There are limits: at most 120,000 painted cells and 4,096 zones with paint in one world. When it is reached the game says “Full”, the stroke stops there and nothing more is added. Erasing always works.
- The palette remembers every layer and kind you used, at most 32 entries. It is never cleaned up and never renumbered. When it is full the game says “Palette full” and you can only use entries that are already in it. If the biome no longer knows a layer, it stays in the list with a warning sign (“blind”); the painted cells are kept.
- Planned: players paint themselves in the game (hoeing, ploughing, paving); a player’s “reset” then goes back to your state, not to the rule of the biome, and where a player has painted strongly, their paint lies over yours. This does not exist in the game yet; today only your paint is saved in the world document.
Tip: The paint is a part of the draft of its own: terrain strokes, vegetation circles and paint are published together with “Save to world”.
If something does not work
- Status of the display: I cannot see the painted ground in the game.
- Status of the display: The tab stores the paint in the draft and in the world. Showing the painted ground in the game and its effect on grass and footsteps come with the next work packages; until then you do not see the paint there yet.
- The game says “Full” or “Palette full”.
- The limits are in the steps above. Erase areas you do not need (“Full”), or use a layer that is already in the palette (“Palette full”).
Painting vegetation
What for?
With the “Vegetation” tool in the “Paint (preview)” tab you decide how dense plants grow in an area of your island: from bare (0 percent) up to 200 percent of the rule of the biome. You paint with a round brush; the data is stored in cells of four metres. You can set one value for all plants, or separate ones for trees and for bushes + herbs (step 4).
How it works
- Open the build menu with B, switch to the “Paint (preview)” tab and choose the “Vegetation” tool at the top (next to “Ground”). The “Ground” tool stays as it was; the tab opens on “Ground”.
- Set the density (0 to 200 percent, 50 at the start). 100 percent is the rule of the biome, 0 percent means no plants from the scatter. Up to 200 percent: values above 100 percent sow extra plants of the same kinds in free spots. The minimum distance of the kinds still applies, so big trees and rocks hardly get added, bushes, herbs and mushrooms do. 200 percent acts roughly like ×1.5 (147 to 182 percent depending on the biome), not like double. The preview shows the result. Grass, ferns and ground cover follow the density as well, at once while you paint: 0 percent makes the area bare, values below 100 percent thin the grass out (the blades that stay are the same after every rebuild). Above 100 percent there is no extra grass. In the game the grass follows only after you publish.
- Set the radius (2 to 50 metres). You can also change it with the keys [ and ] or − and +, by two metres per key press. A cell of four metres belongs to the stroke when its middle lies in the circle.
- Under “Which plants?” choose the kind: “All” (chosen at the start), “Trees” or “Bushes + herbs”. The button stays chosen when you switch the tool. “All” writes one value for every plant, as before. “Trees” writes a value for tree models only, “Bushes + herbs” only for everything that is not a tree (bushes, herbs, grass, ferns, mushrooms, branches and stones); the line below names the models of each group from the game’s list. The rule is “a set value wins”: for a plant the value of its kind counts if it is set (also 100 percent), otherwise the value “All”, otherwise 100 percent. Example: a cell holds “All” 50 percent and “Trees” 100 percent. Then half of the bushes, herbs and mushrooms stay, and all trees stay. “Trees” 0 percent means: no trees there, the bushes are untouched. “Bushes + herbs” 150 percent re-seeds only these kinds. A stroke with “All” resets the values of both kinds in the cells it touches, when painting and when erasing: “All” is the overall statement; the message after the stroke names how many cells with an own tree or herbs value were reset, and the map tints such cells pink under “All”. “Erase” with “Trees” or “Bushes + herbs” removes only that kind’s own value; the kind then follows the value “All” again (the button is then called “Erase (remove the kind value, All applies again)”). Grass belongs to “Bushes + herbs”: “Trees” 0 percent leaves it standing, “Bushes + herbs” 0 percent removes it at once while you paint. Anything unknown counts as “Bushes + herbs”, never as “Trees”. Undo and redo restore all layers of a stroke together and name the same number of reset cells as the stroke. An existing world without kind values does not change through the choice: only a stroke with “Trees” or “Bushes + herbs” stores kind values, and they act in the game only after publishing.
- Drag the mouse over the ground. A cell holds exactly one value per kind: the last stroke replaces the old one. With “All”, “Erase” sets the cell back to 100 percent, where the rule of the biome applies again (for a kind see step 4). With the Shift key you swap paint and erase while dragging. The same area gives the same plants: what stands at 130 percent also stands at 170 percent, only more are added.
- The plant preview around you follows the draft: when you let go of a stroke it scatters the affected areas anew, without you saving or publishing anything.
- The switch “Show density map” shows a small overview of the 3×3 zones around you in the tab: dark stands for 0 percent, grey for 100 percent (rule of the biome), light and warm for 200 percent, the red dot is you. The map is an overview and does not colour the ground in the game; “nothing painted” and 100 percent look the same. With “Trees” or “Bushes + herbs” the map shows what these plants get in each cell: an own value in green (trees) or violet (bushes + herbs), otherwise the value “All” in grey. With “All” the map looks as before, except that cells with an own value for trees or bushes + herbs are tinted pink: a stroke “All” would reset them.
- Ctrl+Z undoes the last stroke, Ctrl+Y or Ctrl+Shift+Z redoes it. A stroke is one step, and the order is shared with the strokes of “Ground” and of the “Terrain” tab. Esc or right click leaves the tool.
- “Check numbers” asks the game server what publishing your painting would do and shows the same sentences as the window at publishing. It asks only when you press the button, never at every stroke. Before them stands a line with the number of painted cells per kind (All, Trees, Bushes + herbs); the numbers below count all kinds together. If the game server is not running, it says “numbers unknown”. If the game server could not calculate the numbers (“The game server is running but could not calculate the numbers”) or no answer comes in time (“The game server did not answer in time”), that sentence stands there; “Publish” is not offered in that case: try again in a moment. If path, field or paving are painted as well, the numbers name the removed plants apart: “density” and “painted path/field/paving” (together the number of removed plants). On large areas the game server calculates in the background in small slices and needs a few seconds for it; meanwhile the area below says “Calculating …” and the button is locked. A new check can go at the earliest 3 seconds after the last question; a double click asks only once. If two editors ask about the same world at the same time, the game server first finishes the running question; the second one waits and gets its numbers afterwards (the waiting questions form a queue, at most one per editor, the oldest first; if you ask again, the new question replaces your own waiting one and keeps its place; if you ask again while your question is running and 16 are already waiting, the new question replaces the running one; up to 16 questions wait, and the game server tells every waiting question its place: the editor keeps waiting as long as the place changes and gives up only after 45 seconds without any sign of life). If too many questions are open at once (more than 16 at a time, or 16 already waiting), the game server does not calculate the new one; the area then says “Too many preview questions are open right now” and “Publish” is not offered in that case: try again in a moment. If you yourself ask a newer question, the older one says “A newer question overtook this one”.
- Publishing (“Save to world”, “Save & restart”, the route editor and “Save to world” in the map editor) asks first as soon as the density or the painted ground (path, field, paving) differs from the published world. The window names “N plants will be removed for good”, with painted path, field or paving apart as “(density D, painted path/field/paving S)”, and “N of M plants will be planted”. At most 2000 new plants are planted per publish, the rest follows the next time you publish (not at server start). Removing is permanent: if you take the density back, removed plants do not return in zones that already exist. Plants that were sown extra are cleared again by the next publish when you take the density back, with the number in the window. Objects set by hand or by players, pick-up items and plants without a scatter mark always stay. Above 20,000 plants to remove nothing is deleted, neither when publishing nor at server start; the window names how many it would be. An exception are the older painted areas from the reconciliation (step 15): the editor clears them in installments of at most 20,000 plants per publish. Otherwise change less at once: the density in smaller steps, path, field and paving in parts; if the window names both, the number is shown apart as density and painted path/field/paving. Plants without a scatter mark and zones without a stored recipe appear as a short note line. “Cancel” sends nothing. If nothing changes, no window appears. A changed palette entry behind painted ground cells (for example “@erde” instead of a grass area) also counts as a change, because it decides where plants drop out. Whenever the draft carries any density or ground painting at all, the editor always asks the server for the numbers: the server compares with the state it has applied, which can differ from the file. If the answer is 0 and 0, no window appears anyway.
- Zones in the mode “stock as change list” are refused when the density or the painted path, field or paving changes (for the density even from 100 to 150 percent only), unless you explicitly agree in the window to put them back to normal objects. Without that consent the window offers only “Cancel”: all or nothing. On DEV none of the 452 zones is in this mode today (measured 31 October 2026). This also applies to values for “Trees” or “Bushes + herbs”: even 100 percent as an own value changes the fingerprint of the recipe with which the server created the zone, although the plant list stays the same (a review measured this in 18 of 24 zones). Publishing refuses such zones without your consent.
- If the game server is not running, the window says the numbers are unknown: publishing then only writes the file. Plants are removed only by a publication while the server runs that you confirmed in the window. What you paint while the server is stopped and the server takes from the file at start (for example a path, after the one-time reconciliation has already run) it does not clear at start: the plants on it stay for now. The server does remember, though, that the painting of the file is not the one last confirmed, and counts the area at the next publication while the server runs. The “Publish vegetation” window then names the plants on it, with the addition “also includes older areas”, and they are removed as soon as you confirm with “Publish”. The window also appears when you change only the name or the density. If the published world could not be read at all, the window says the numbers are not available and suggests “Cancel”. The start check of the server deletes at most 25 percent of the scatter stock per start; it skips the start when the painting of the file is not the one last confirmed (the log says “not confirmed published”), and a density above the upper limit then rests until a confirmed publication confirms the state.
- If the shape of the terrain (height, radius) or the biome of a region changes after the world was created, extra sown plants can stay; only “Re-scatter island …” clears them.
- Removal circles in the “Terrain” tab stay tools of their own: a circle has a hard edge and can remove “trees only”, the density is a soft area. Zero percent and a circle give the same result; removal circles also apply to extra sown plants. For the density you choose by plant kind with the buttons “All”, “Trees” and “Bushes + herbs” (step 4). Grass, ferns and ground cover disappear inside the circle at once while you paint, too; “trees only” leaves them standing. In the game the grass disappears only after you publish.
- Path, field and paving keep plants away: on cells you painted with the “Ground” tool as “Path”, “Field” or “Paving” (strength 50 or more; half-painted areas below 50 do not count), no trees, bushes or stones grow. The plant preview shows this while you paint. Newly generated zones (also by “Re-scatter island …”) scatter nothing there. Zones that already exist lose their scatter plants on newly painted path, field and paving when you publish, but only after your confirmation: the window names the number apart as “density” and “painted path/field/paving”, and exactly these plants are removed, no more and no fewer. A server restart never deletes anything because of a path. The first publish after this function is switched on that changes the density or the painted ground also clears areas that were painted before (reconciliation); their number is in the same window beforehand (part of the number “painted path/field/paving”), with the addition “The number for painted path/field/paving also includes older areas that were painted before this publish (reconciliation of the older areas; it repeats until a confirmed publication completes it).” The window also shows the addition when the server started with a file whose painting was not the one last confirmed (for example a path you painted while the server was stopped). The addition returns with every further publication as long as the reconciliation is not complete: when you cancel the window, when the number is above the upper limit, or when the server started with an unconfirmed file. Only a confirmed publication completes it; after that only what is newly painted counts. If more than 20,000 plants stand on these older areas, publishing clears them in installments: each publish removes at most 20,000 of them, always in the same fixed order (by zone and position), and the window names the installment (“Installment (about N in total still to go): X of Y plants on older areas will be removed for good, R remain afterwards”). Every installment needs its own confirmed window; nothing is deleted without confirmation, and the confirmation of one installment does not hold for the next. After the installment the message names the rest (“Y plants on older areas are still standing”); publish again and confirm the new window until the rest is 0. Only then does the reconciliation complete. A restart between installments changes nothing either: the reconciliation stays open and the next window offers the next installment. New density above 20,000 plants never gets installments; there it stays “nothing deleted”. A newly painted path above 20,000 gets no installments (and stays “nothing deleted”) only once the reconciliation of older areas is complete. At the first publication after the switch it lies in the open reconciliation and is cleared in installments together with the older areas. The same holds when the reconciliation is open again: after a publication without confirmation (Cancel, MCP, direct call) or after a restart that followed a publication over the upper limit. Even then every installment needs its own confirmed window and clears at most 20,000. If both come together (density and older areas), an installment first clears all density plants and fills the 20,000 with older areas; the window then names both numbers (“of which density D, older areas S”). If the density alone is exactly 20,000, the installment consists of density only, and the window says that this installment does not clear the older areas and how many of them remain. If the density alone exceeds 20,000, nothing is deleted. Objects you placed by hand, buildings made by players, and pick-ups are never affected. Grass, ferns and ground cover that are only drawn in the game (including the grass and flower decoration) are not cleared by the server and nothing is deleted for them; they follow the density and the removal circles when they are drawn. If you paint the area away again, the removed base plants do not come back. If a path and a density above 100 percent together made a publish leave plants out, the publish in which you take the path away or move it lays them as soon as the area is free; no detour through 100 percent is needed. If the path was painted over an existing high density only later, a change of the density value (for example from 200 to 150 percent) lays the extra plants above 100 percent on the freed area; the removed base plants do not come back even then. Density and removal circles act in addition; a piece hit by several rules is dropped only once. Zones in the mode “Stock as a change list” are refused by publishing as with the density (step 11).
- The server deletes generated plants only when you confirmed exactly this publication in the window. “Check numbers” alone is not enough, and neither is “Cancel”. With “Publish” the editor sends a proof along (the id of the check and the two numbers of the window); the server deletes only if the proof matches exactly this file, this check and the numbers of now. If the stock changes between checking and publishing (a different number), or another publication runs in between, the proof no longer counts and nothing is deleted; publish again and confirm the new window. Without a proof the plants stay, new ones may still grow, and the server log says “NOT deleted”. The editor then adds the sentence “N plants were left standing: this publication had no confirmed “Publish vegetation” window …” after “applied live”; after “Save & restart” it is part of the message shown after the restart. If a rest remains after an installment of the reconciliation, the sentence “Installment cleared, the rest follows: Y plants on older areas (painted path/field/paving) are still standing …” follows “applied live”; it is also part of the message after “Save & restart”. Above 20,000 plants to remove (without installments) this sentence does not appear; in its place the sentence “Density not cleared: N plants to remove are over the upper limit, nothing is deleted …” is shown (with painted path, field or paving in the stock it starts with “Not cleared:” and names “density D, painted path/field/paving S”), because even a confirmed window deletes nothing; after “Save & restart” it too is part of the message shown after the restart. The sentence “takes effect after the next restart” (rejected vegetation circles) no longer appears after the restart. This also holds at server start and in the first tick after it, for a publication without a window (a tool via MCP, “PATCH ops”, the file edited by hand) and for density that was never confirmed. The proof counts once and lives only in the memory of the running server: every real publication discards all checks, and a restart forgets them. Above 20,000 plants to remove the server never deletes anything, not even at start. If a rest was left open because of a path, the server remembers it permanently in the file “dichte-bestaetigt.<instance>.json” and counts it again with the next confirmed publication. If this file is damaged (cut off or edited by hand), the server does not overwrite it but writes a line to its log. As long as the marker file is damaged the server remembers no leftover zones. Those remembered so far are lost after a restart, and a new publication does not bring them back; re-seeding there happens again only when a publication leaves out new plants. The next confirmed publication writes the file anew.
Tip: Start with 0 percent for clearings and 150 percent for dense forest, look at the result in the preview and check the numbers before you publish.
If something does not work
- I see no change in the plants after a stroke.
- The preview scatters anew when you let go; that takes a moment. At 100 percent nothing changes (rule of the biome). Above 100 percent big trees hardly get added because of the minimum distance, bushes, herbs and mushrooms do.
- The window says the game server is not running.
- Then the numbers are unknown. Publishing only writes the file; plants are removed and planted only by a publication while the server runs that you confirmed in the window. If you painted a path, field or paving while the server was stopped and the server took the file at its next start, the plants on it stay for now (step 12): at the next publication while the server runs the window names them, with the addition “also includes older areas”, and they are removed as soon as you confirm.
- The window offers only “Cancel” and names zones in the mode “stock as change list”.
- These zones can only be changed when they are put back to normal objects. Tick the consent, or cancel and leave the area out: it is all or nothing.
- The game says “Full”.
- A world holds at most 60,000 cells with a density and 4,096 zones with a density, counted per layer (“All”, “Trees” and “Bushes + herbs” each count on their own). The stroke stops there; the stamps before stay. Erasing always works.
Saving and back to the map
What for?
What you build in the test flight first exists only in the draft. This is where you take it over into the world on the server.
How it works
- “Save to world” (1) writes your draft to the world file on the server. The game server keeps running.
- “Save & restart” (2) saves and restarts the game server. That is needed for terrain changes to apply in the game. The editor asks first: all players are disconnected briefly and then reconnect automatically.
- The Q key takes you back to the editor (“Q: back to the map” is shown at the top right). Close the test flight tab yourself afterwards.
Tip: Save more often rather than less. If the restart is too disruptive, save with “Save to world” first and restart only at the end.
If something does not work
- Saving shows a message that the editor needs a state.
- The editor does not know a server state your draft builds on. Go back to the editor, click the “World” field at the top, fetch the server state and save from there.
Merchants: trading and price lists
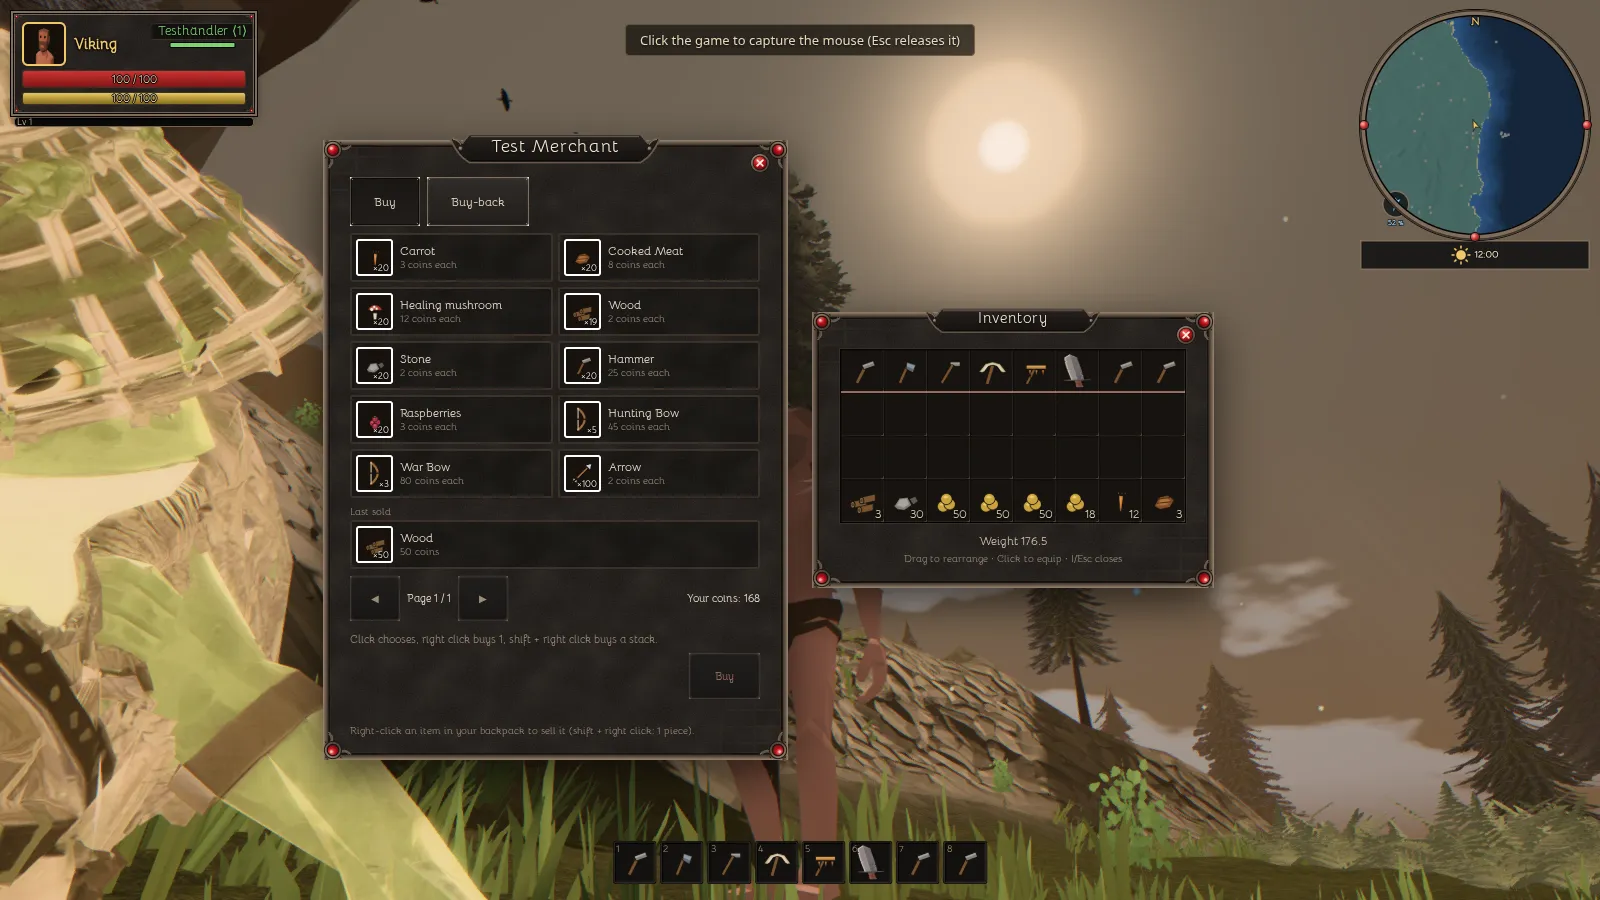
What for?
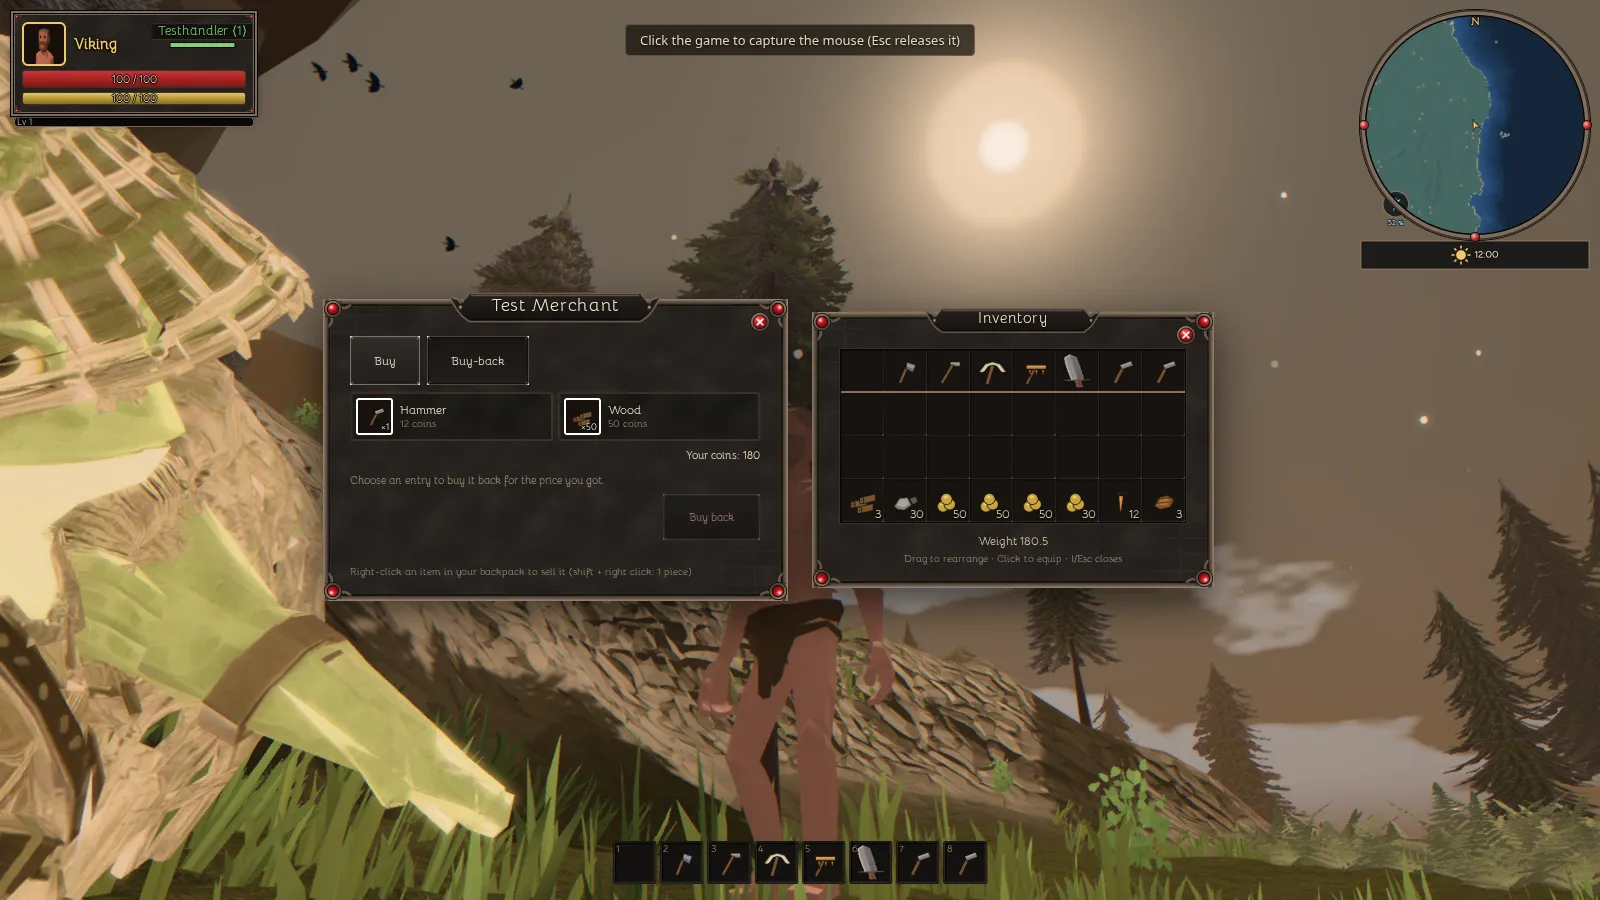
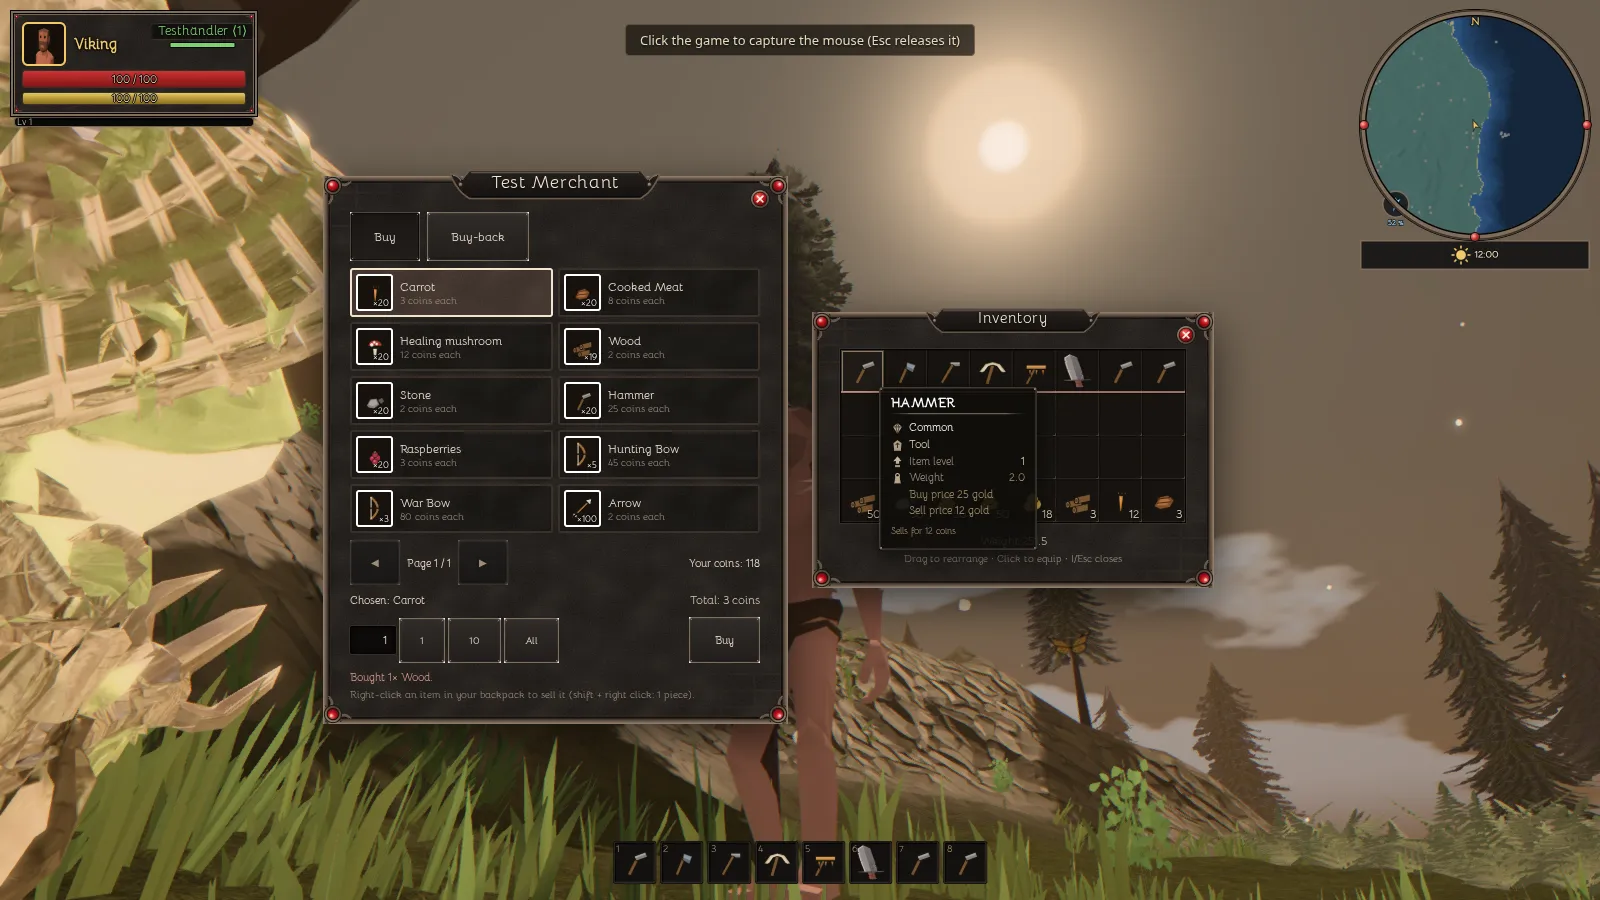
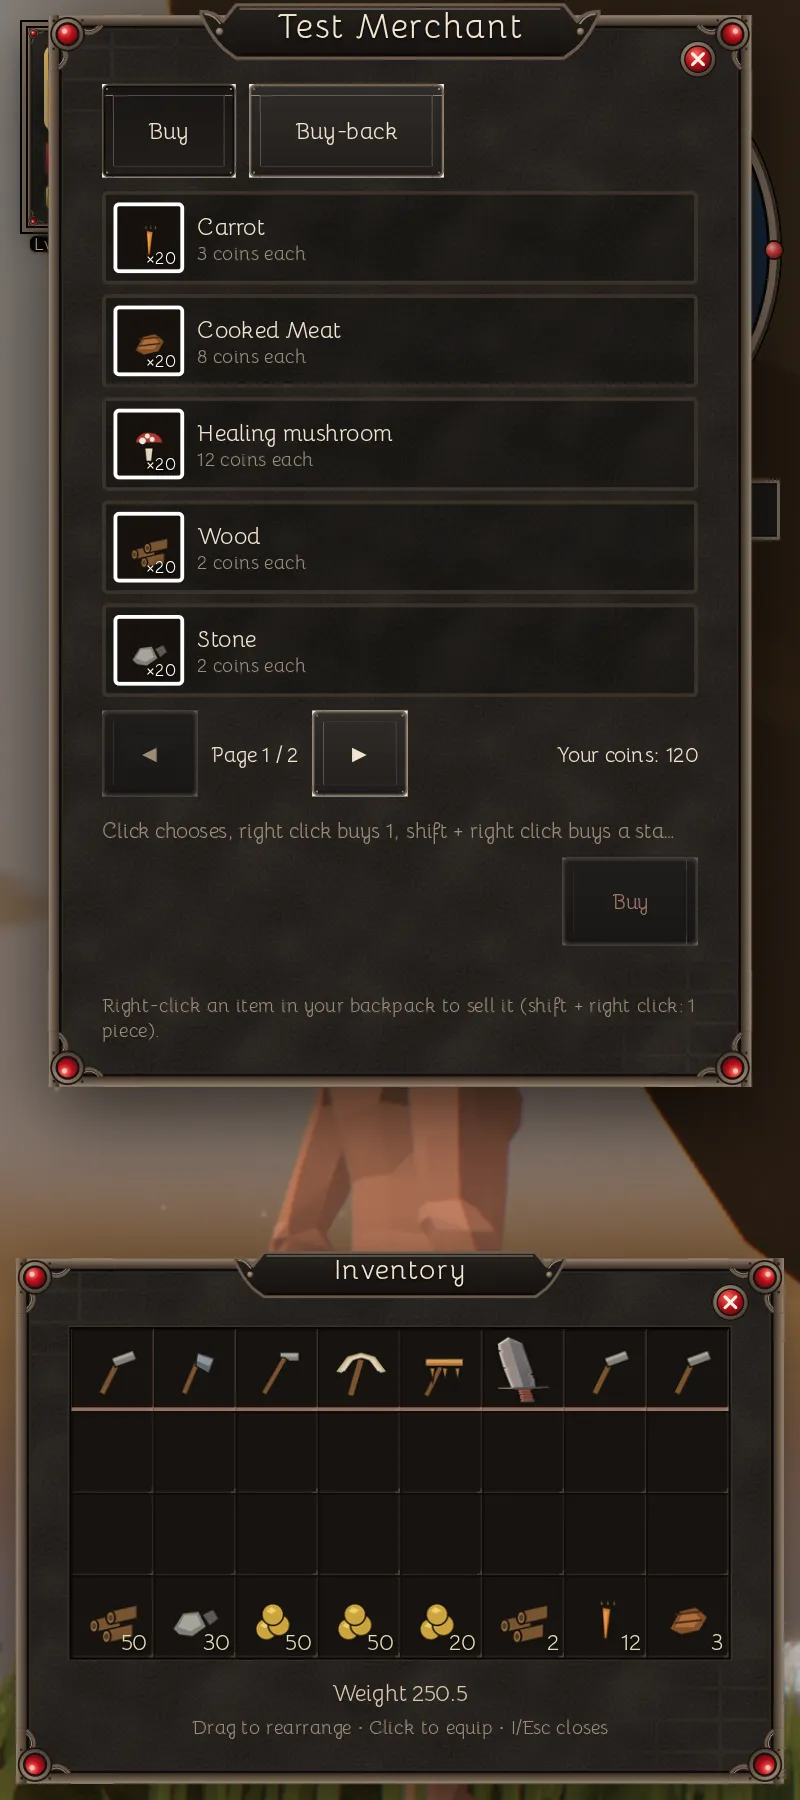
Merchants sell you wares for coins and buy items from you. This chapter shows how you trade with a merchant as a player, and how you turn a figure into a merchant and give it a price list as an author.
How it works
- Player: Walk up to within four metres of a merchant and press E. A merchant that has nothing to offer but trade opens its offer at once: the merchant window appears right away, with no conversation window in between, and the mouse stays free. This applies if the figure has the role Trader, has been assigned a price list that exists in the merchant document, and has nothing else to offer. If the figure has something else to offer as well, the conversation window shows a “Trade” button; a click on it opens the merchant window.
- Player: The merchant window has two tabs, “Buy” and “Buy-back”. If the author has entered a greeting for the figure, it stands as one line under the title. The wares are shown in a grid of fields: two columns and five rows, so ten fields per page; in a narrow window (under 520 pixels wide) one column and five fields. Each field shows the icon of the item with a frame in the colour of its rarity, the name, the price for one piece and, on the icon, the stock as “×n”. A sold-out ware is dimmed and carries the text “sold out”; a price you cannot pay is shown in a warning colour. When you move the mouse over a field, a hint shows the item’s data. With the arrows ◀ ▶ under the grid or with the mouse wheel you turn the pages (“Page 1 / 3”); next to them is your coin balance. Coins are an item like any other in your backpack.
- Player, buying: A left click chooses a field. At the bottom of the window it then says “Chosen: …” with the amount field, the buttons 1, 10 and “All”, the total and the buy button; pick the amount, at most 100 per trade, and click the buy button. It is quicker right at the field: a right click or a double click buys one piece at once, shift + right click a whole stack: as many as fit into one stack of the item, as the stock offers and your coins pay for, at most 100. With the keyboard you choose a field with the arrow keys, buy the footer amount with Enter (Enter only works with a chosen field, not on a button) and turn pages with Page Up and Page Down; on a touch screen you tap a field and buy with the button (a long press buys nothing). You can never buy more than the stock offers and your coins pay for; “All” picks the largest amount that both and the maximum allow. After every trade the buttons rest briefly (0.4 seconds), so a double click does not buy twice. The window stays open afterwards, shows the new stock, and the choice and the page are kept.
- Player, selling and buy-back: If the merchant window stands alone (a merchant with nothing else to offer), your backpack opens beside it (the merchant on the left, the backpack on the right; one above the other on a narrow screen; if there is not enough room for that either, both windows shrink together); if you close the backpack with I, the merchant window moves back to the middle, and when you open it again the two move apart. A backpack that was already open stays open. If the merchant window stands beside a talk window, you open the backpack yourself with I; selling works the same way. A right click on an item in your backpack sells it: the whole stack, at most 100 pieces per sale (if the stack holds more, the rest stays); shift + right click sells exactly one piece. There is no confirmation. On a touch screen a long press (half a second) shows a “Sell” button. When you move the mouse over an item, the hint also gives the proceeds (“Sells for n coins”) or the reason why it cannot be sold. Worn items, coins and items without a sell value are not sold. For each piece the merchant pays the list’s buy-in price in coins; if the item is not on the list or the buy-in price is 0, it pays the item’s sell value. Limit: if the same item lies in several stacks, the server takes the smallest ones first; the total is right, but a different stack may shrink than the one you clicked. Sold goods do not vanish for good: the “Buy-back” tab holds the last 12 entries you sold, until you log out, at every merchant. Each entry shows icon, name, amount and the price you were paid; buying it back costs the same. A click chooses an entry; a right click, a double click or the “Buy back” button buys it back. The entry you sold last also stands under the buy grid (“Last sold”); a click on it buys it back. If an entry is gone because a newer one pushed it out, its field disappears.
- Player, stock: The stock of a ware is limited. When it is used up, the ware is sold out. Depending on the price list, one piece comes back after a fixed time, the refill time, until the stock is full again; without a refill time it never refills. The refill time lies between 5 seconds and 30 days.
- Player, closing: The merchant window closes together with the conversation window: with Esc, when you move more than five metres away from the figure, when you die and when the world changes. With a merchant that has nothing else to offer, the “Close” button of the merchant window also ends the whole conversation and gives the mouse back to the game; if the merchant does not answer, a message appears and nothing stays open. Whether a trade counts is decided by the server on every click, not by the window.
- Author, setting a merchant: In the test flight, select a figure in the world. In the block “Character (selected placement)” set “Role” to “Trader”.
- Author, assigning a price list: With the role “Trader” the field “Price list” appears below the role. It shows all lists of the world’s merchant document with id and name, plus the entry “none”. Choose a list; it then belongs to exactly this figure, and several figures may share one list. You create the lists in the merchant editor. A figure without a list has nothing to offer, and the “Trade” button is missing. So that the server knows the assignment, save the world.
- Author, the choice is kept: If you set the role to anything other than “Trader”, the field disappears, but the chosen list stays stored and applies again as soon as you set “Trader” back. The entry “none” removes the assignment completely. If a stored list is no longer in the merchant document, the field shows it as “unknown: id” and keeps it until you choose another list or “none”.
- Author, prices: For every ware of a list: the price the merchant pays you is at most the item’s sell value, and the sell value is at most the price you pay. So nobody can gain coins by buying and selling right away; the merchant document straightens out prices that break this. A price you pay of 0 means the ware is not for sale. A price the merchant pays of 0 means the merchant buys it at the sell value. Items without an entry are bought at the sell value too; an item with a sell value of 0 is bought by no merchant.
Tip: Try a new price list first with a few wares and a small stock: you quickly see what a sold-out merchant feels like and how long refilling takes.
If something does not work
- The merchant window does not open, or the “Trade” button is missing in the conversation window.
- Check three things in the editor: the figure’s role is “Merchant”, the field “Price list” shows a list instead of “none”, and that list exists in the merchant document. If you have just set the assignment, save the world with “Save to world” so that the server knows it.
- The window refuses a purchase or a sale.
- The server names the reason: too few coins, the ware is sold out or not for sale, your backpack has no room or is too heavy, the item is equipped, the item has no sell value (no merchant buys it), the amount is over 100, or you are no longer within reach. A purchase with a full backpack is refused as a whole; nothing falls on the ground.
- The field “Price list” only shows “none”.
- The world’s merchant document does not contain a list yet, or could not be read. Create a list in the merchant editor and then select the figure again.
- After clicking “Trade” the message “The merchant does not answer. Please try again.” or “This action is not available right now.” appears.
- The first message appears when the server does not answer with the offer within three seconds: check the connection and click again; if you stand too far away, step closer to the figure. The second message means the button has no effect in this view; reload the page. The server also writes a refused request to its log.